Margin vs Padding (Difference and Usage)
Table of Contents
Margin and padding are two fundamental concepts in the realm of web development and design. Primarily used in CSS (Cascading Style Sheets), they play a crucial role in crafting unique designs and layouts for web pages.
Every aspiring web designer must have a firm grasp of what margins and padding are, what is the difference between margin and padding, and how to use them. So, read on to learn the ins and outs of these two styling properties that will take your page-building game to the next level.
You can picture a margin as “the breathing space” for an element. Adjusting it allows you to control the space between different elements, establishing a sleek and custom layout.
Depending on the values of the margin properties, the element will be pushed away or towards the adjacent elements or page borders. Furthermore, the size of an element may change to fit within the set margin.
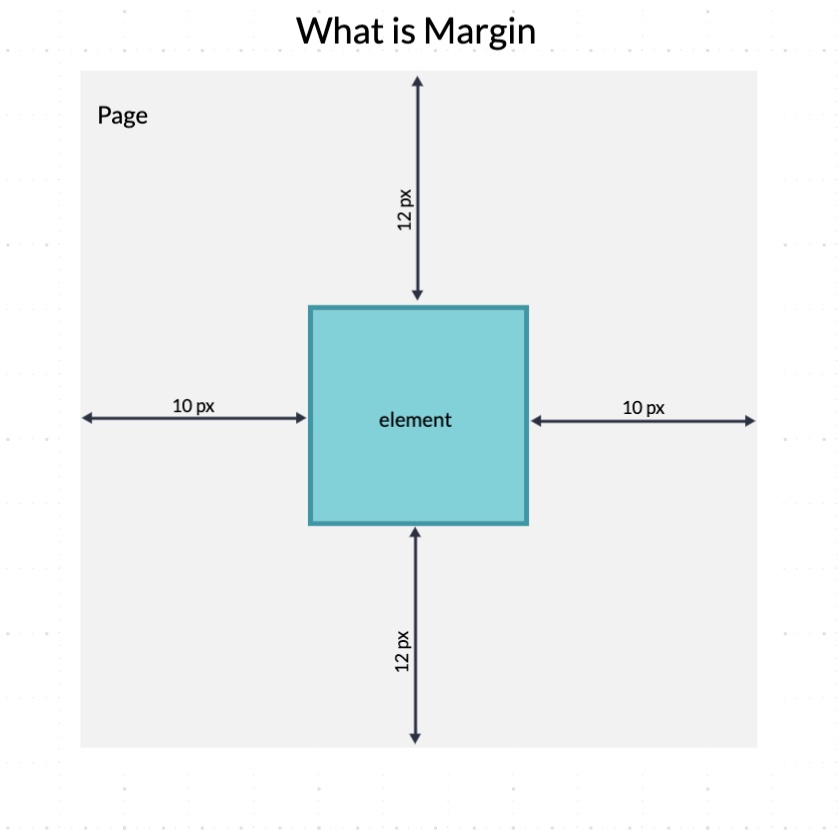
The following diagram illustrates the margins between the page borders and an element. The block has a horizontal margin value of 10 pixels (10px) and a vertical margin value of 12 pixels (12px).
In other words, the padding defines the size of the frame that envelopes the content (image, text, etc.) within a web page element.
The content’s size decreases or increases to preserve the padding distance to the element’s borders.
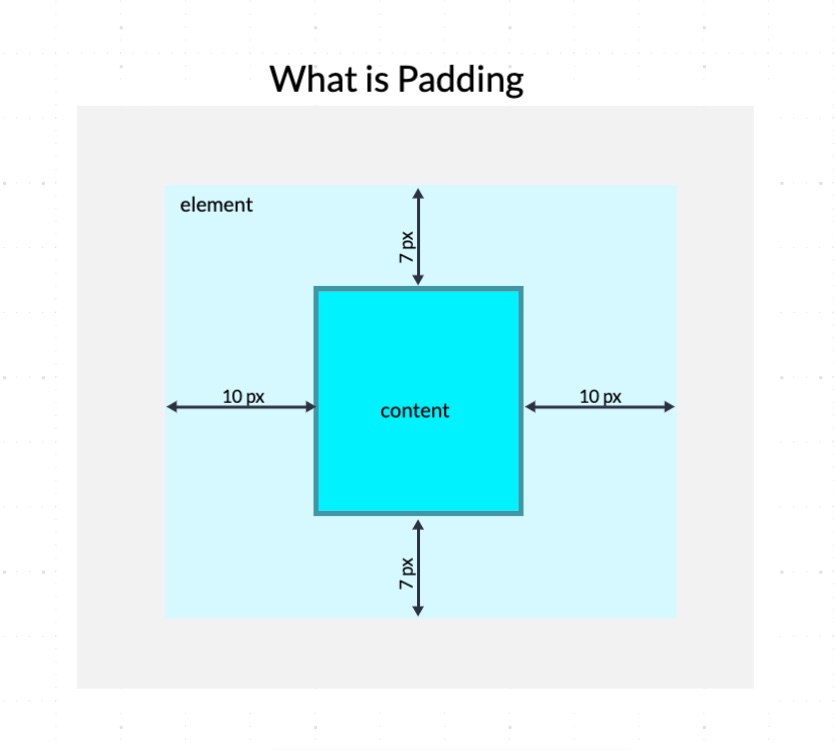
Below is an example of an element with horizontal padding of 10px (10 pixels) and vertical padding of 7px (7 pixels).
If you want to change the position of an element in relation to the page layout or set a distance between adjacent elements, you must use margins.
You should set padding to change the content’s position within the element’s border.
The chart below outlines the most prominent differences between margin and padding.
| Padding vs Margin | |
| Margin | Padding |
| Margin is the space outside of a page element. | Padding defines the space surrounding content within a web element. |
| Margin controls the distance between separate elements on the page. | Padding sets the distance between the content and the borders of its containing element. |
| You can set the margin to auto, applying to all elements. | You can’t set automatic settings for the CSS padding properties. |
| Margin can take negative values to overlap elements. | Padding can’t take negative values. |
| Margin is not affected by the styling of other elements. | Padding can inherit the styling of other elements. |
| Margin affects adjacent elements. | Padding doesn’t affect other elements. |
When to Use Margin
The primary purpose of the margin property is to create space around an element. Unlike padding, it doesn’t affect the layout inside the element. It only impacts outer space, pushing elements apart or toward one another.
Margin doesn’t have styling properties. The space outside the border is invisible, also known as “whitespace.”
Thus, margins allow you to perform the following actions on your website.
Control Over Element Positioning
Margin gives you precise control of the element positioning. Adjusting the margin allows you to move an element left, right, up, or down on your web page.
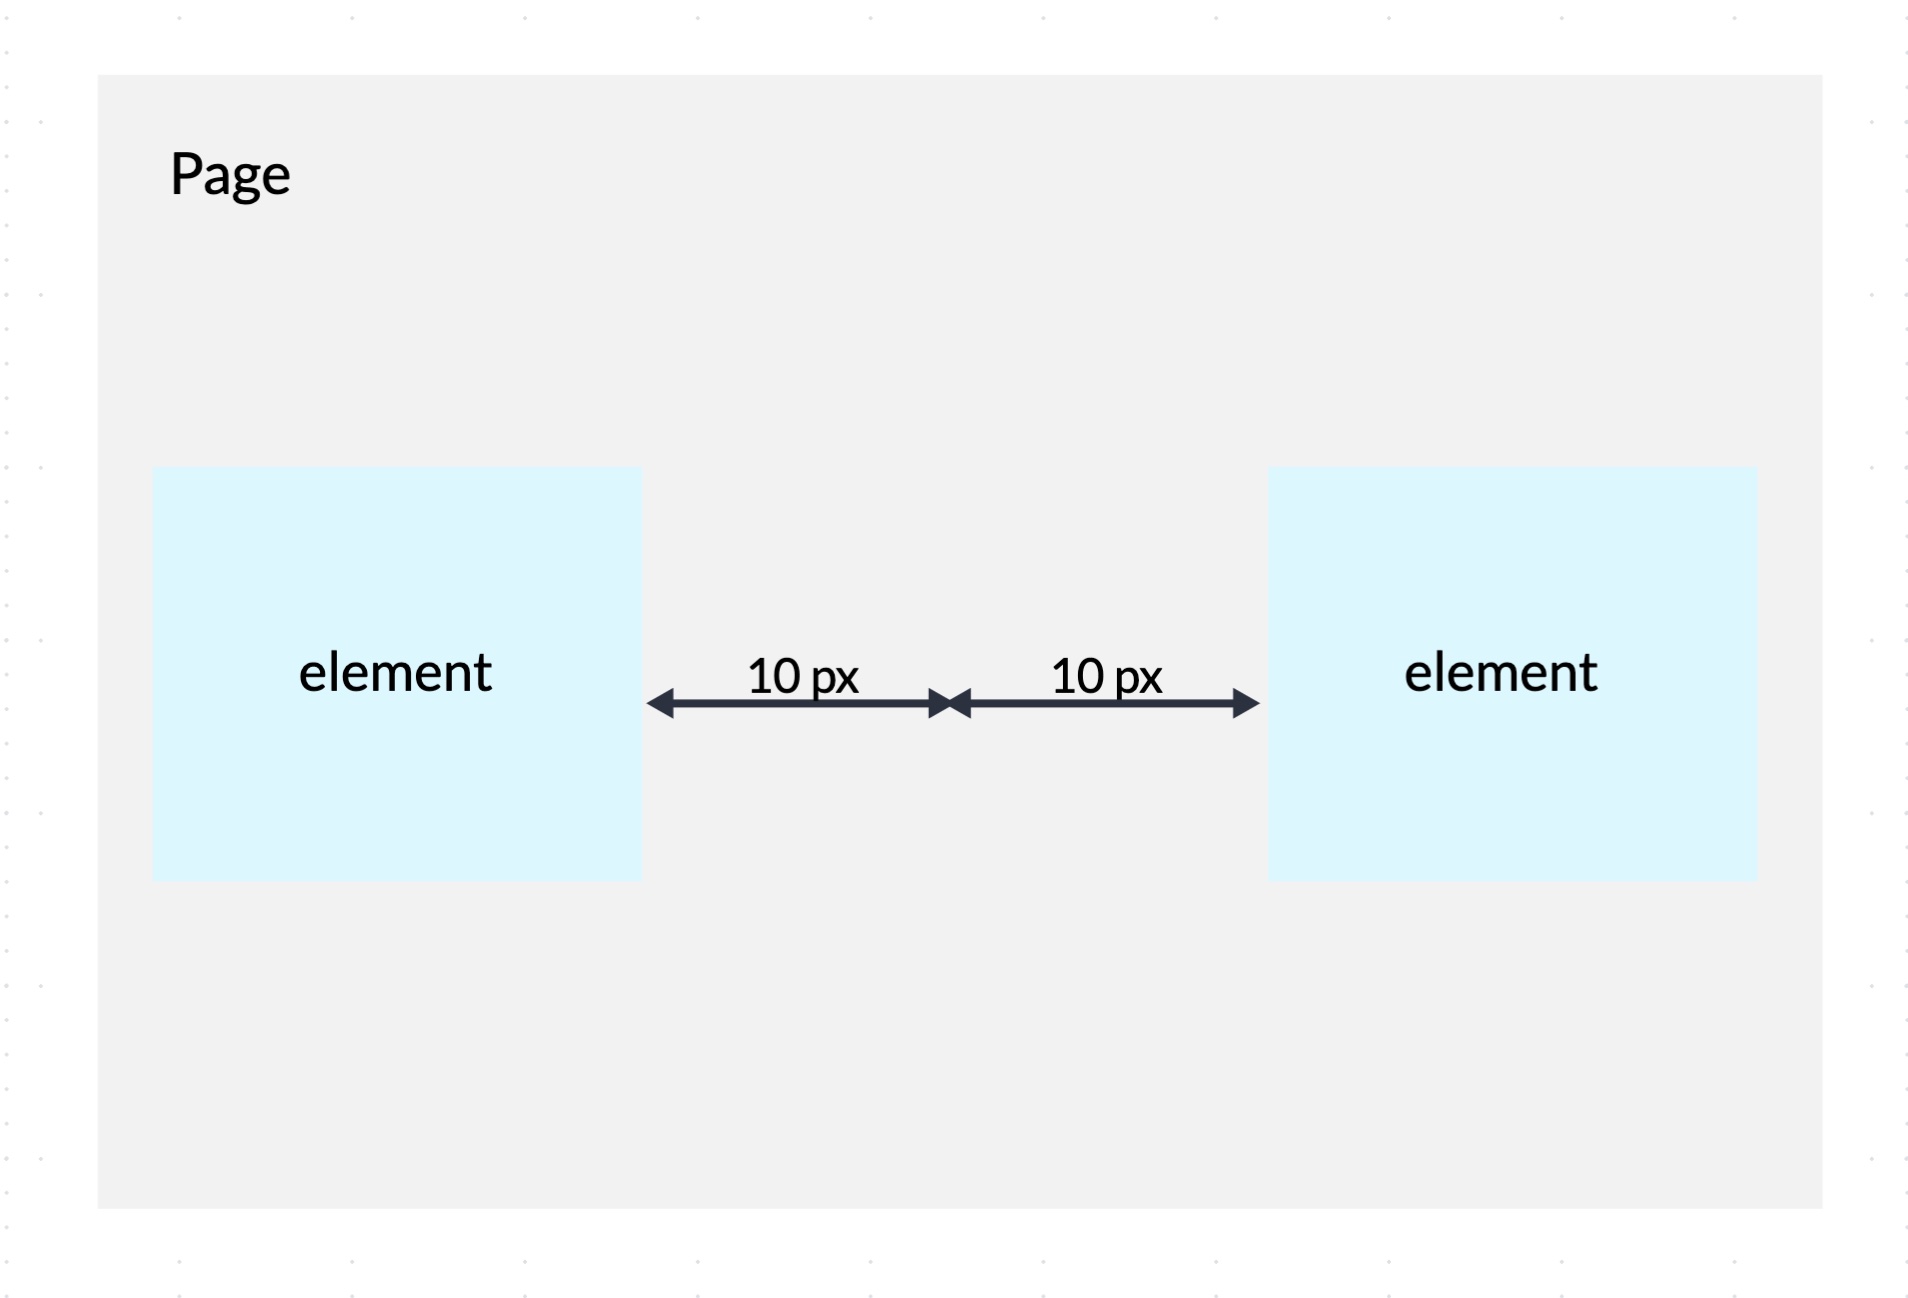
Set a Distance Between Adjacent Elements
One of the primary functions of a margin is to set a distance between nearby elements. Adjusting the margin ensures that elements will not overlap and your web page will remain aesthetic.
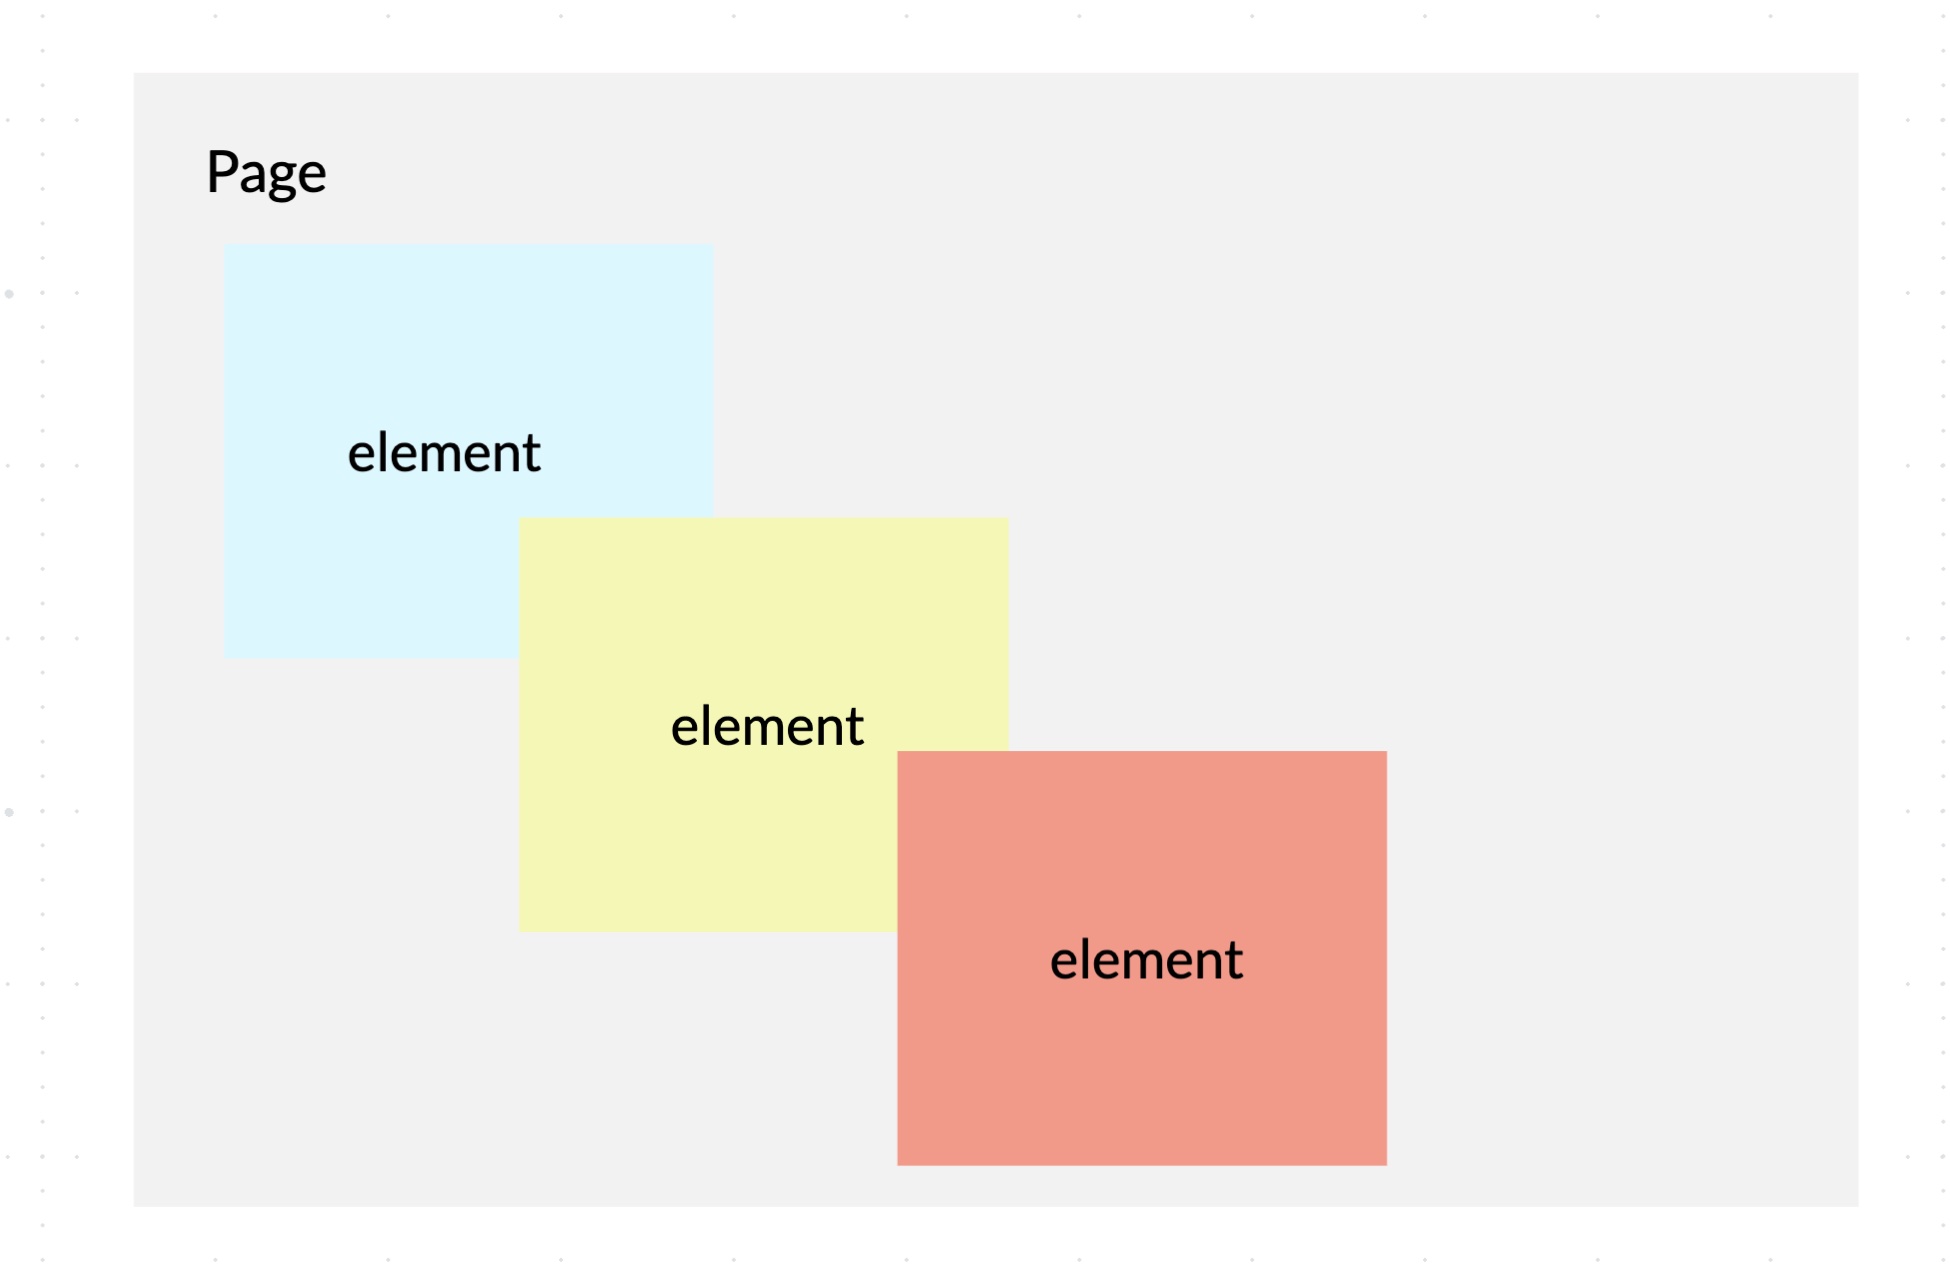
Overlap Elements
Instead of setting a distance between elements, you can use margin to overlap neighboring elements to create inventive and captivating designs. You can achieve this by using a negative margin value, bringing elements closer to one another.
Below is an example of a web page with overlapping elements with negative margins.
Enhanced Readability
You can improve the readability of your web pages by using margins to adjust the space between the text and other HTML elements.
Aesthetics Improvement
Adding more space between elements gives them “room to breathe.” Elements won’t be cluttered, and as a result, your web page design will improve.
Alignment
Margins can center an element within its parent element or the page itself by setting the left and right margins to “auto.”
Responsive Design
Margins can make your web pages responsive to preserve design consistency across different screen sizes. You can achieve this using percentages instead of fixed values for a CSS margin.
When to Use Padding
Padding is the space between the borders of an element and its content. By manipulating the padding, you define the content position and size within the inner space of its parent element.
Considering the above, padding has some useful applications for improving your web design.
Adding Space between the Border of an Element and Its Content
By changing the space inside an element, the content will fit better inside the element borders, and you can establish design consistency. At your discretion, you can add more “whitespace” between the text or image and its borders or bring it closer to the element edges.

Change the Size of an Element
Using padding, you can leave the content size intact and affect only its surrounding space inside the element. This allows you to set custom sizes for elements with different purposes. For example, you can expand the clickable area of a button or reduce the space around a static image.
Improved Readability
You can use padding to create space between the content of an element (like text) and its border. Thus, you can improve readability and user experience on your website by modifying the padding.
Separate the Content from the Element Borders
Increasing the padding lets you create a visual distinction between an image or text and its borders. This could come in handy when the borders are visible, and you wish to make the text easily distinguishable.
Design Improvement
Padding can prevent your webpage from appearing cluttered by providing space around the content, thus enhancing its overall visual appeal.
Responsive Design
You can set padding properties with percentages to make the elements’ design responsive. This way, your web design will remain consistent on different screen sizes.
At the center of the box sits the content. It is surrounded by padding extending to the border. The border boxes the content and its padding. Finally, the border box is surrounded by a margin, which is an invisible barrier separating the HTML element from other components.
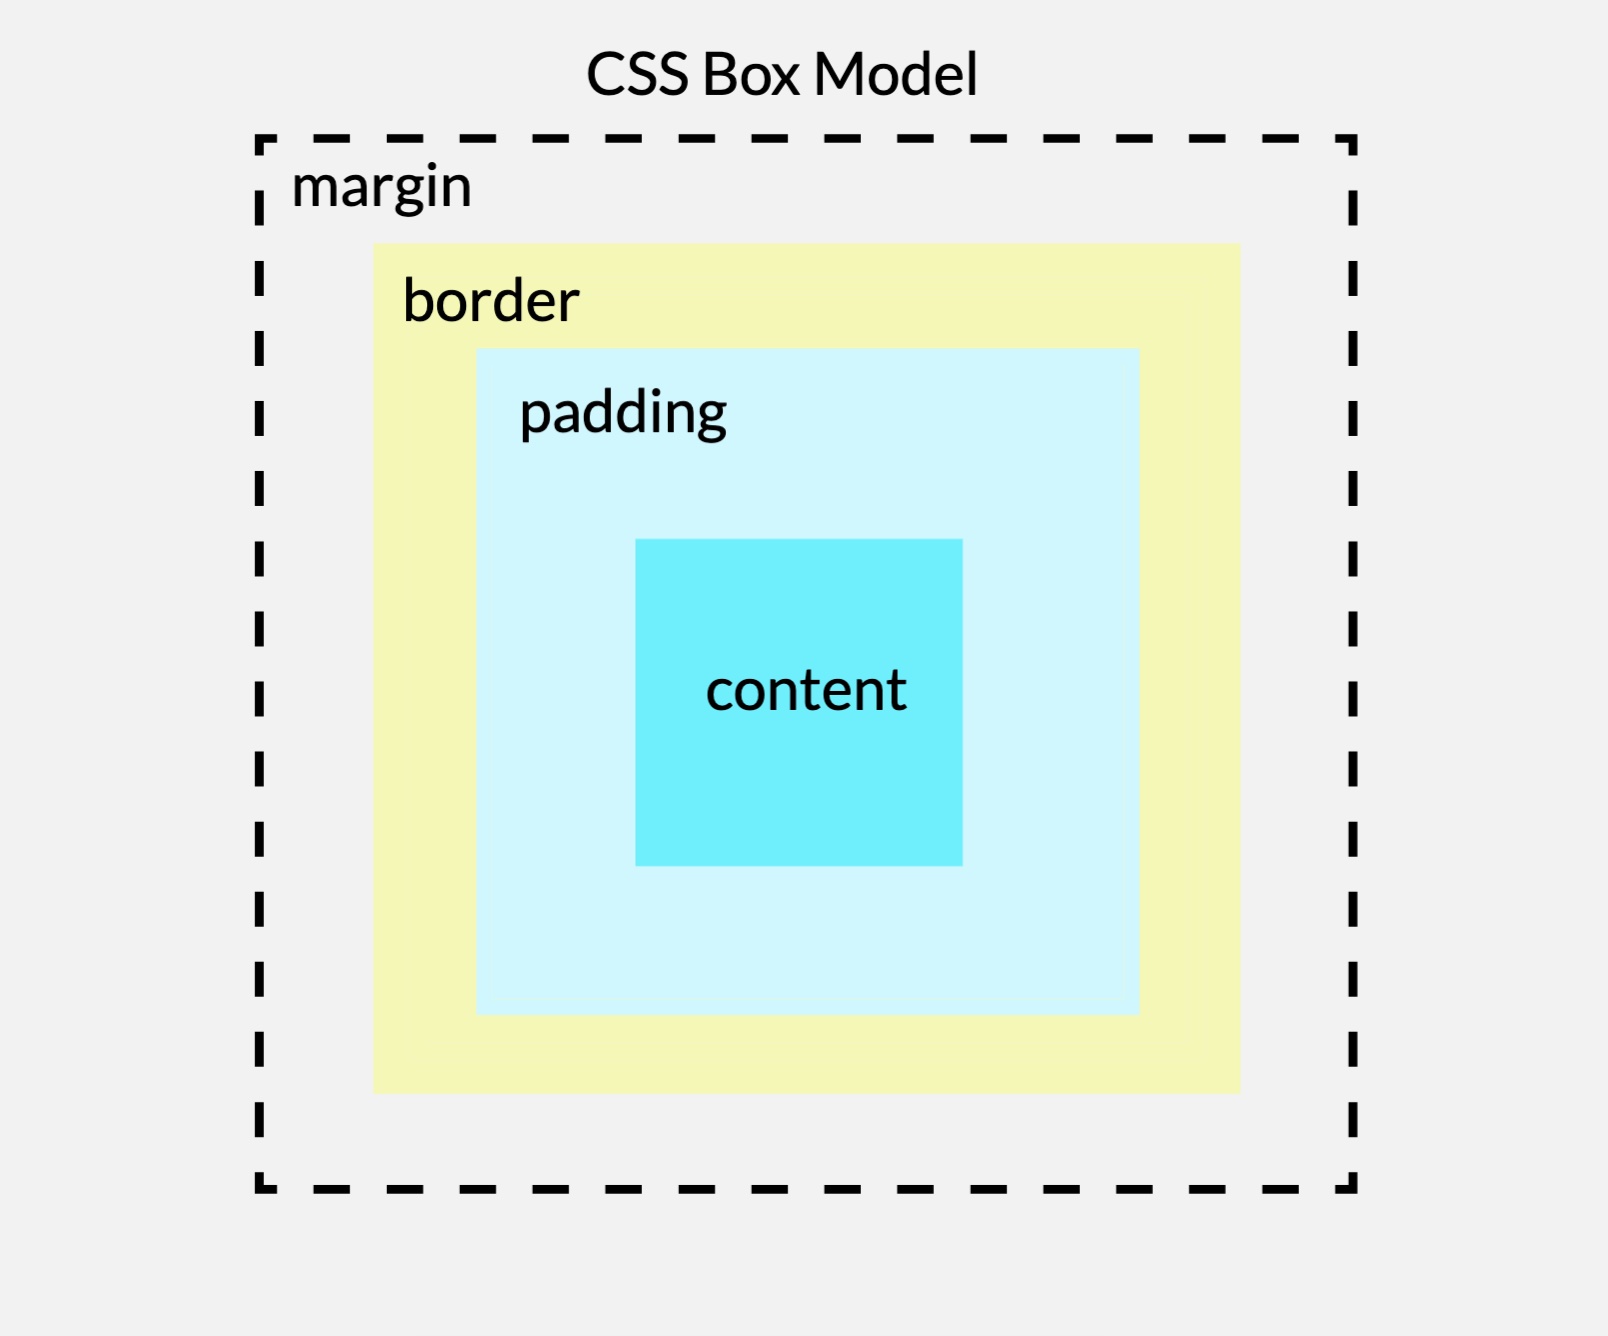
The box model is critical to understanding and manipulating HTML elements’ structure. By mastering the concept, you can change your web components’ size, position, and alignment without the risk of breaking the general layout.
How to Add Margin in CSS
You can apply a margin to an element using the “margin property” in CSS. There are two options for implementing the code:
- Adding margin directly to the HTML code of the web page as inlined code.
- Adding the margin property to a separate CSS file, which contains a set of styling rules applied to your web pages.
In general, keeping the margin and padding settings in a CSS file is the better practice. This makes your HTML code lighter and cleaner and increases the efficiency of your CSS styling.
Regardless of your chosen method, the process of adding margin is the same. Follow the steps below.
Step 1. Identify the Element
First, you need to identify the element to which you want to add a margin. It could be a paragraph (p), heading (h1, h2, etc.), div, or any other HTML element.
Step 2. Define the Margin Property
Once you have selected the element, use CSS to add the margin property. Assign a value to the margin, which defines the size of the area around the element borders. The value can be assigned as:
- Fixed length – most often in pixels (px).
- Percentage – represents the margin size as a percentage of the container width.
- Auto – lets the browser automatically calculate the margin.
- Inherit – the element inherits the margin of its parent element.
Set the Margin Individually on Each Side
To set the margin individually for each side, use the following properties:
- margin-top – sets the margin over the top side of an element.
- margin-right – adds margin on the right side of an element.
- margin-bottom – sets the margin below the bottom side of an element.
- margin-left – sets the margin on the left side.
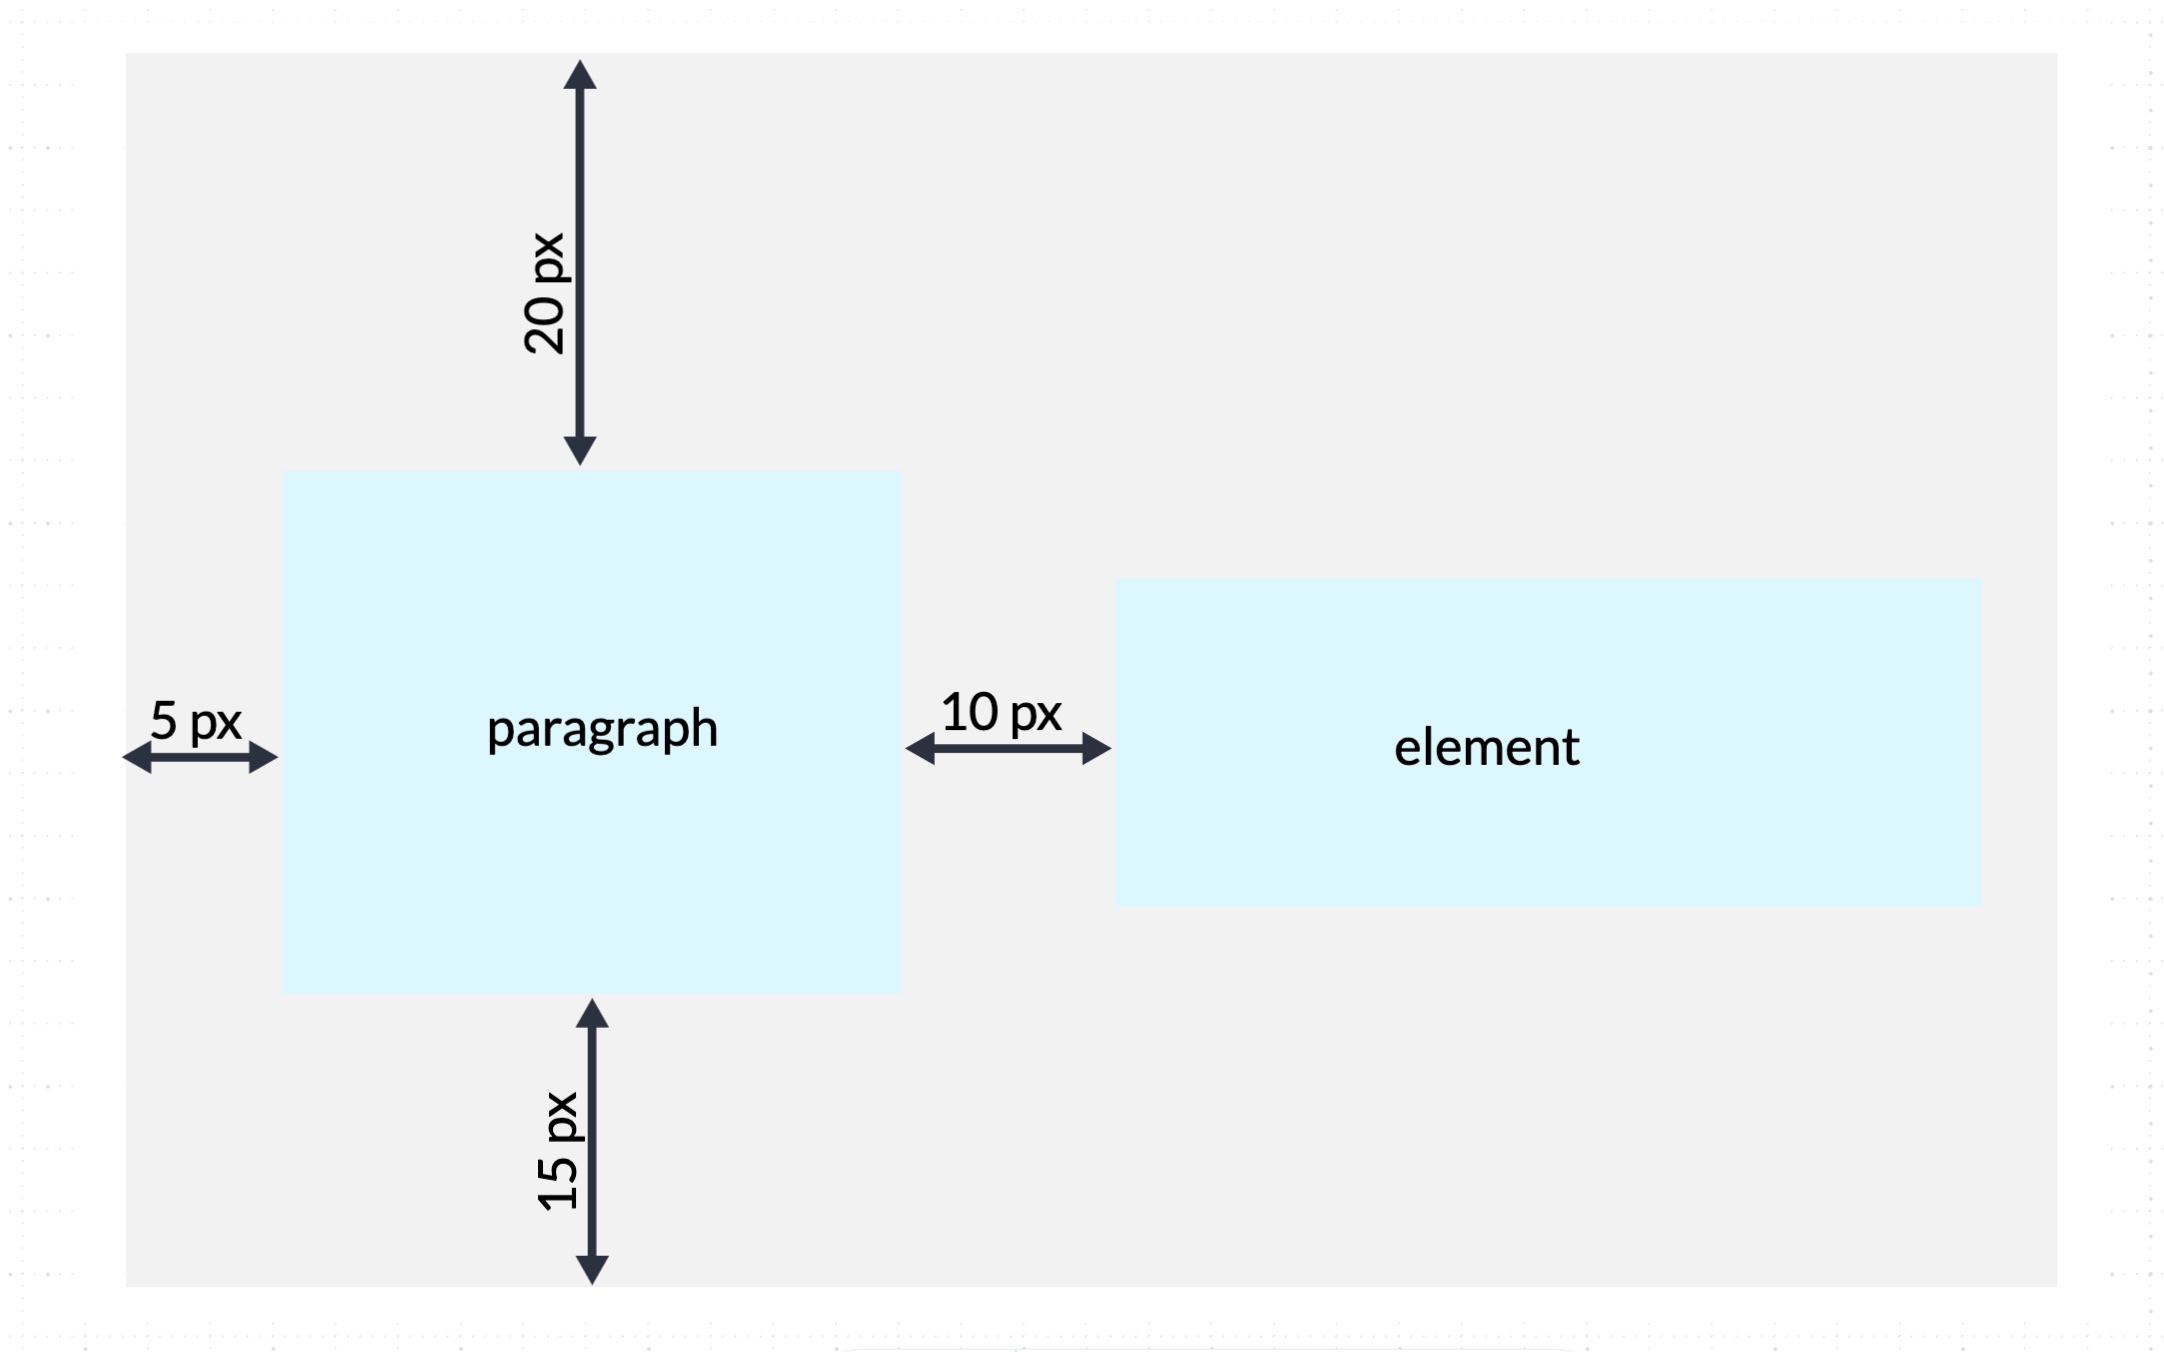
For example, we want to set margins on all four sides of a paragraph. The CSS code will be:
p {

margin-top: 20px;

margin-left: 5px;

margin-right: 10px;

margin-bottom: 15px;

}
It sets the top margin to 20 pixels, the left margin to 5 pixels, the right margin to 10 pixels, and the bottom margin to 15 pixels for the paragraph element.
Shorthand Margin
Alternatively, you can use the margin shorthand property to assign values to several or all sides of an HTML element. It can save you time and keep your code shorter and cleaner.
You can set the margin with one, two, three, or four values.
- One value – By assigning a single value, the same margin will be applied to all four sides. For example, the following code will apply a margin of 20 pixels to all sides of a paragraph:
p { margin: 20px; } - Two values – If you use two values, the first will be applied to the top and bottom, and the second – to the right and left sides.
The following example sets a margin of 10 pixels to the top and bottom sides and 5 pixels to the right and left sides.p { margin: 10px 5px; } - Three values – When using three values, the first value defines the top margin, the second one sets the margin to the right and left sides, and the third is for the bottom margin.
The code below sets margins of 5 pixels to the top side, 10 pixels to the left and right sides, and 3 pixels to the bottom side.p { margin: 5px 10px 3px; } - Four values – If the margin property has four values, they are assigned to the sides in the following order: top, right, bottom, and left.
In the example below, the top margin is 5 pixels, the right margin is 3 pixels, the bottom margin is 6 pixels, and the left margin is 2 pixels.p { margin: 5px 3px 6px 2px; }
How to Add Padding in CSS
To add padding to an element in CSS, use the padding property. Similar to margins, you can define padding to the four sides of an element. The size of the padding is defined by three types of values.
- Fixed length – A fixed padding value, most often in pixels.
- Percentage – The value represents a percentage of the containing element’s width.
- Inherit – The element inherits the padding of its parent element.
Like margins, you can assign padding in two general ways.
Set the Padding Individually to a Side
You can use the following padding properties to set the padding to each side of an element:
- padding-top – defines the top side padding of an element.
- padding-right – sets the right side padding of an element.
- padding-bottom – sets the padding of the element’s bottom side.
- padding-left – defines the left padding of an element.
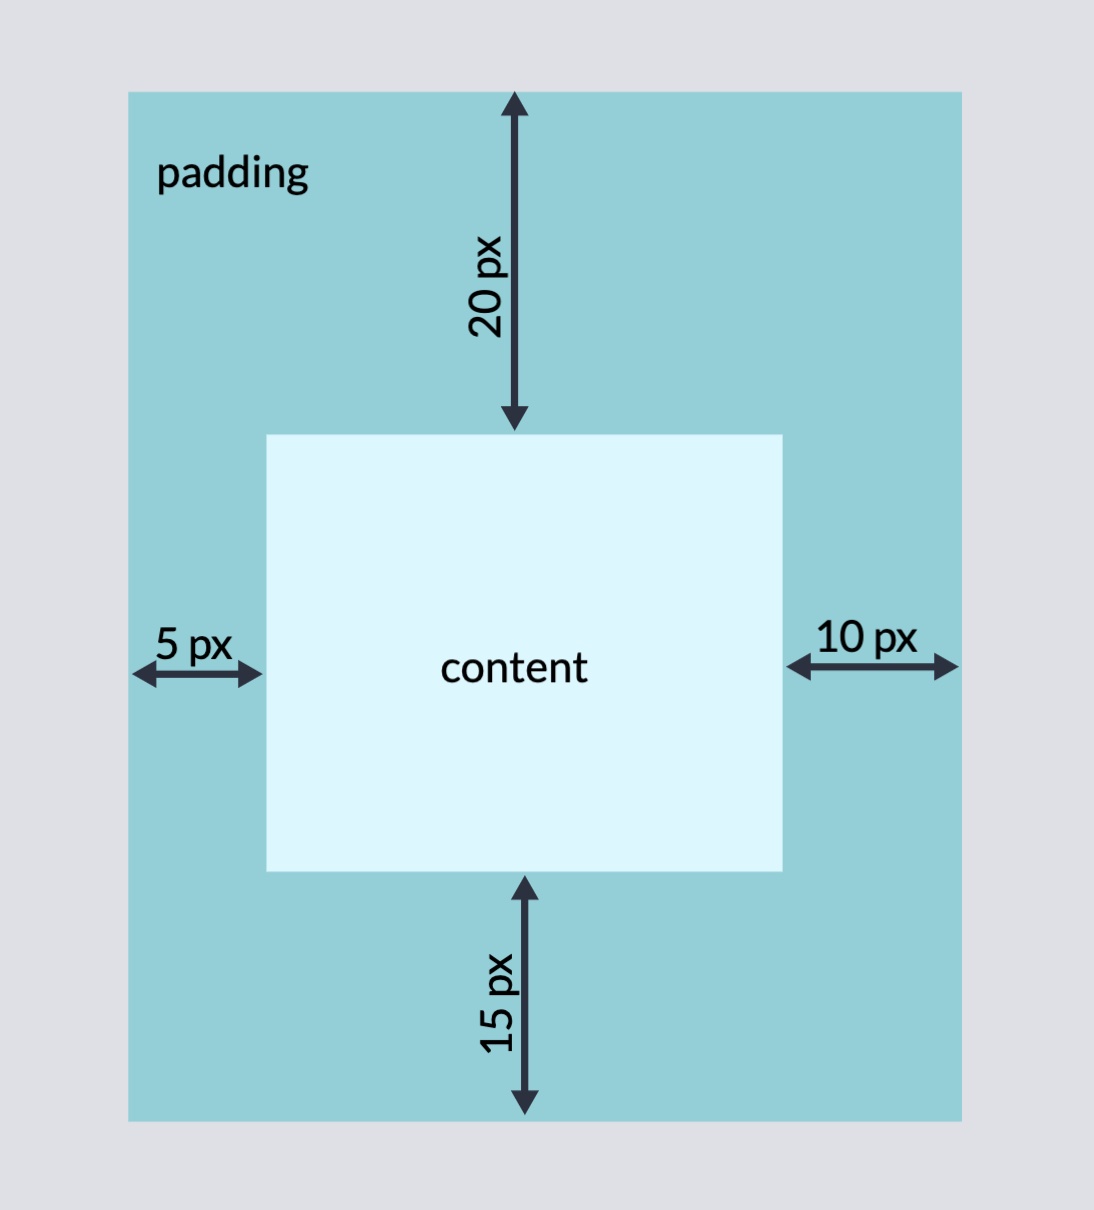
Below is an example of CSS code containing padding properties.
.element {

padding-top: 20px;

padding-right: 10px;

padding-bottom: 15px;

padding-left: 5px;

}
The code sets the padding for an element with 20 pixels to its top, 10 pixels to the right side, 15 pixels to the bottom, and 5 pixels to the left side.
Use the Padding Shorthand Property
Similar to margins, instead of setting the padding to each side individually, you can use the padding shorthand property to adjust the padding to several or all sides. This will result in cleaner and shorter CSS code.
You can set the padding with either one, two, three, or four values.
- One value – assigning one value will set the padding for all four sides. Here is an example of a padding property with a value of 20 pixels.
.element { padding: 20px; } - Two values – If two values are used, the first one defines the padding for the top and bottom sides of the element, and the second value is for the left and right padding. For example:
.element { padding: 20px 10px; } - Three values – When you use three values, the first defines the top padding, the second is for the left and right padding, and the third one determines the bottom padding. The following code illustrates this case:
.element { padding: 20px 10px 5px; } - Four values – Four values define the padding in the following order: top, right, bottom, and left. The example below sets the padding with a value of 20 pixels for the top, 10 pixels for the right side, 15 pixels for the bottom side, and 5 pixels for the left side.
.element {

padding: 20px 10px 15px 5px;

}
How to Add Margin and Padding in WordPress
In WordPress, the theme defines the margin and padding properties of all HTML elements. You don’t have to adjust them if you are happy with the look of your website.
However, you can override the preset design and customize the margin and padding settings from your WordPress dashboard.
Add Margin and Padding from the Full Site Editor
Recent WordPress versions are equipped with the Full Site Editor, which allows you to modify your theme’s settings from the Gutenberg page builder. However, keep in mind that this option is only available to block-based themes such as native WordPress themes (like Twenty Twenty-Two and Twenty Twenty-Three).
To access the editor, open your dashboard, and navigate to Appearance > Editor.
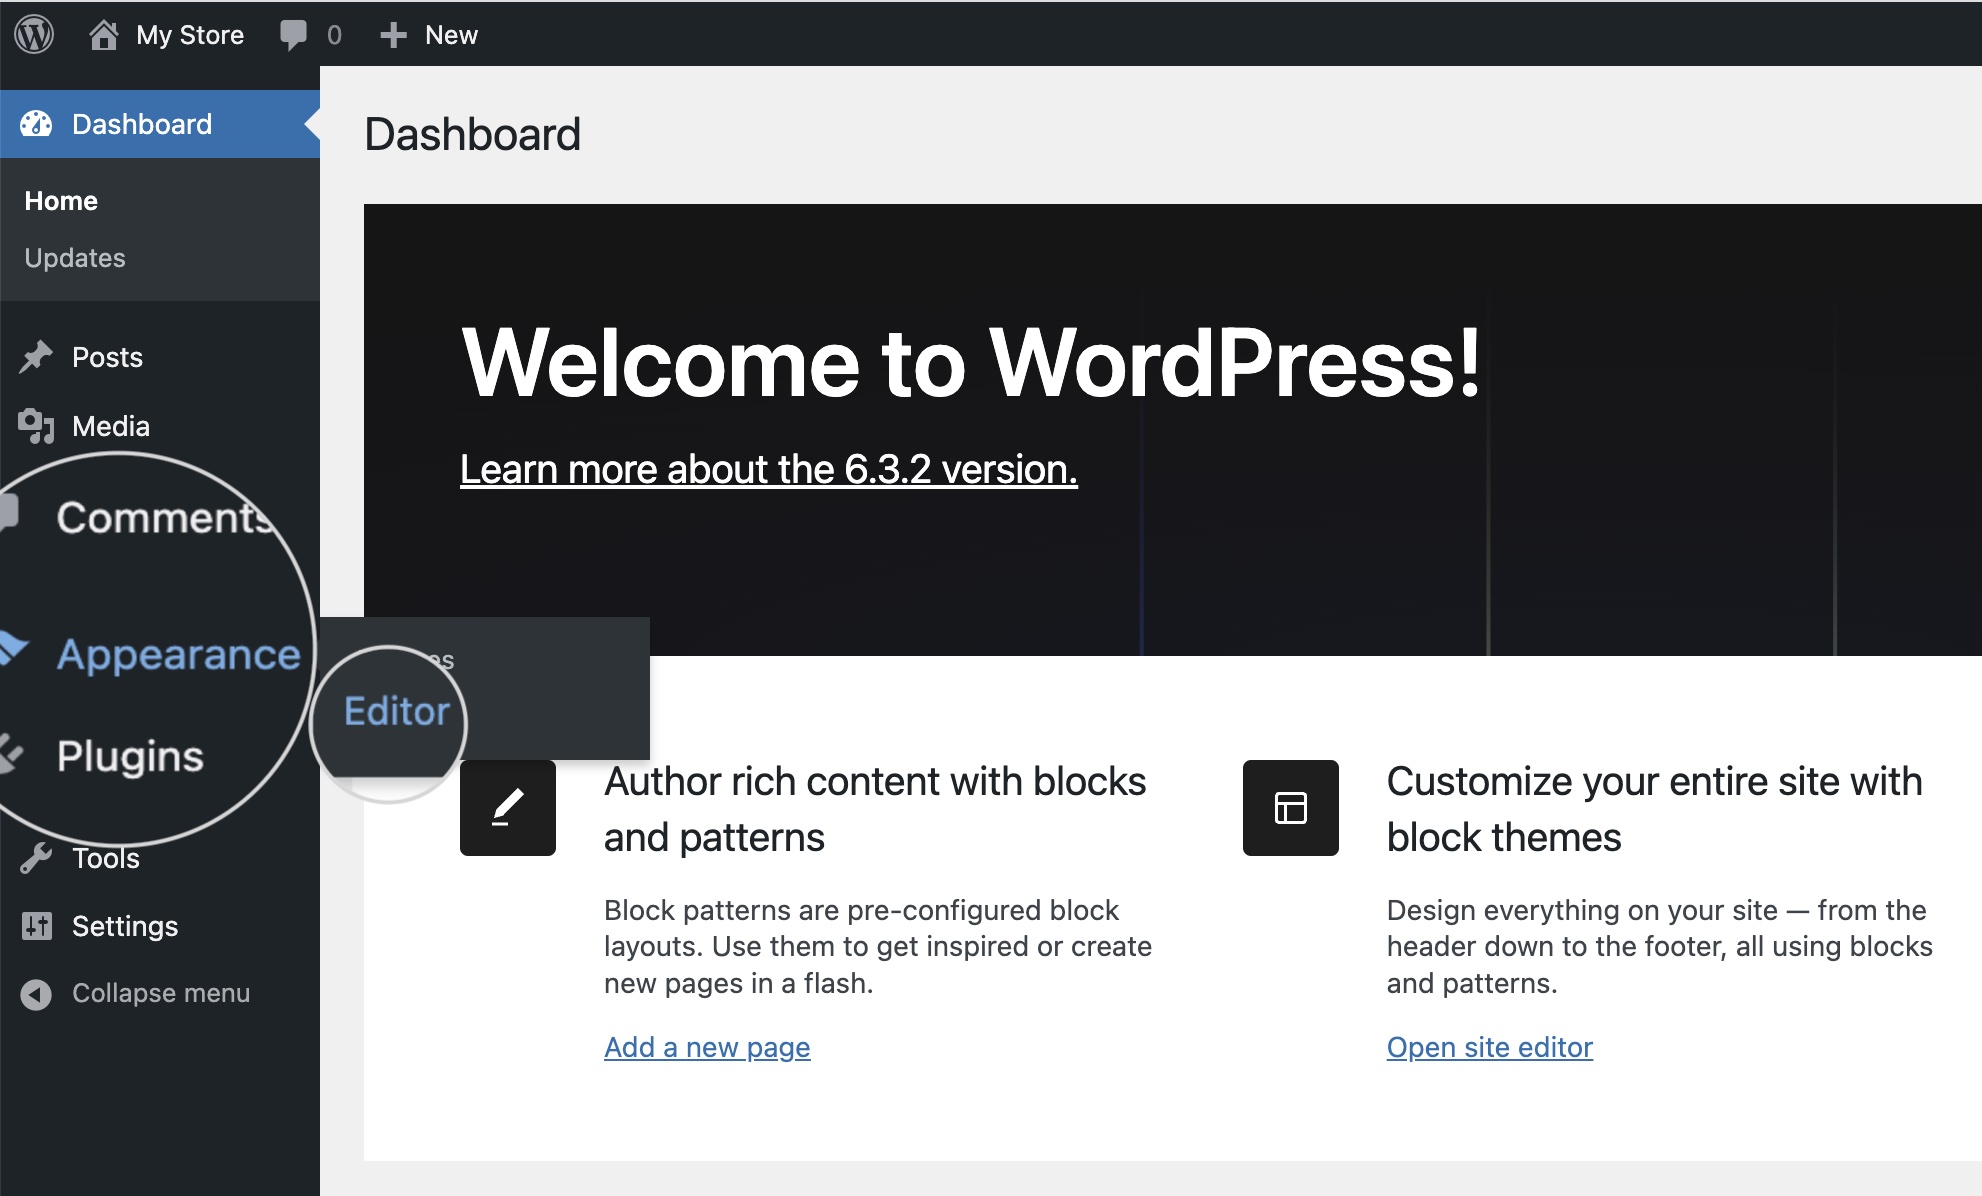
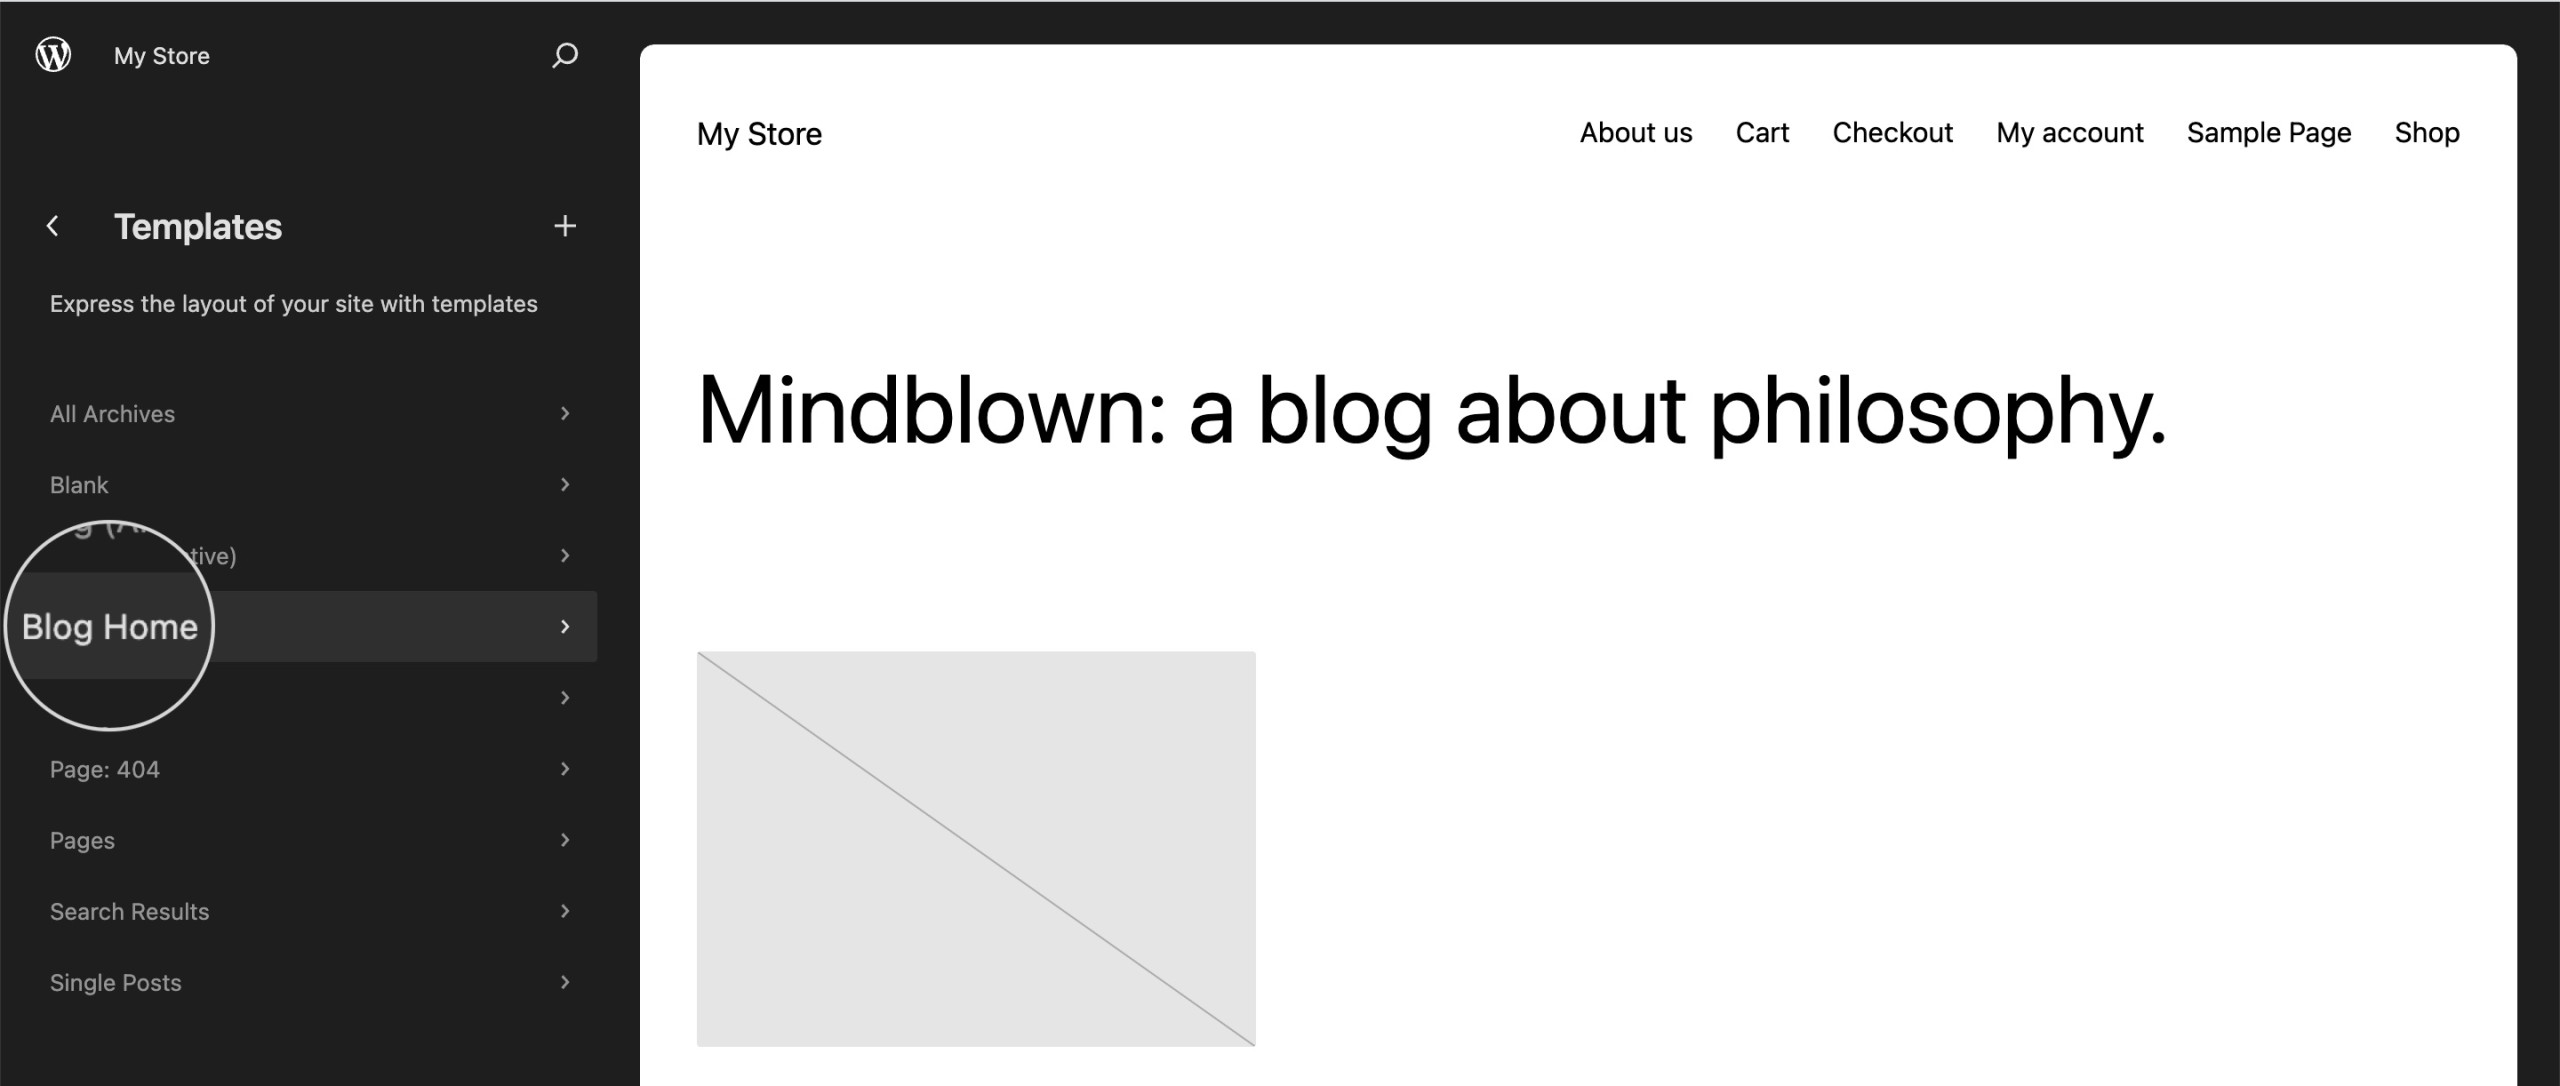
On the next page, select the Templates section to view the available page templates for your theme.
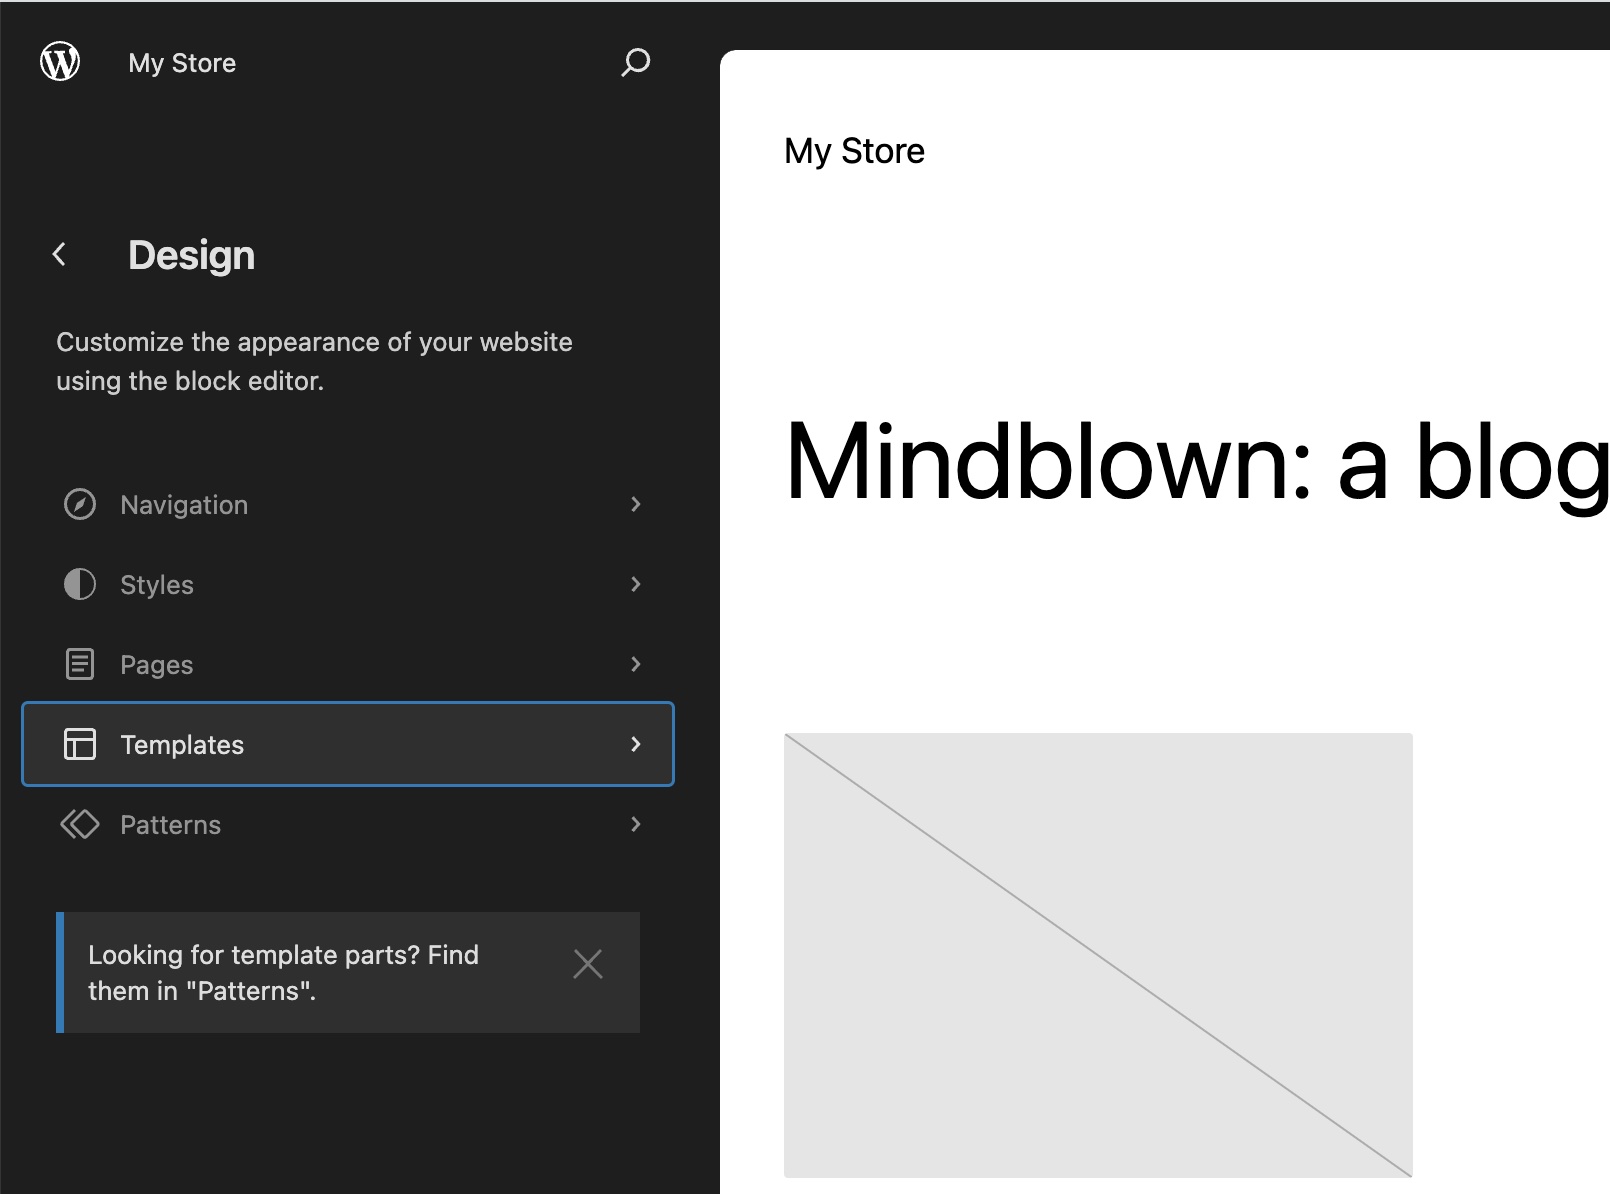
Now, you can choose one of the available templates for your theme. Once selected, the template page will be visualized.
Click on one of the page’s existing elements to edit its padding and content margin properties. WordPress will switch to the block editor mode. From the menu on the right, select Styles (“contrast” icon). Scroll down to Dimensions, where you can adjust both Margin and Padding.
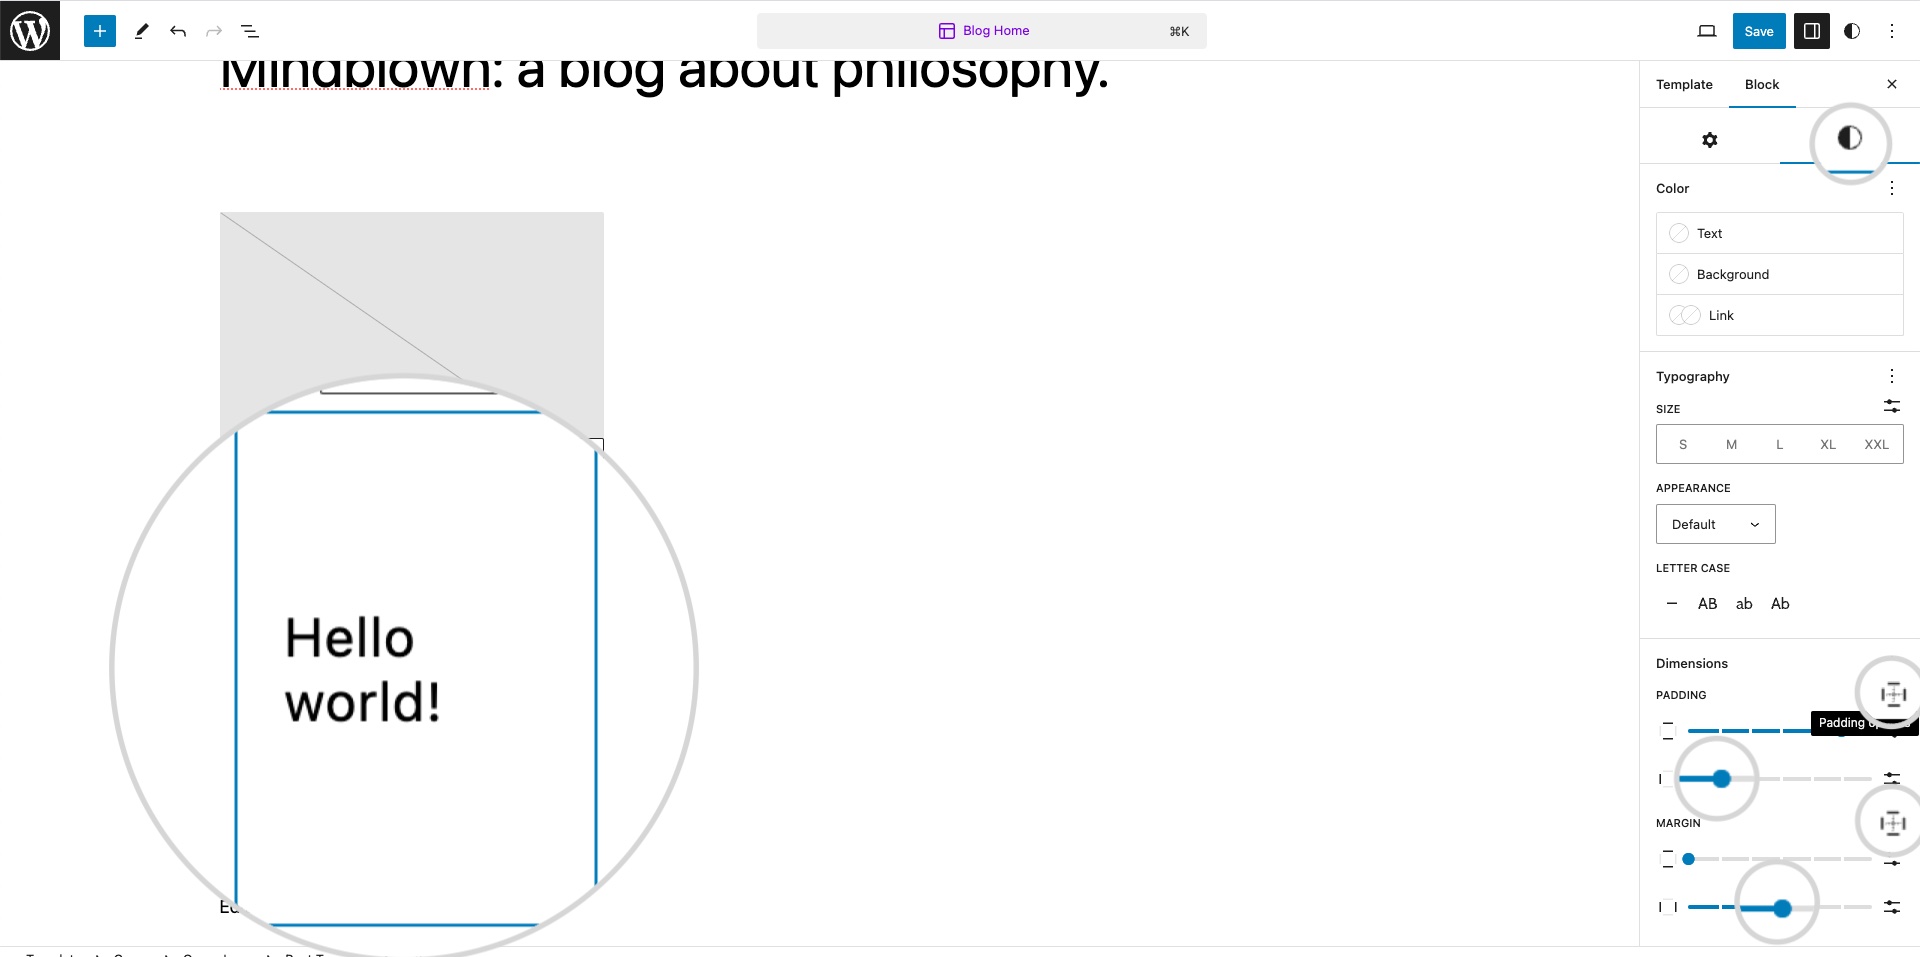
By default, you can edit the top-bottom and left-right pairs of sides by moving the sliders. To modify each side individually, click on the Padding options or Margin options icon next to the respective property name.
Add Margin and Padding to Additional CSS
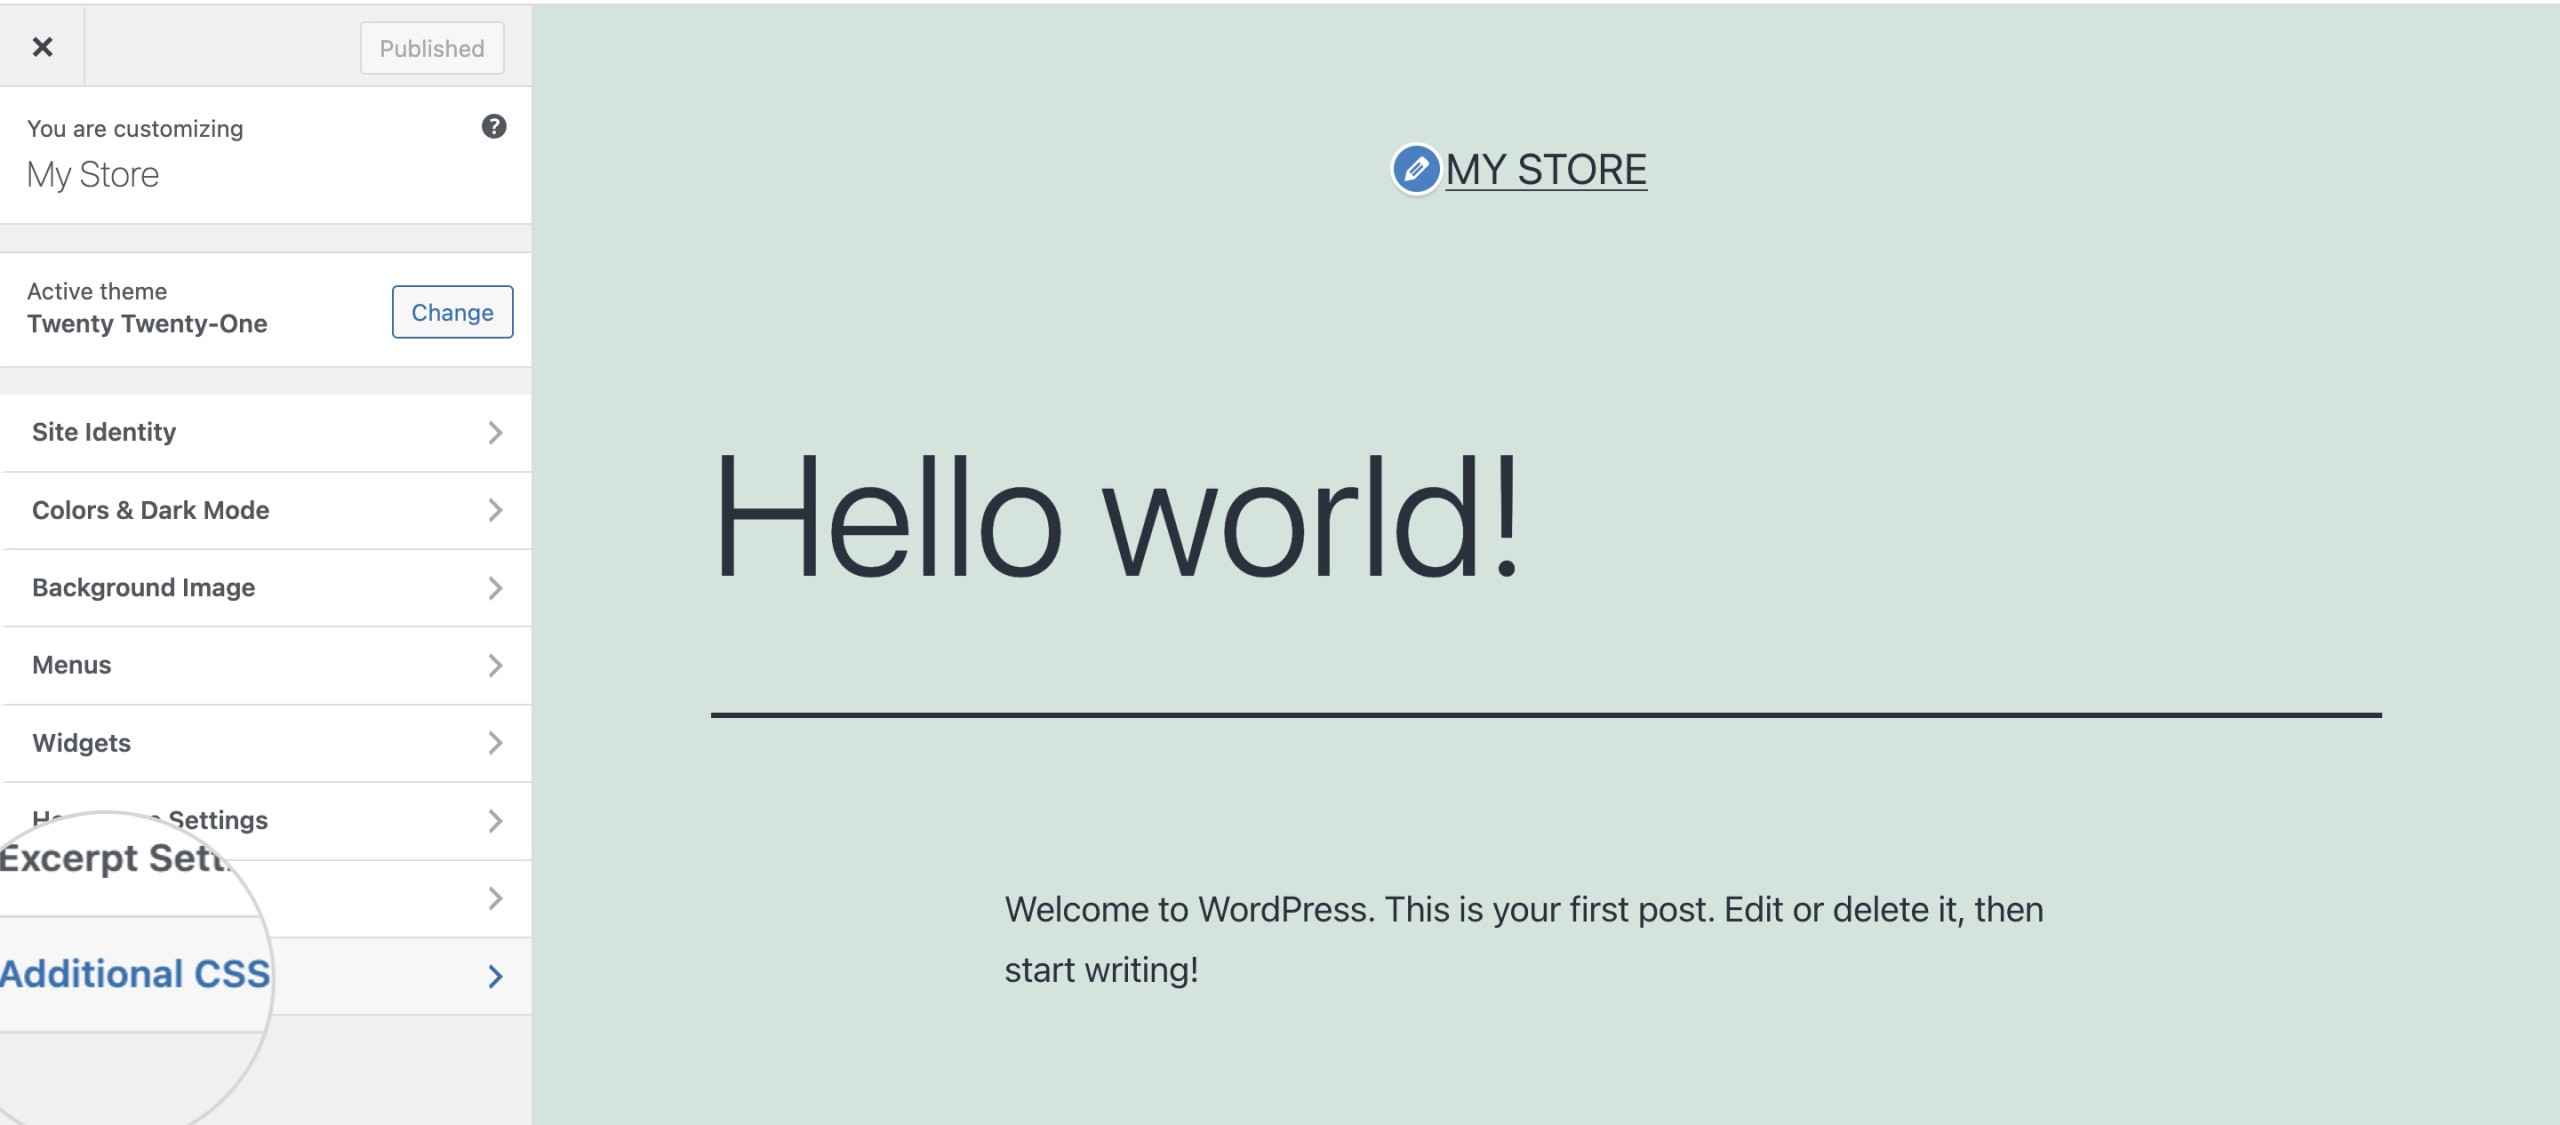
If your theme is not block-based, the Full Site Editor option is unavailable. However, you can add custom padding and margin stylings from the theme customizer.
To access it, open your WordPress dashboard and navigate to Appearance. Click on the Customize button for your active theme or the Customize sub-section in Appearance.
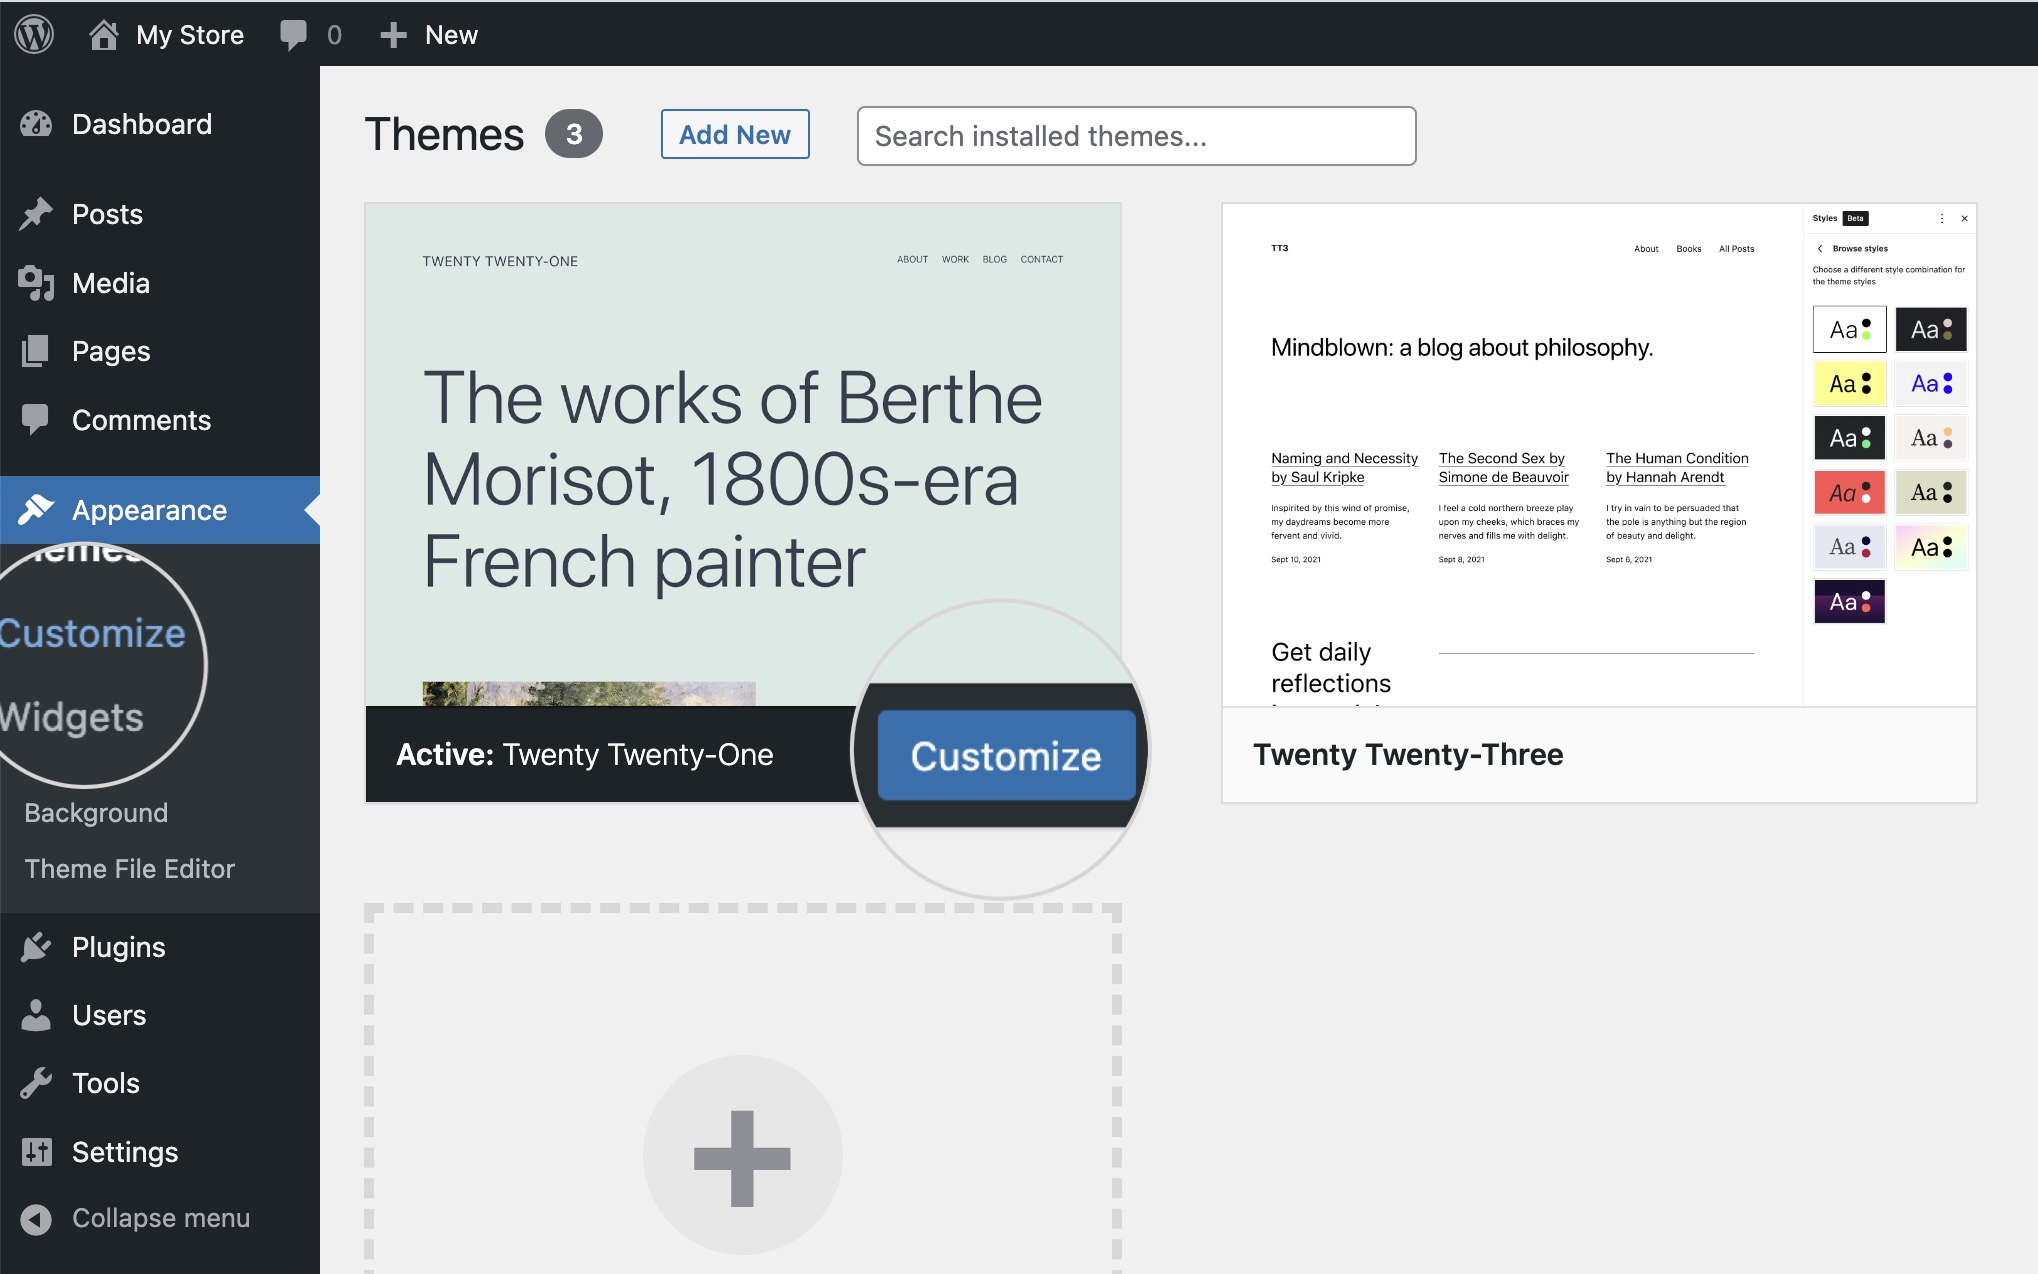
On the theme customizer page, select Additional CSS, where you can add your padding and margin settings.
Identify the name of the element you’d like to edit. Then, write the CSS code in the text field on the left. Once ready, press the Publish button to apply the changes.
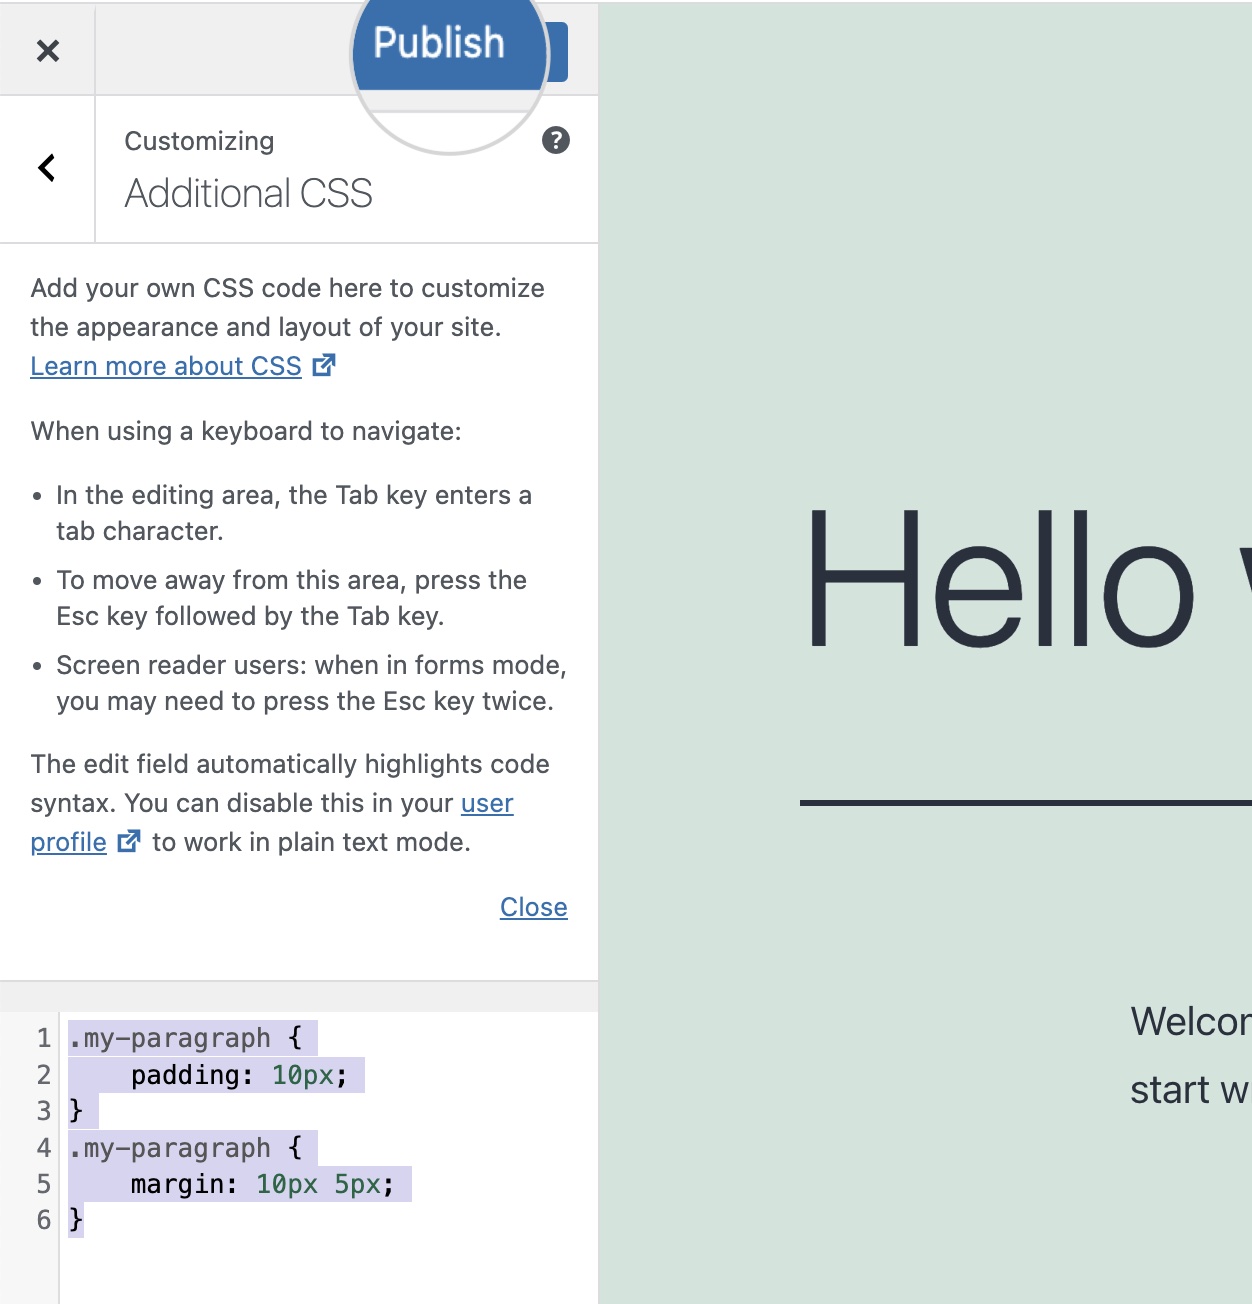
The CSS code above assigns padding of 10 pixels to all sides, a margin of 10 pixels to the top and bottom sides, and a margin of 5 pixels to the left and right sides of the element named .my-paragraph.
Practical Applications of Margin and Padding
Margin and padding are used in a variety of ways in web design. They help you to:
- adjust the white space in your design;
- create a visual separation between elements;
- improve the readability and flow of content.
For instance, adding padding around text can make it easier to read. On the other hand, adding a margin between images can prevent them from appearing cluttered.
These properties are also essential when crafting responsive design for your website, ensuring the layout looks good on all screen sizes.
Exploring Advanced Techniques
There are many advanced techniques for using margin and padding. Some of the most common include:
- Using percentage values – Using a percentage value for a margin or padding creates a space that’s a percentage of the containing element’s width. This can be useful for creating responsive designs that adapt to the screen size.
- Using negative values – Negative values can be used for margins to create interesting effects, like overlapping elements. However, remember that negative values are not allowed for padding.
- Using auto margins – Auto margins help to center an element horizontally within its container. If both the left and right margins are set to margin auto, and the element has a specified width, the browser will evenly split the remaining space on the left and right, effectively centering the element.
Best Practices for Using Margin and Padding
It’s important to adhere to best practices when applying margin and padding.
- Stick to a consistent scale for your spacing to maintain a consistent design.
- Avoid using arbitrary values and instead establish a standard spacing scale to use throughout your design.
- Be mindful of the impact of margin and padding on the responsive behavior of your design. Test your layout on various screen sizes to ensure the spacing looks good on all devices.
- Understand how margin collapse works and how to prevent it when necessary. For instance, you can add a border or padding to the parent element to prevent margin collapse.
- Use shorthand properties to set the margin and padding for all four sides of an element in one declaration.
- Use browser developer tools to inspect elements and see how margin and padding are applied. This can help you troubleshoot layout issues.
Common Mistakes to Avoid
Whenever you start delving into a new endeavor, mistakes can occur, but they shouldn’t discourage you. However, you can learn from the past experiences of others to avoid some of the most common ones.
- Ignoring the CSS Box Model – Understanding the CSS box model is crucial in avoiding miscalculations in layout dimensions. Remember that an element’s total width and height is the sum of its content, padding, border, and margin.
- Using margin and padding interchangeably – Always keep in mind that margin pushes other elements away, while padding sets a distance between the element’s content and its border. Confusing them can disturb your web page’s layout.
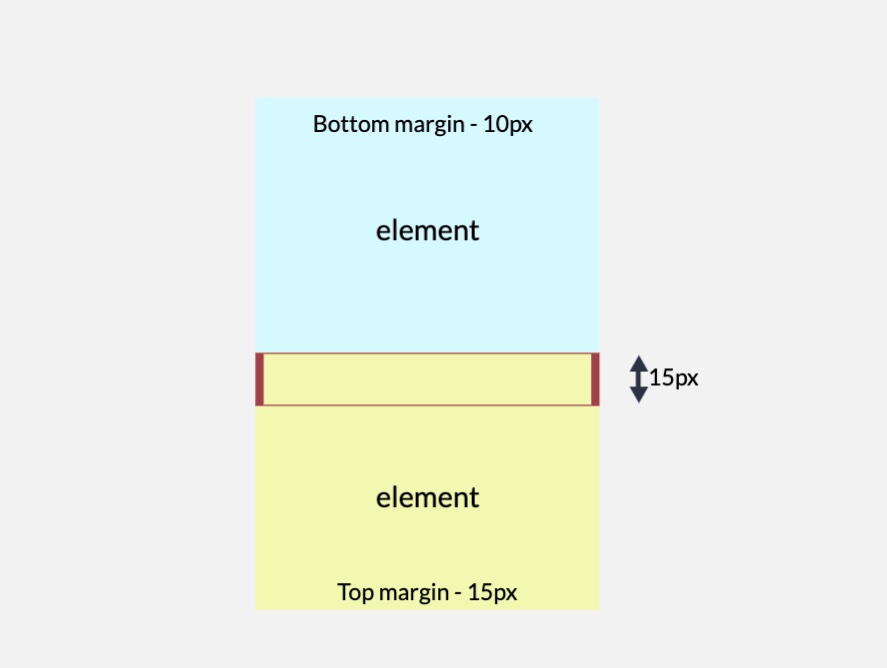
- Ignoring Collapsing Margins – Margin collapse occurs when vertically stacked elements without borders have different margins. Avoid using different margins on elements to prevent unintentional overlapping between them.
- Using Absolute Units for Responsive Design – Using pixels (px) for margin and padding can make your design less responsive. It’s often better to use relative units like percentages (%), viewport height (vh), viewport width (vw), or ems (em).
- Not Testing on Multiple Devices – Inconsistent design on different screen sizes often results from not testing your changes on various devices.
Conclusion
Margin and padding are powerful tools in web design. They control the spacing in your layout, which can greatly impact your website’s usability and aesthetic appeal.
By understanding their differences and appropriate use cases, you can create layouts that are visually pleasing, easy to navigate, and effective in communicating your content.
FAQs
Can both margin and padding take negative values?
You can set negative values for margins to create an overlapping effect. However, padding cannot take negative values.
Does padding or margin take the background color?
Padding can take the color of the parent element, while margin can’t take colors. Both properties create an invisible space, but if the parent element has a background color, the padding space will inherit it. However, the margin space always remains invisible.
Are padding and margin interchangeable?
No. While both margin and padding control the space on web pages, they have different effects.
- Padding determines the space between the content and the borders of its containing element.
- Margin controls the space between an element and other elements.