What is DKIM, and why is it important?
Table of Contents
DKIM is one of the paramount security measures for preventing email spoofing. It aids receiving mail servers in verifying the legitimacy of incoming emails and blocking falsified emails from landing in recipients’ inboxes.
In this article, you will find out what DKIM is, how it works, and how to set it up for your domain.
So, in simple terms, a DKIM record is like a digital signature for emails, ensuring they are genuinely sent by the claimed sender and haven’t been altered in a harmful way.
It is based on public-key cryptography through which a digital signature is created. This signature is part of the email headers and contains encrypted portions of the email. Recipients can check this signature against the DKIM public key and verify the email’s authenticity.
Below, you can see an image of email headers containing a DKIM signature.
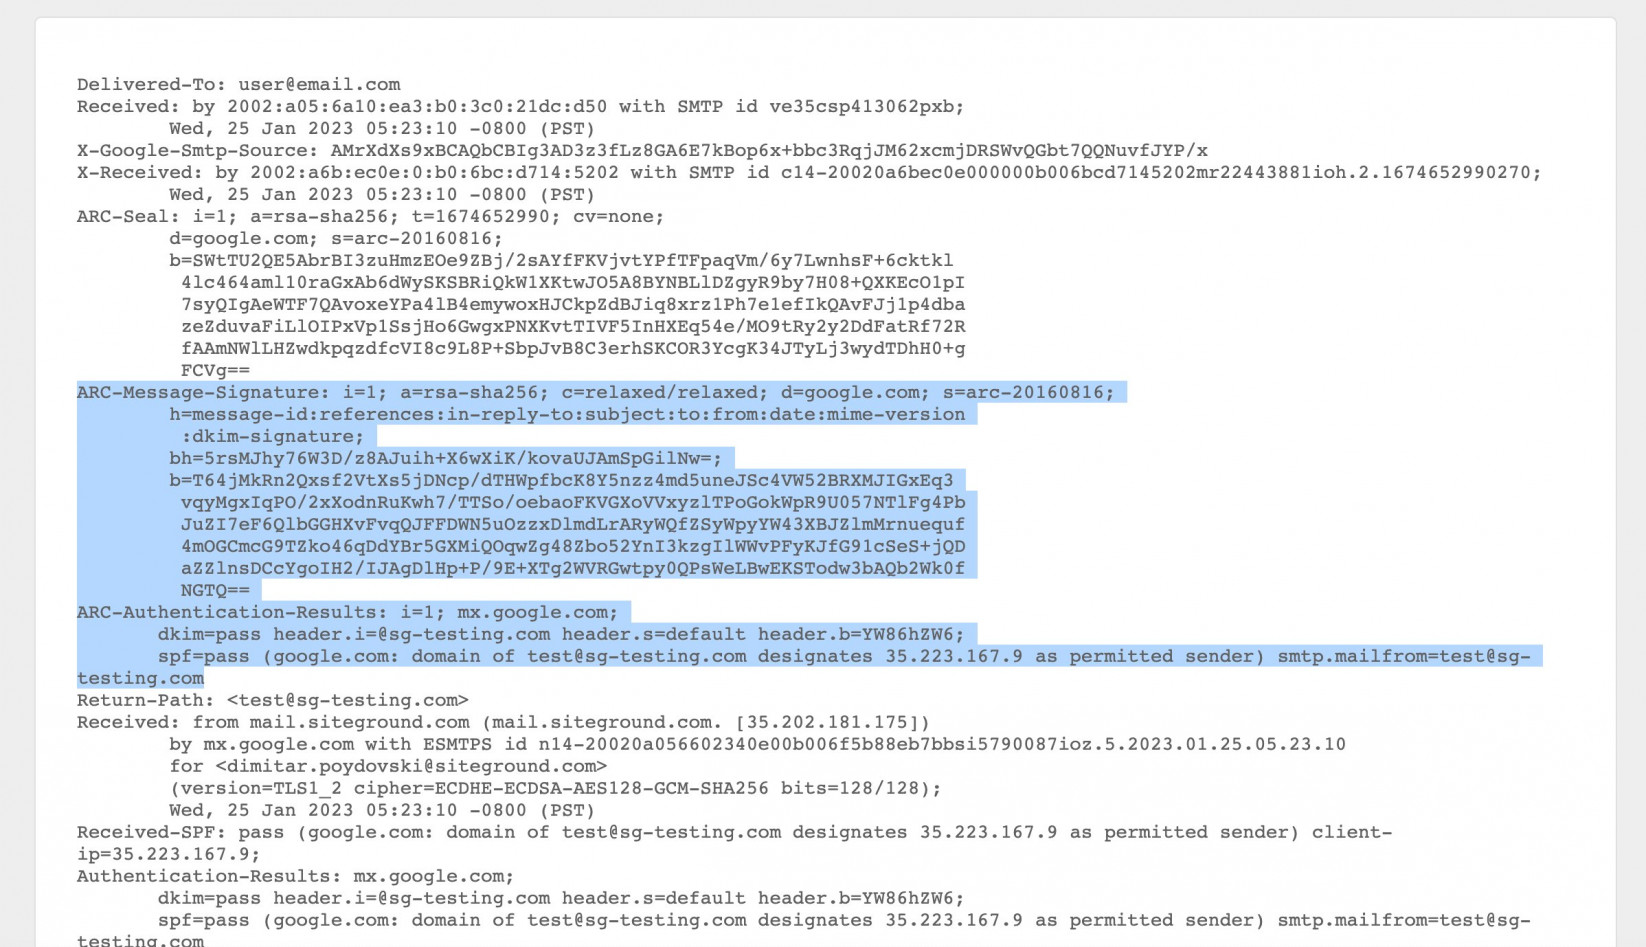
DKIM aligns with the other two main authentication methods – SPF and DMARC. All three mechanisms contribute to email security and prevent email spoofing and phishing.
Why is DKIM important?
DKIM is beneficial in two key aspects – it helps prevent email spoofing and increases the delivery rate of emails.
Typically, scammers conduct email spoofing by claiming they are someone else. With DKIM, recipients can verify that an email was sent by the actual domain owner, preventing forged emails from landing in their inboxes. Thus, DKIM adds an extra layer of security for both senders and recipients.
On the other hand, many email service providers enforce DKIM authentication to determine if incoming emails are legitimate. Even if the emails are solicited and sent by the actual domain owner but missing DKIM keys, they may still be marked as spam by the recipient’s mail server.
Therefore, employing DKIM decreases the chance of having valid emails blocked by spam filters.
What is a DKIM record?
A DKIM record is a type of DNS (Domain Name System) record containing a public key. Recipients can verify the authenticity of incoming emails by matching their digital signatures to this public key.
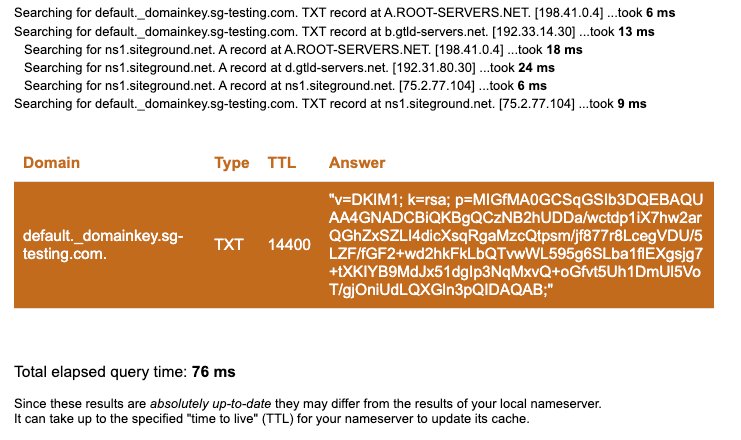
The DKIM record is typically a TXT record with the public key included in the record’s value. The most common format of the record’s name is
default._domainkey.yourdomain.comThe prefix “default” is called DKIM selector, which may have a different name for the various email services. The prefix “_domainkey” denotes that the DNS record is DKIM and always follows the DKIM selector.
The record’s value is usually in the following format:
"v=DKIM1; k=rsa; p=PUBLICKEY"PUBLICKEY is a placeholder for the actual public key of the DKIM record.
Here, you can see the final format of a DKIM TXT record appearing in DNS lookups.
Apart from a DNS TXT record, the DKIM record could also be a DNS CNAME record. In this case, the value of the DKIM record is an address leading to a server where recipients can obtain the domain’s DKIM public key. The DKIM CNAME record has an address similar to this:
dkim.server.comBelow, you can see how a DKIM CNAME record would appear in DNS checkers.
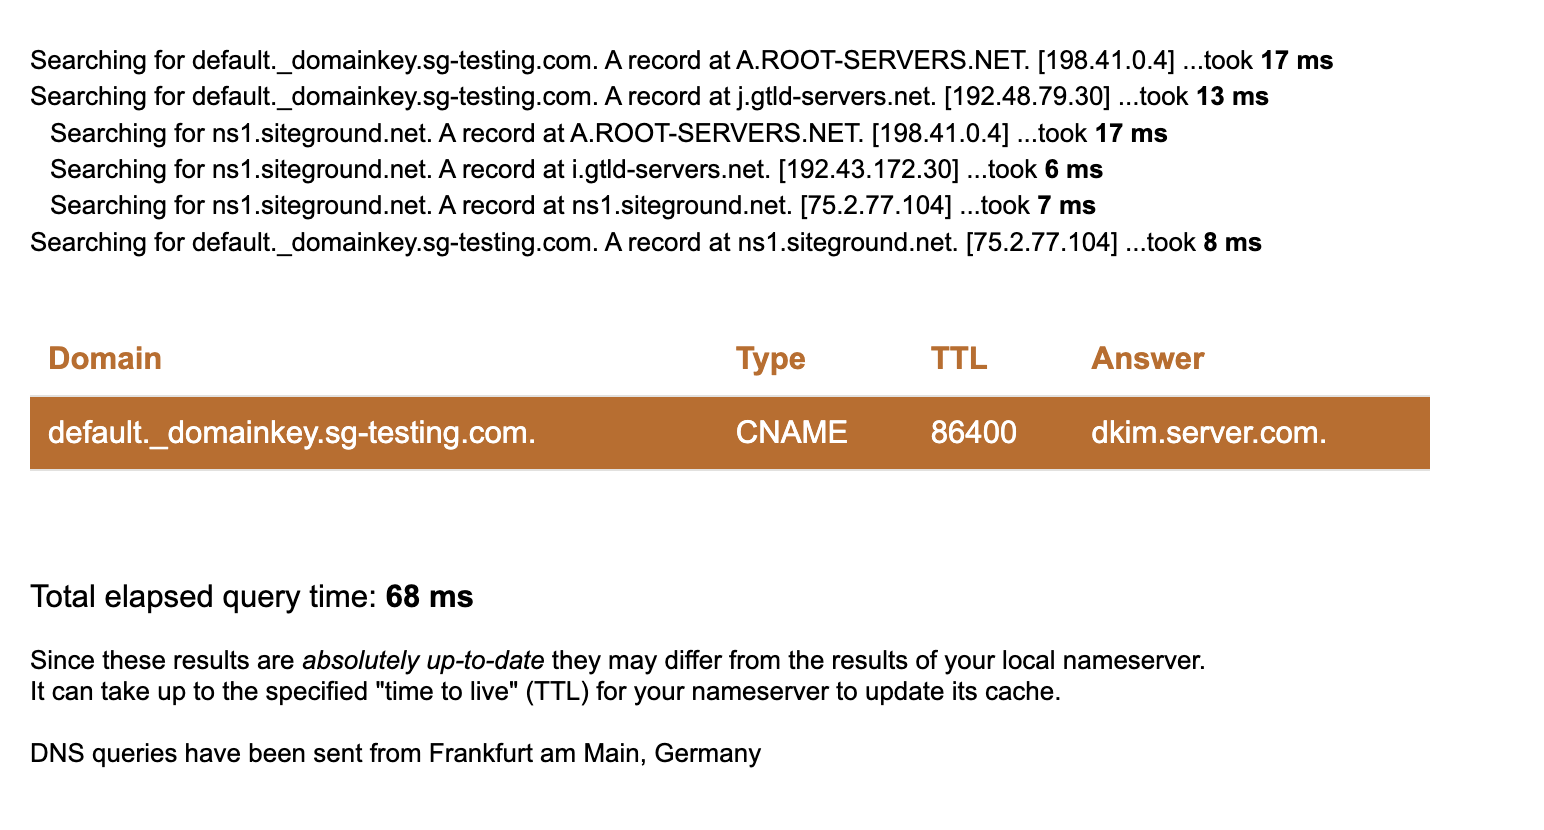
The email service provider determines the type of DKIM DNS record you must add to your DNS zone.
How do DKIM records work?
Sending a signed DKIM message
When DKIM is enabled, every email you send is signed with a digital signature. This signature contains selected parts of the email that are hashed and encrypted with the email server’s DKIM private key.
Before sending an email, the outgoing mail server adds the signature to the email headers. It is important to note that DKIM doesn’t encrypt the email message itself but only the digital signature.
Verifying a signed DKIM message
When an email recipient receives an email, their email server can look up the public key associated with the DKIM record of the email’s domain. The email server uses the public key to verify the mail’s signature and decrypt it. If the signature is valid, the recipient can be sure that the email was sent by the domain from which it claims to originate and that it hasn’t been modified in transit.
How does DKIM prevent domain spoofing?
Email spoofing is a scam tactic in which attackers send emails impersonating trusted brands or individuals. The end goal for them is to gain the trust of their victims and make them reveal sensitive information.
However, since scammers don’t have access to the authorized mail server of the domain they impersonate, they can’t use the DKIM private key. As a result, their emails don’t contain a valid digital signature matching the DKIM public key.
Therefore, when DKIM is enabled, recipients can verify if an email originates from the server of the claimed domain by checking the signature against the domain’s public key from the DKIM DNS record. The recipient can conclude that the email is forged if the signature doesn’t match the public key.
How do I add a DKIM record to my domain?
The DKIM record is a DNS record that authorizes an email server to send emails from your domain. Your email service must provide its details so you can add it to your domain’s DNS zone. The DKIM record could be a TXT or CNAME DNS record.
Once you have the record, you must access the control panel, where you manage your DNS zone. If your domain is pointed to SiteGround nameservers, navigate to Site Tools > Domain > DNS Zone Editor.
How to add a DKIM TXT record
In the section Create New Record, choose TXT to add the DKIM TXT record.
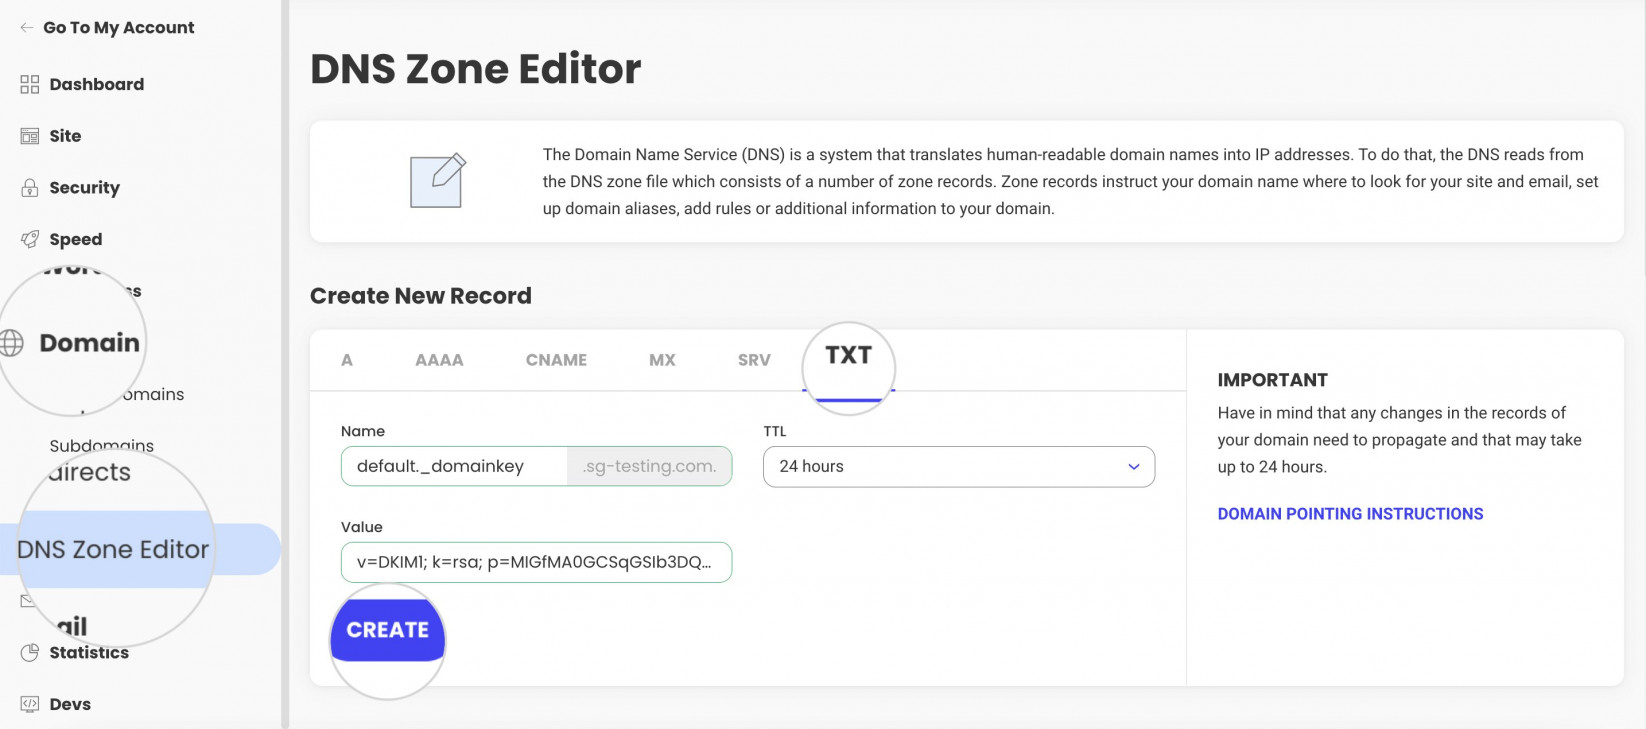
Every DKIM record has a distinct identifier called a DKIM selector. It is a prefix of your domain’s DNS record followed by another prefix _domainkey. Both must be submitted in the Name field of the TXT record in the format:
DKIM selector._domainkey.yourdomain.comIn Site Tools, the domain is automatically appended to the record’s name. Thus, when typing the name, omit your domain name and include only the part:
DKIM selector._domainkeyIn the Value field, place the DKIM record value. To confirm the record, click on the CREATE button.
Once created, the record will appear in your DNS zone editor.

How to add a DKIM CNAME record
If the required DKIM record is CNAME type, in the section Create New Record, choose CNAME.
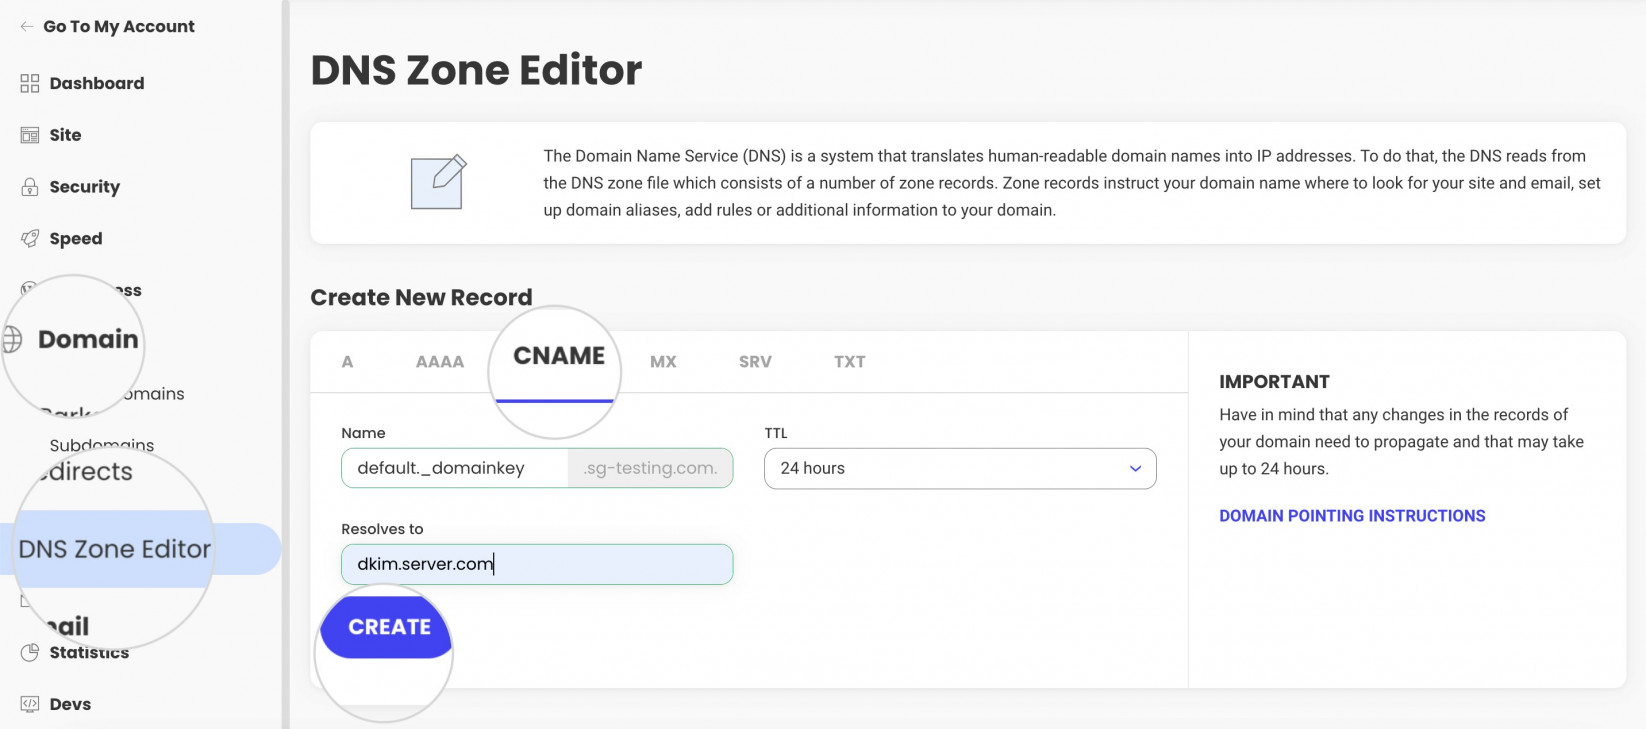
In the field Name, submit the DKIM name which is DKIM selector._domainkey. Just like TXT records, leave your domain name out of the CNAME record’s name. It is appended automatically to the name.
In the field Resolves to, add the address of the DKIM server. Press CREATE to confirm the CNAME record.
Once you add the record, you will see it in your DNS zone.

How to activate a DKIM record for SiteGround’s email service
If your domain is pointed to SiteGround nameservers and you use SiteGround’s email service, activating DKIM is quite simple.
The DKIM record is enabled by default, and you don’t need to do anything. You would only need to activate the DKIM record in case you disabled it previously or manually deleted the DKIM TXT record.
To check the record’s status, navigate to Site Tools > Email > Authentication. In the Authentication Settings section, select DKIM. Under the column Status, you will see the current state as ACTIVE or INACTIVE.
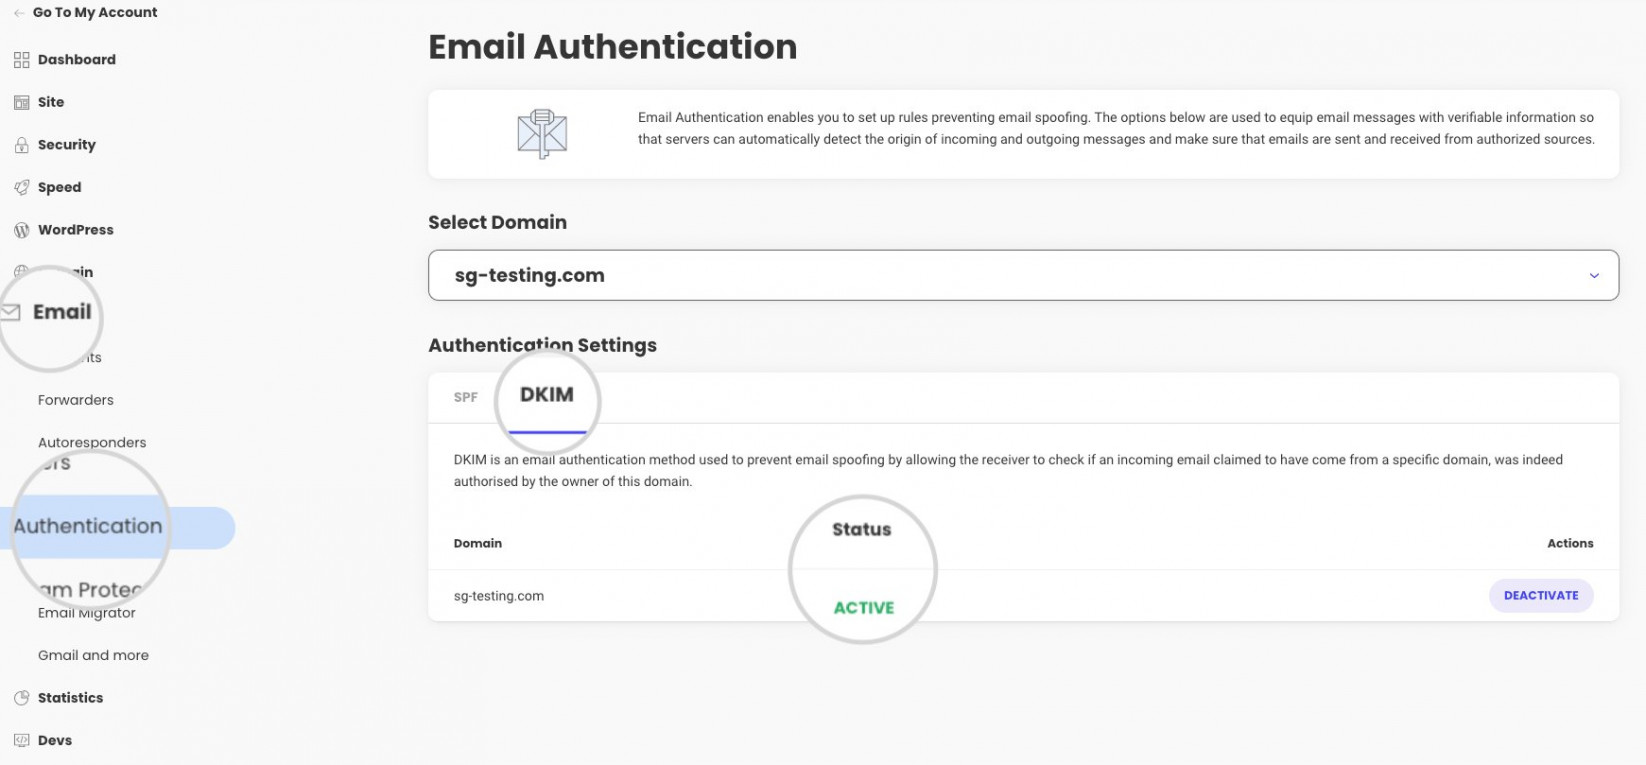
If the record is disabled, simply click the ACTIVATE button under the Actions column. The DKIM record will be automatically added to your DNS zone, and no further action will be required.

How can I test if I have set up DKIM correctly?
There are several ways to test if your server signs emails with valid DKIM signatures. You could inspect the email headers manually or use online DKIM checkers.
The manual way is to send an email to your address and check the headers of the received message to see if the DKIM signature is present and valid. For detailed steps, check out this guide on how to view email headers on different email clients.
An email with a valid DKIM signature should contain header fields similar to these:
ARC-Message-Signature: i=1; a=rsa-sha256; c=relaxed/relaxed; d=google.com; s=arc-20160816;

        h=message-id:references:in-reply-to:subject:to:from:date:mime-version

         :dkim-signature;

        bh=5rsMJhy76W3D/z8AJuih+X6wXiK/kovaUJAmSpGilNw=;

        b=T64jMkRn2Qxsf2VtXs5jDNcp/dTHWpfbcK8Y5nzz4md5uneJSc4VW52BRXMJIGxEq3

         vqyMgxIqPO/2xXodnRuKwh7/TTSo/oebaoFKVGXoVVxyzlTPoGokWpR9U057NTlFg4Pb

         JuZI7eF6QlbGGHXvFvqQJFFDWN5uOzzxDlmdLrARyWQfZSyWpyYW43XBJZlmMrnuequf

         4mOGCmcG9TZko46qDdYBr5GXMiQOqwZg48Zbo52YnI3kzgIlWWvPFyKJfG91cSeS+jQD

         aZZlnsDCcYgoIH2/IJAgDlHp+P/9E+XTg2WVRGwtpy0QPsWeLBwEKSTodw3bAQb2Wk0f

         NGTQ==

ARC-Authentication-Results: i=1; mx.google.com;

       dkim=pass header.i=@sg-testing.com header.s=default header.b=YW86hZW6;
Alternatively, you can test if you have set up DKIM correctly by using an online tool such as the one provided by MXToolBox. It can confirm that the public key is properly published in your DNS zone and that your email server signs outbound messages correctly.
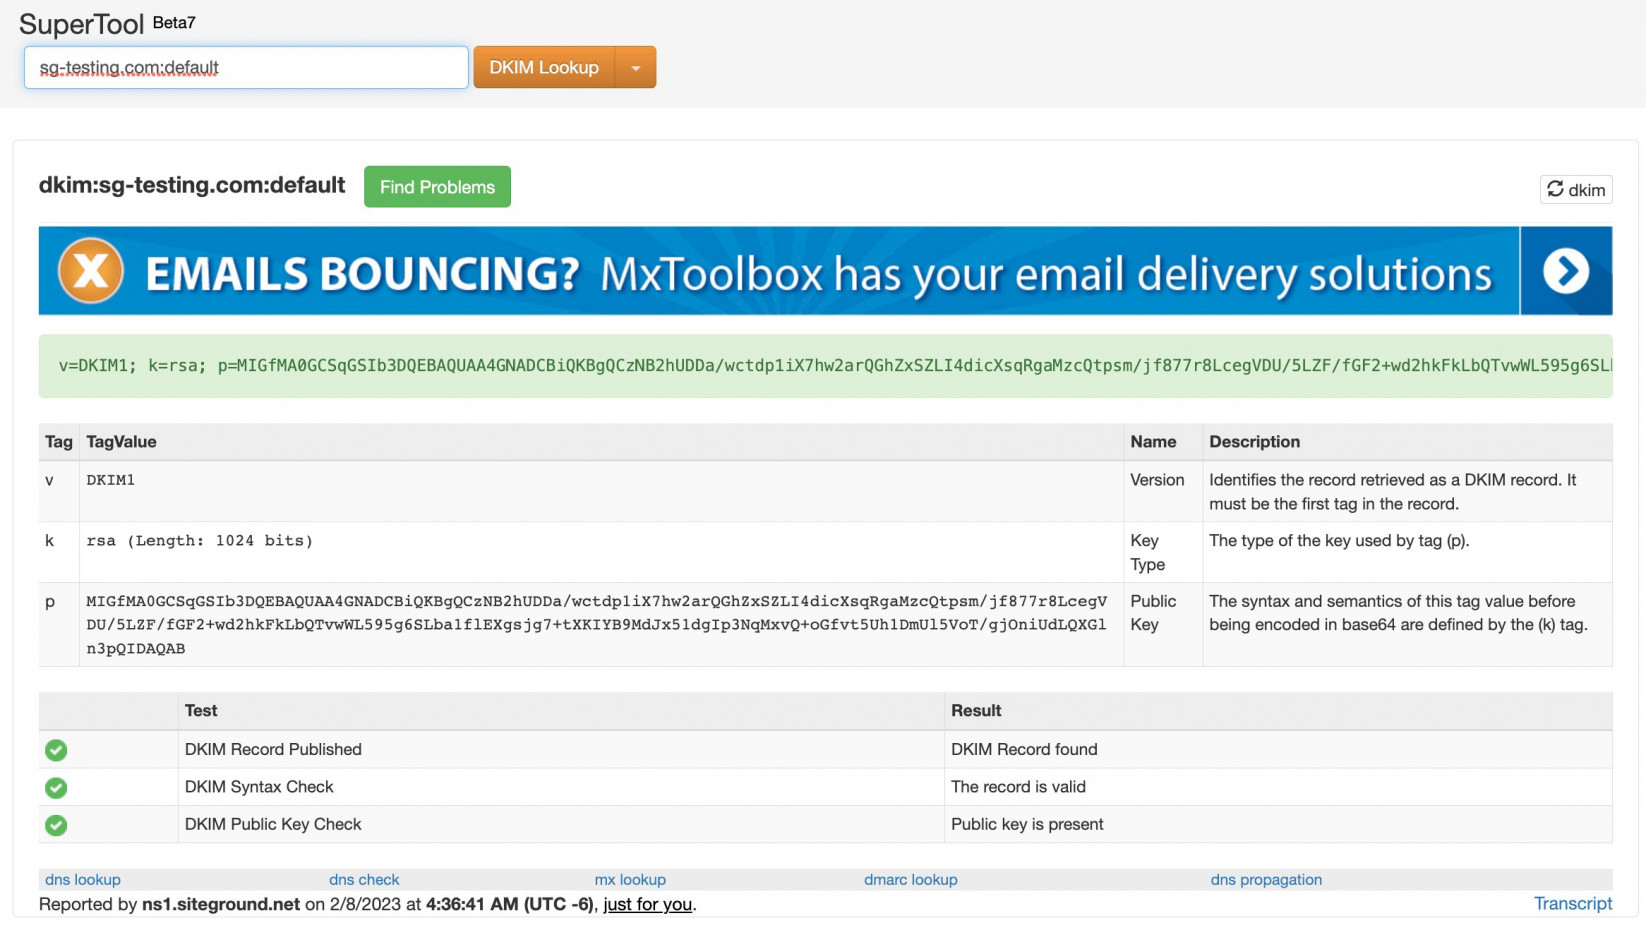
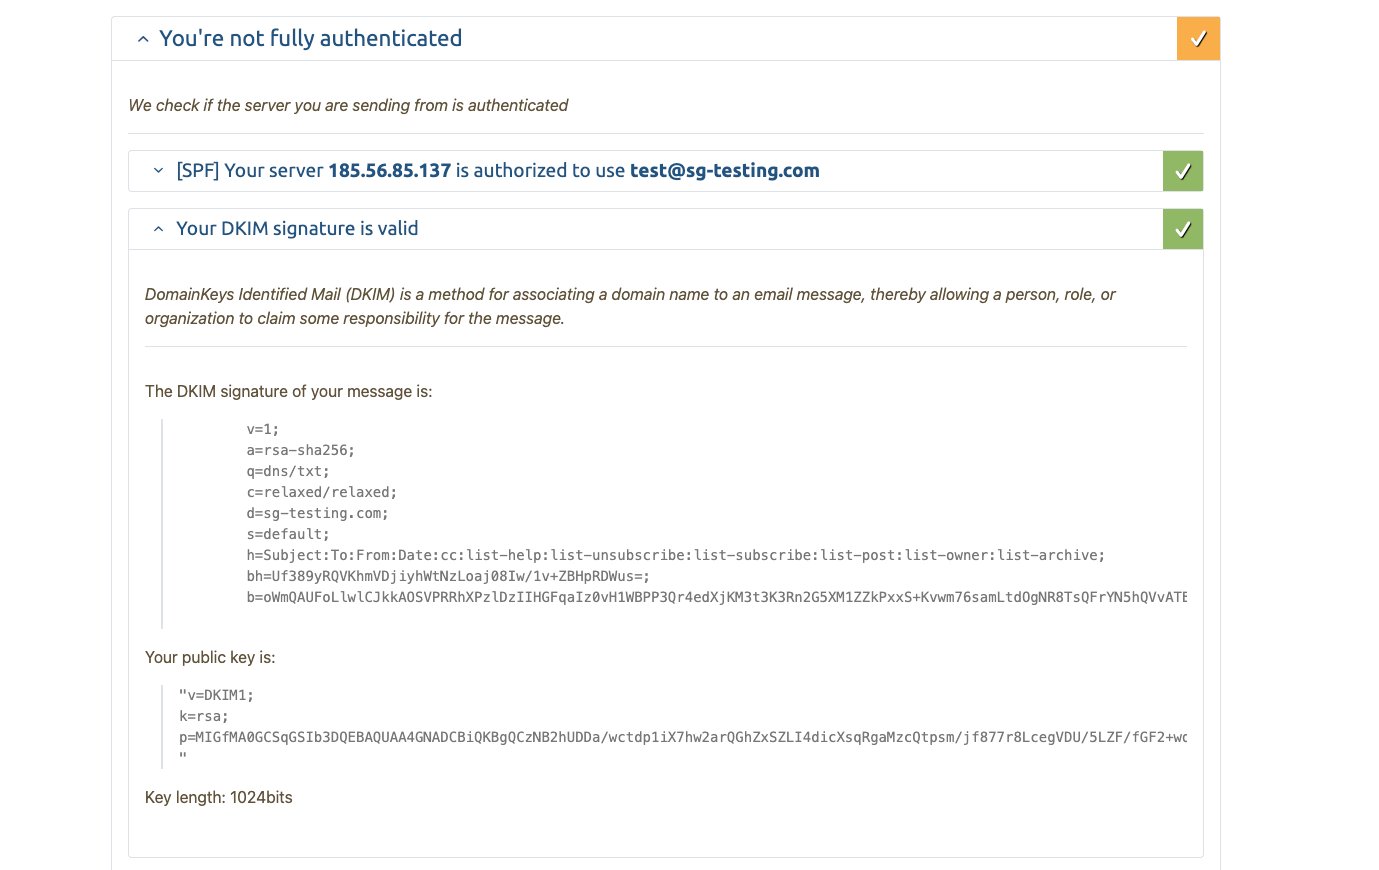
There are also other checkers like mail-tester.com. On this website, you will be instructed to send an email from your domain’s email to a designated test email address. After you send the email, the tool will generate a status report of all utilized email authentications, including DKIM.
Summary
DKIM is an email authentication mechanism instrumental in countering email spoofing and phishing. By implementing it for your domain name, you prevent scammers from impersonating your brand and protect your recipients from forged emails.
It is an important feature that every domain owner should consider incorporating. We hope this article helped you understand how DKIM works and how to enable it for your email service.