How to flush the DNS cache in Linux?
Table of Contents
Perhaps you have come to notice that websites you visit frequently load much faster than others. This happens due to the browser cache and the DNS cache your Linux Operating System collects. It allows your Linux machine to retrieve the DNS information locally, instead of waiting for the public DNS resolver.
Oftentimes, though, this DNS cache may get invalid or corrupted. This can lead to issues when loading your website in the browser. You have to instruct your Linux to flush the DNS cache on such occasions.
This article will focus on what is a DNS cache, how to determine the DNS resolver your Ubuntu is using, and how to flush the DNS in Linux Ubuntu.
The DNS cache is the temporary database of domain-to-IP translations your Operating System (OS) gathers.
The information stored in the DNS cache consists of Resource Records (RR) that hold the IP addresses of the domain names you frequently visit.
These records include requisites like Name, Record type, Time to Live (TTL), Class, Resource data, and Resource data length. Time to live (TTL) refers to the time (in seconds) a record is considered valid before a new DNS lookup has to be initiated. All that data in a record file is in ASCII code, and there is a separate line for each domain name in it. Here is what a common format of a Resource Record looks like:
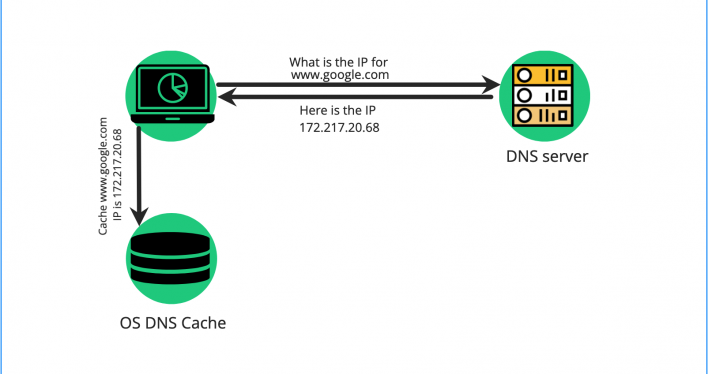
<name> <ttl> <class> <type> <rdlength> <radata>When you try to load a website, your browser sends a query to your OS that it needs the IP for this domain name. The OS sends this query to the local DNS resolver to find if there is such a Resource Record in the DNS cache.
If there is no record in the local cache, the OS will initiate a DNS lookup to the public DNS server and wait to receive the domain’s server IP address. Once this data is delivered, the OS stores it in the DNS cache for further use.

In case the DNS cache has a record for the domain at hand, the browser will serve the website’s content faster. Hence, the DNS cache streamlines the DNS lookup process and acts as an accelerator, improving your overall browsing experience.
However, as we mentioned earlier, the DNS cache is a temporary stack of DNS records, and as such, it may expire or become corrupted. When that happens, you may not be able to reach your website or any other of your favorite websites due to various DNS errors.
These errors may be related to DNS propagation or DNS spoofing attacks. You may as well be keen on your privacy, and resetting the DNS cache records frequently could help with that matter.
To amend an issue of this sort, you should force a DNS flush on your Linux machine. That will clear the outdated information, and your OS will start generating new records to cache the results of further DNS queries.
Find your local DNS resolver
Different versions of the most commonly used Linux distribution, Ubuntu, may use various services as a DNS resolver. Most Linux systems use systemd-resolved or dnsmasq as their DNS resolver application.
Therefore, the first thing you need to do before engaging with a Linux DNS flush is to check what DNS resolver your system uses.
To do that, you will need to load the Terminal, and the easiest way to do that is using the key combination of Ctrl +Alt +T.
Then type the following command:
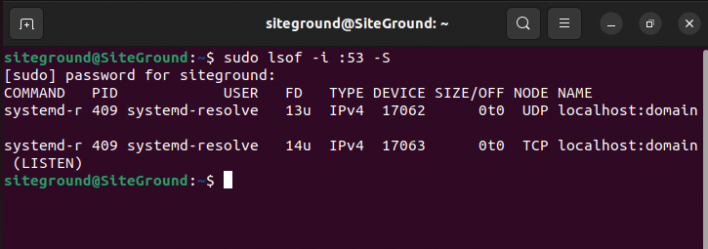
sudo lsof -i :53 -SThe command will output all services listening to port 53 – the server port reserved for DNS. This way, you can see which is the DNS resolver your Linux is using in order to clear its DNS cache.

As seen from the screenshot above, on the most recent Ubuntu release (22.04), the service listening on the DNS port 53 is systemd-resolved. This is the configuration for all Ubuntu versions since the 18.04 release.
Prior releases may work with dnsmasq DNS resolver, and if that is the case for you, the command’s output will look like in the screenshot below:

Having figured out which DNS resolver your system is using, you can proceed with the correct flush DNS command for your Linux.
How to flush the DNS cache on Linux?
In this section, you will find the commands you can use to flush the DNS cache on different Linux configurations below.
Flush Linux DNS using systemd-resolved
If your Linux system is systemd-resolved service, you can use one of the following commands in the Terminal window:
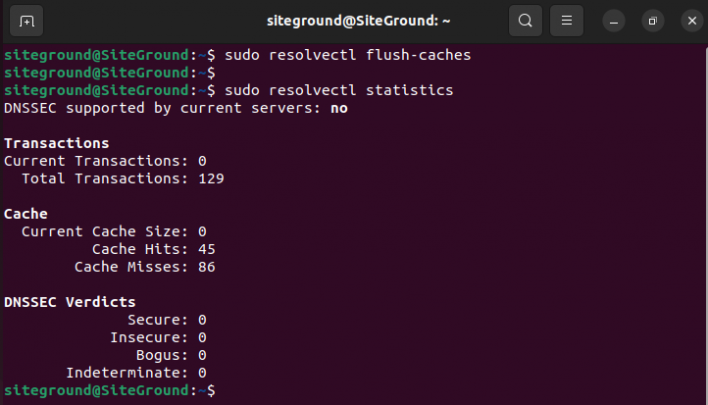
$ sudo resolvectl flush-caches$ sudo systemd-resolve --flush-cachesNote that none of the commands above provide any output for confirmation. However, you can use the following corresponding commands to check the Current Cache Size value.
$ sudo systemd-resolve --statistics$ sudo resolvectl statisticsHere is how the output with the Current Cache Size value looks like:

Clear DNS cache using signals
Alternatively, clear the DNS cache in a system using systemd-resolved by sending a “USR2” signal to the DNS resolver.
$ sudo killall -USR2 systemd-resolvedAfterward, use the signal “USR1” to instruct the service to dump its current state into the systemd-journal. You can do this by running the following two commands consecutively. The output will show you the log confirming the cache flush.
$ sudo killall -USR1 systemd-resolved$ sudo journalctl -r -u systemd-resolvedFlush DNS using dnsmasq
Provided that your machine uses “dnsmasq” to resolve DNS, you can execute the command as shown below.
$ sudo killall -HUP dnsmasqAs the execution of this command does not output confirmation, you can again use a “USR1” to signal the process. This will log the statistics into the “syslog” file. Using a “tail” command will show you that the cache size is 0.
$ sudo killall -USR1 dnsmasq
$ tail -f n1000 /var/log/syslog |grep "cache size"
Dnsmasq running a service
On certain occasions, Dnsmasq may be running as a service on your server. To check whether the dnsmasq is active, you can execute this command:
$ sudo systemctl is-active dnsmasqFor systems based on SysVinit, you can see if dnsmasq is on, and proceed with the command below:
$ sudo service dnsmasq statusDepending on your type of system configuration, you can use one of the subsequent two commands to restart the service.
$ sudo systemctl restart dnsmasq$ sudo service dnsmasq restartRestarting the Dnsmasq service will reset the collected cache in your system.
Clear DNS cache using Nscd in RedHat
In case you are using the RedHat Linux distribution, it is most likely running the Name Server Cache Daemon (Nscd). You can flush the DNS cache of that service by executing one of the commands outlined here.
$ sudo systemctl restart nscd.service$ sudo service nscd restartClear DNS cache on Google Chrome
Besides the operating system’s DNS cache, the Google Chrome browser is also stacking DNS cache. To ensure that Chrome’s DNS cache is not obstructing you from accessing your website, you should flush it.
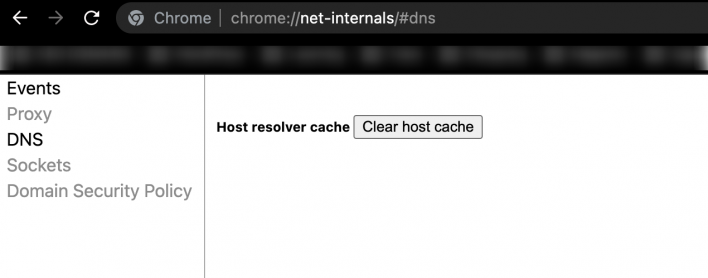
You need to open the Chrome browser and paste this into the address bar:
chrome://net-internals/#dnsThis will forward you to Chrome’s internal network settings page. Click the “Clear host cache” button to flush the cache.

To sum it up, if you are experiencing any DNS errors or dealing with DNS propagation, you should flush your Linux DNS cache. Moreover, clearing this cache can help address DNS spoofing issues or help build a secure network experience for yourself. Following the steps described in this article will help you do that independently and resolve any such issues.