Understand DNS Propagation & Why it Takes so Long
Table of Contents
DNS propagation is an important part of managing your domain name that can sometimes be confusing. It’s a complex topic, but understanding it can greatly benefit your online presence.
This guide will teach you the basics of DNS propagation, which can greatly improve your ability to manage your domain name. By reading on, you’ll better understand DNS propagation and learn how to make changes to your domain name more efficiently.
DNS servers are responsible for the mapping of domain names to IP addresses. In essence, DNS propagation is the time required for DNS servers worldwide to update their cached information for a domain name.
How does DNS propagation work?
The DNS system is a decentralized network of computers (servers) that streamlines the DNS resolution process. Spreading across servers worldwide, it provides scalable, reliable, and efficient domain-to-IP translation services. Thanks to it, users from everywhere can access websites by simply typing a domain in their web browser.
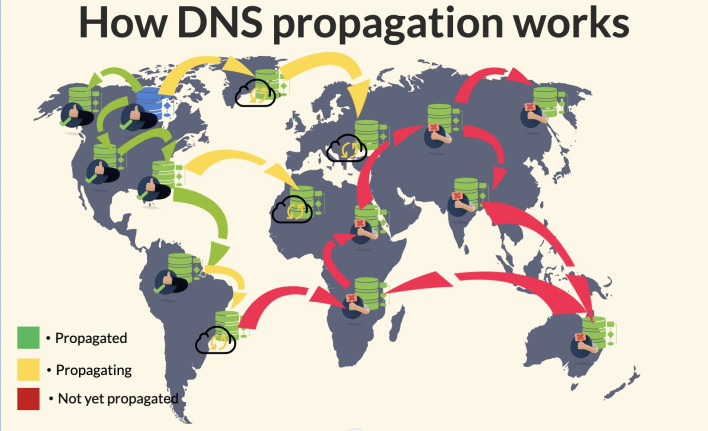
When you change your domain’s DNS, it is sent to its Authoritative DNS server. That is the DNS server which is responsible for storing and updating your domain’s DNS information. When this DNS server updates its records to reflect the changes, it broadcasts the new data to other servers.
Other DNS servers periodically check with authoritative DNS servers for updates. When they detect a change, they request the latest information (DNS lookup/resolution). Typically, that happens when the Time to Live (TTL) set for the domain’s DNS record expires. Afterward, they store this new information in their DNS cache for future use.
Then each DNS server with updated information starts propagating it to the DNS servers they are connected to. Eventually, the updated information reaches all servers worldwide. Understandably, that may take a while until the information propagates across all servers on the web.
Factors affecting the Domain propagation period
The amount of time it takes for the propagation period to complete can vary based on several factors. These include the Time to Live (TTL) of the DNS record, the record type, the DNS cache, and network conditions.
The TTL is the amount of time a DNS server caches a DNS record before it needs to be updated. A lower TTL will result in faster propagation. Additionally, record types such as A or MX records tend to propagate faster than NS records due to their lower TTL.
DNS cache and network conditions can also affect the propagation period. Despite potential delays caused by the many servers involved, DNS propagation will eventually take effect and ensure a seamless browsing experience for users.
Why DNS propagation takes so long?
DNS propagation can take some time to complete because it involves updating information on many servers across the internet. DNS records, like IP address, must be updated on all servers resolving your domain name.
Even after making a change, some servers may still have outdated information, leading to inconsistencies in DNS resolution and longer propagation times.
In some instances, network issues or other technical problems may cause DNS propagation delays.
How to speed up DNS propagation – 3 Methods
Method #1 – Decrease the Time-to-Live (TTL) value
One of the best ways to speed up your DNS propagation is the decrease the Time-to-Live value, also known as TTL. One way to do this is by lowering the TTL value for your records a day before implementing the change.
This will help the updated records propagate faster, allowing a smoother transition for both search engines and website visitors. Once the change has taken effect, you can return the TTL value to the default.
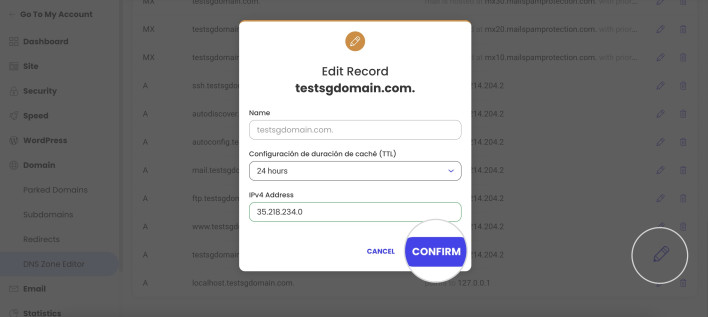
TTL’s value is specified in seconds, and at SiteGround, the default TTL value is set to 24 hours. To set a lower TTL value for a particular record type from your Site Tools, navigate to the DNS Zone Editor tool. Then select the record and choose a 15-minute value for TTL from the respective drop-down menu.
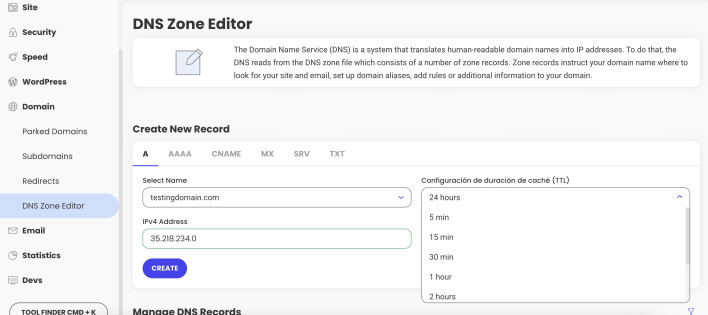
When the propagation completes, return to the DNS Zone editor and set the TTL value back to default.
If propagation is taking too long despite lowering the TTL value – keep reading to learn more ways to speed it up.
Method #2 – Flush Your Local DNS Cache
Flushing your local DNS cache is a quick way to ensure that your device uses the latest version of your domain’s DNS records. By clearing your cache, you can avoid potential errors when accessing your website.
This step is crucial for website owners and developers, as it ensures they see the site’s most up-to-date version. It’s also a good practice for website visitors, as it improves their overall browsing experience.
Read our detailed guides on flushing local DNS cache in various OS.
Method #3 – Flush the cache of public DNS databases
Another way to speed up DNS propagation is to flush the DNS cache from popular public databases like Google or OpenDNS. This ensures that these databases use the most recent version of your domain’s DNS records. Hence, it promotes both accurate search results and a positive customer experience.
- Clear Google’s public DNS cache.
To do that, navigate to Google’s Public DNS console, type your domain with record type, then click the Flush cache button.
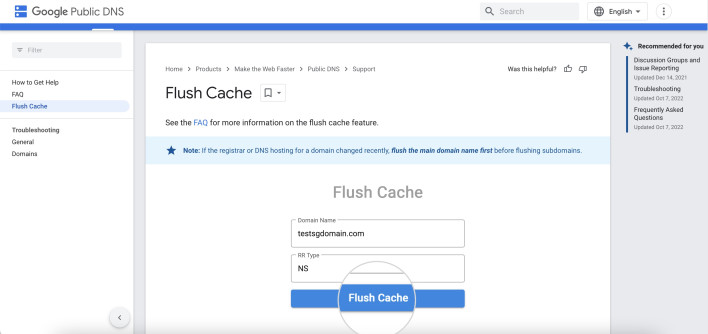
By doing that, you are prompting Google to update its DNS cache with the present-day information.
- Flush OpenDNS cache
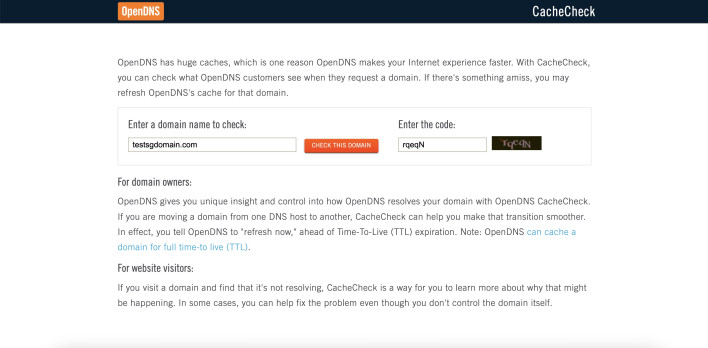
OpenDNS has a large DNS cache database that improves your internet experience by streamlining DNS resolution. Thus, clearing the cache of this public DNS database for your domain name can help expedite propagation.
To flush the OpenDNS cache, simply enter your domain name and click the Check this domain button.
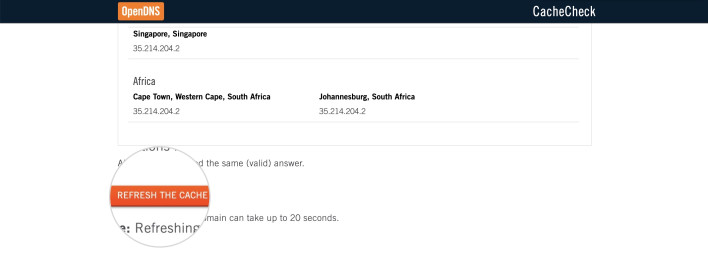
OpenDNS checks whether your domain resolves with the same result for all locations and if it is a valid one. Then click the Refresh the cache button to update OpenDNS’ records database for your domain, which may take up to 20 seconds.
Taking these steps ensures faster and smoother propagation for your domain name. Read further to learn how to check whether your domain has propagated correctly.
How to check if DNS propagation is complete
Checking the progress of your DNS propagation is an essential step in ensuring that your changes have taken effect. A few tools available can help you check if the propagation is complete, including online propagation checkers and command line tools.
These tools can provide you with a quick and easy way to verify the status of your DNS changes, giving you peace of mind.
Check DNS propagation with a web tool
Using a web tool to check your DNS propagation is a convenient and accessible way to monitor the progress of your changes. These tools provide real-time information about DNS records, allowing you to easily track the spread of your updates across the internet.
DNS propagation checkers help you stay informed and ensure that your website and email remain accessible to your audience. For instance, Google provides a simplistic and easy-to-use DNS checker, which you can check out.
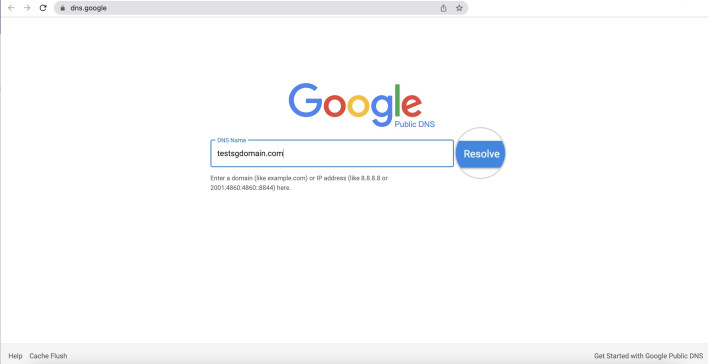
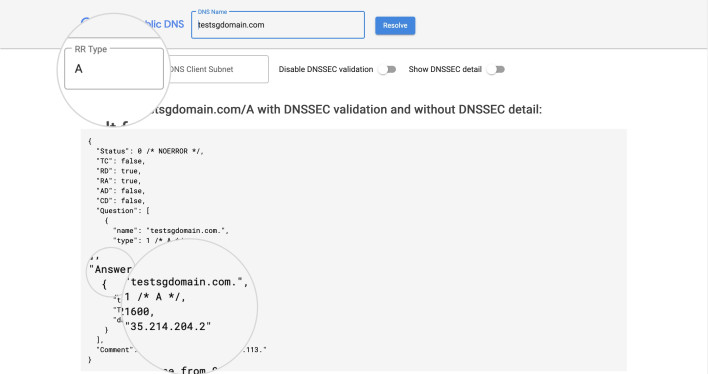
Google will do a DNS lookup for your domain and provide you with the results. As you see in the screenshot below, by default, it displays the A record (IP address) the domain corresponds to. You can check other DNS record types as well by typing their symbol in the RR Type field.
Congratulations! Now you know all the tricks to track the status of your domain’s DNS propagation.
Summary
In short, DNS propagation is the process of updating your domain’s DNS records across all servers on the web. Typically, it may take up to 48 hours, but in some cases, it can take up to 72 hours. It may seem like a long wait, but there are reasons for it.
Various factors like the Time-to-Live value and DNS cache affect the propagation speed. With the tips you found here, you’ll be able to speed up your domain’s global DNS propagation and minimize the wait time. Thus, this guide is a must-read for anyone who wants to understand and optimize DNS propagation to deliver a seamless user journey.