How to clear the DNS cache in Windows 10?
Table of Contents
Similar to web browsers, a computer’s operating system (OS) stores a cache for the web pages you visit. However, the DNS cache records may become out-of-date or corrupted. If you are having trouble reaching a website, the culprit may be a compromised DNS cache on your computer. Therefore, resetting it may fix the issue you are experiencing.
This article will go over the steps on how to flush your Windows OS DNS cache and how to do that on different Windows OS versions. We will also provide insight into the DNS cache and how it works.
How Does a DNS Cache Work?
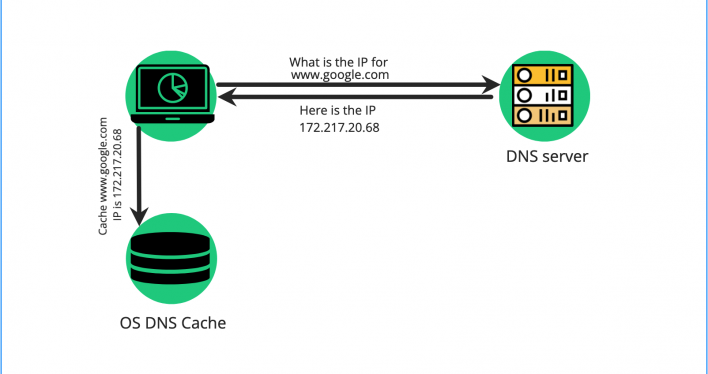
The DNS cache is a local storage of DNS records maintained by the operating system. The DNS cache contains the Resource Records (RR) of the domains you have previously visited and their IP address translations.
When you access a web page, your computer’s OS initiates a DNS lookup for the domain. First, it checks whether the DNS cache contains records for the requested domain name. If no data is available locally – the OS queries the DNS server for the domain’s IP translation. The DNS server then returns the information, and the OS cumulates it in the DNS cache for future use.
When you ask for the same website – your OS will use the cached DNS records. Fetching the resource records for a domain from the DNS cache speeds up the DNS lookup process. With DNS cache, your browsing experience is faster and smoother.
The DNS cache Resource Records incorporate the following data per domain name, coded in ASCII:
| Field | Description |
| Name | The domain name you are entering in the browser. |
| Record type | This is the type of DNS record fetched from the DNS zone file. |
| Time to live (TTL) | TTL determines how long the resource record is valid in seconds. After that time expires, it can not be sure whether the Resource Record is updated. |
| Class | There are different classes of DNS records, and the most common class refers to the internet “IN” |
| Resource data (or rdata) | This identifies the hostname or the IP address translation of a domain name. |
| Resource data length (rdlength) | This field stores the length of the resource data field. |
Although your OS is also automatically resetting the DNS cache on schedule, there are a few reasons to manually prompt Windows to clear the DNS cache.
When should I clear my Windows DNS cache?
If you change your domain’s DNS records and point them to a new server, the domain enters the so-called DNS Propagation period. While the process is ongoing, the DNS cache on your computer is practically outdated.
As a result, you may also encounter DNS errors on your website while it is available for everyone else. Flushing your computer’s DNS cache will refresh that information, eventually speeding up the DNS propagation period.
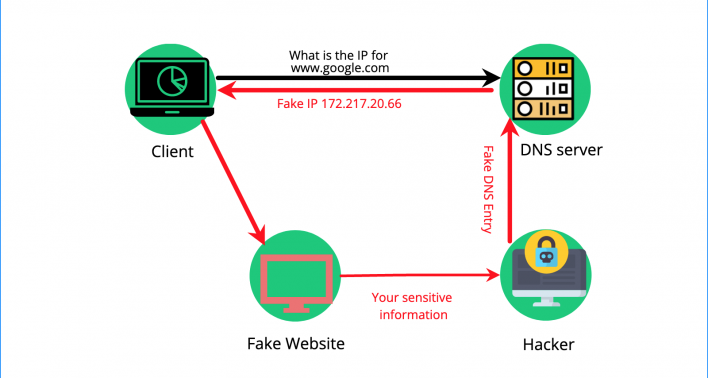
Another good moment to clear your DNS cache is to avert a DNS spoofing/poisoning attack. In DNS poisoning attacks, hackers inject a spoofed DNS record into the DNS cache resource records. With this technique, they can redirect you to fake websites and lure you into providing personal information or infect your computer with malware.
Furthermore, since the DNS cache on your PC is practically the history of your search requests, you may consider keeping it private. To endorse your network security, you should frequently clear Windows’ DNS cache.
Is it safe to reset the DNS cache?
It is safe and recommended to regularly remove the DNS cache on your computer. It improves your network security and prevents cyberattacks. It can also help with DNS errors or propagation.
How to flush DNS cache in Windows 10?
Regardless if you are using Windows 10 or Windows 11 – the steps to remove the DNS cache are identical. You can use various applications on a computer with either version to perform this operation.
Using Command Prompt
The typical approach to clear the DNS cache on Windows 10 and 11 is through the Command prompt. This command-line interpreter is present on most Windows versions, although the steps to open it are different depending on the OS version. For Windows 10 and 11, you can locate the Command prompt and flush the DNS cache by following the steps below.
- In the Windows Search bar, type “cmd” to find the Command Prompt:
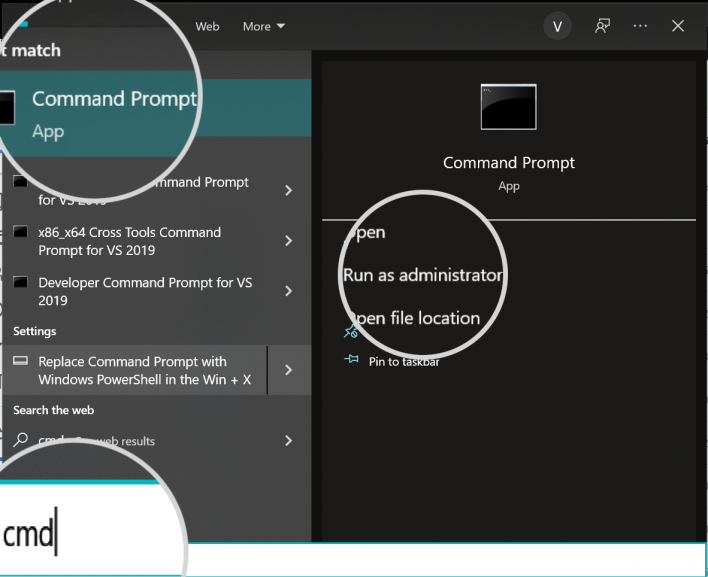
-
- Select the “Run as administrator” option on the right to load the cmd in Admin mode.
- When the Command line windows loads, type the following command
ipconfig /flushdns
- Next, hit the Enter key to execute the command

- A message “Successfully flushed the DNS Resolver Cache” will appear to inform you that the Command prompt has executed your command.
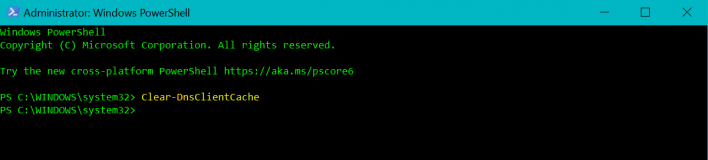
Via Windows PowerShell
Another application you can use to reset the DNS cache records on a Windows 10 or a Windows 11 PC is Windows PowerShell. Follow the instructions below to learn how to do that.
- You will need to type the app name in the Windows Search bar to initiate it. Then click on the Windows PowerShell in the suggestions and select to run it in Administrator mode from the right-hand-side menu.
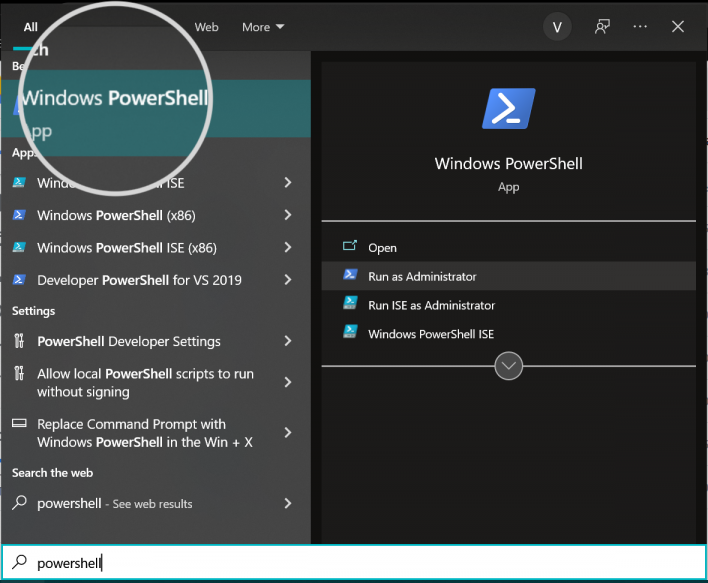
-
- When the command line window opens up, type ( or copy/paste) the following command:
Clear-DnsClientCache
- After PowerShell has executed your order, another command line will come up without any other confirmation output.
This process will flush the DNS cache on your Windows PC.
Using the Run command tool
A third option is to use the Run dialog box to execute the command ipconfig /flushdnscache. This approach does not require opening a command line window to perform the operation.
- To launch the Run dialog box, you can use a shortcut key combination – press the Windows button + R key.
- Type ( or paste) the command in the appropriate command box:
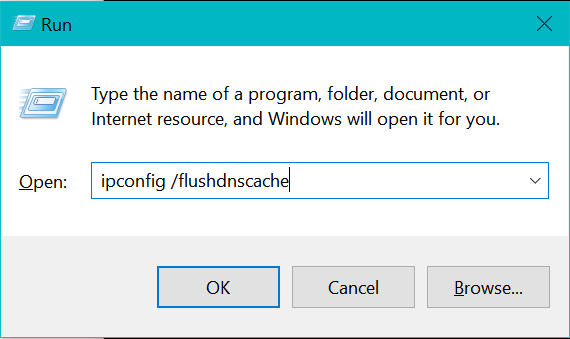
The Run tool will effectuate your query to flush the DNS cache without outputting a success notification.
How to clear the DNS cache on Windows 8 and Vista?
When using a computer with Windows 8 or Windows Vista, you can flush the DNS cache by following the guideline below.
- Click on the Start button
- In the Search field, type “Cmd,” and the Command prompt will come up in the suggestions
- Right-click on it and select “Run as administrator”
- Type “ipconfig /flushdnscache” in the command line window and press Enter
- You should receive a “Successfully flushed the DNS Resolver Cache” notice.
Flush the DNS cache in Windows 7 and Windows XP
- Open the Start menu,
- Click Run
- In the Run dialog box, type “cmd,” and press Enter. This will launch the Command prompt.
- In the Command Prompt window, type the command ipconfig /flushdns and press Enter.
- A message of successful completion will be output.
Clear Google Chrome’s DNS cache
Apart from the local DNS cache gathered by the OS, the Chrome browser also stacks a DNS cache. To flush Chrome’s DNS cache, type the following in the address bar:
chrome://net-internals/#dns
Then, simply click on the “Clear host cache” button:
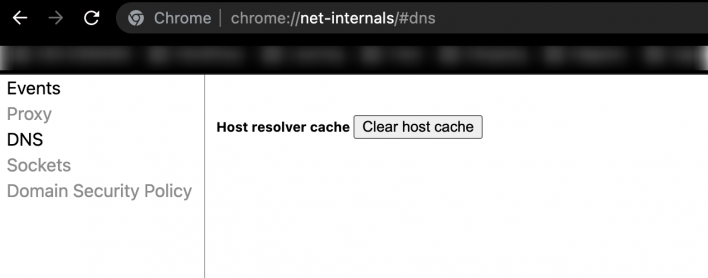
This action will reset the cached DNS information the browser has collected.
To summarise, we can confidently say that clearing your local DNS cache is a helpful strategy when dealing with DNS propagation, DNS errors, or even enhancing your network security.