Home
/
How To Use SiteGround Staging Tool
/
How to create a Staging copy of your site?

How to create a Staging copy of your site?

Create a staging copy in Site Tools – Video Guide

Creating staging copies of your website is really easy and straight forward. Follow these instructions and you will be working on the new development copy of your site in no time.

Important! To ensure the stability and optimal performance of our servers the following limitations apply to the Staging service:

  • The site database has to be under 2GB
  • You must have under 500 tables in your database
  • You must have more than 51% free space in your account
  • You must have more than 20% free inodes in your account
  • You can have up to 10 staging environments per account
  • You can make up to 15 staging operations daily
  • The Staging tool is also not compatible with WordPress Multisite at the moment

Important! Our staging tool relies on subdomains. For the smoothest experience with the tool, we recommend that you point your domain’s nameservers to SiteGround. If your domain name is not pointed to our nameservers, you need to manually create stagingX.yourdomain.com and www.stagingX.yourdomain.com by adding an A record for them in the domain name’s active DNS zone with the current DNS provider.

Choose the WordPress Installation you want to work on

Creating a Staging copy of your site is very simple. Choose your WordPress install that you want to work on from the drop-down menu, or add it if it is missing, set your preferred Staging Name and click on Create.

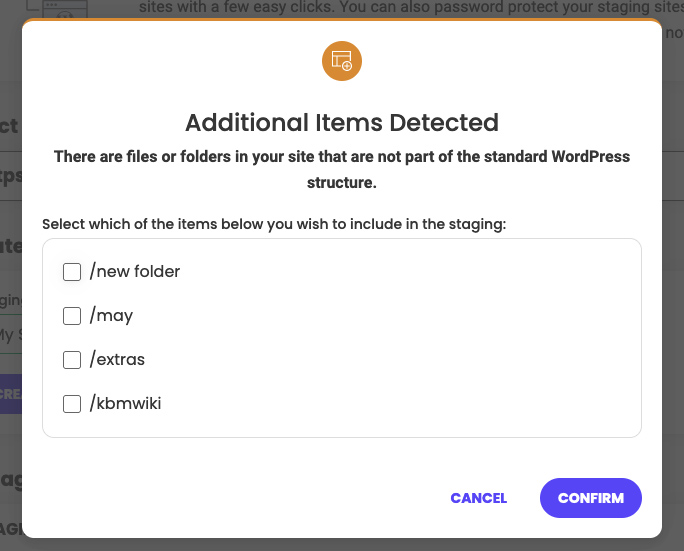
Choose what to be included in the Staging copy

Our tool will analyze the folder your application is installed in. If there are any files or folders in the root directory of your site that aren’t part of the default application structure, you will be asked whether you want these added to the staging copy or not. For example, if you have uploaded a folder with family photos, you wouldn’t want those to be copied in the staging environment, because they won’t be part of the site you’re developing. On the other hand, if you’re including a JavaScript, images, or other resources from such folder or even from the root directory of your site – place a check next to their names and they will be added to the staging copy. After you decide which of those you need, click on Confirm to proceed.

Important If you don’t have any files outside the default WordPress directory structure, you won’t see this notification and your staging copy will be created right away.

Staging copies have their WordPress default cron job functionality disabled in order to prevent unwanted duplicated automated actions from WordPress on the staging site like charging credit cards, sending emails for order updates, invoices or newsletters, etc. If you experience any problems due to the default WordPress cron job functionality being disabled you can reenable it.

That’s it, the staging copy of your WordPress site is now ready!

Share This Article