How to use WordPress robots.txt - Best Practices and Examples
Table of Contents
WordPress robots.txt file is essential for improving your site’s SEO. Understanding and properly configuring a robots file helps search engines engage better with your WordPress website.
In this article, we’ll walk you through the best practices and provide examples to ensure search engines crawl your content effectively. Focusing on key areas can enhance your site’s performance and visibility in search results.
WordPress comes with a built-in feature that generates a robots.txt file dynamically – this isn’t a physical file stored on your server. This means that WordPress automatically creates a virtual file upon a crawl request from a search engine bot.
Blocking the crawl of a page in robots.txt doesn’t explicitly mean that Google will not index it if there are other pages linking to it. Moreover, Google recommends using other methods (like “nofollow“) to restrict page crawling.
What’s inside the robots.txt?
The default robots.txt file generated by WordPress is designed to allow search engine bots to crawl most of your website. At the same time, it restricts access to areas that are not beneficial to WordPress SEO or contain sensitive information.
The default virtual robots.txt content provided by WordPress looks something like this:
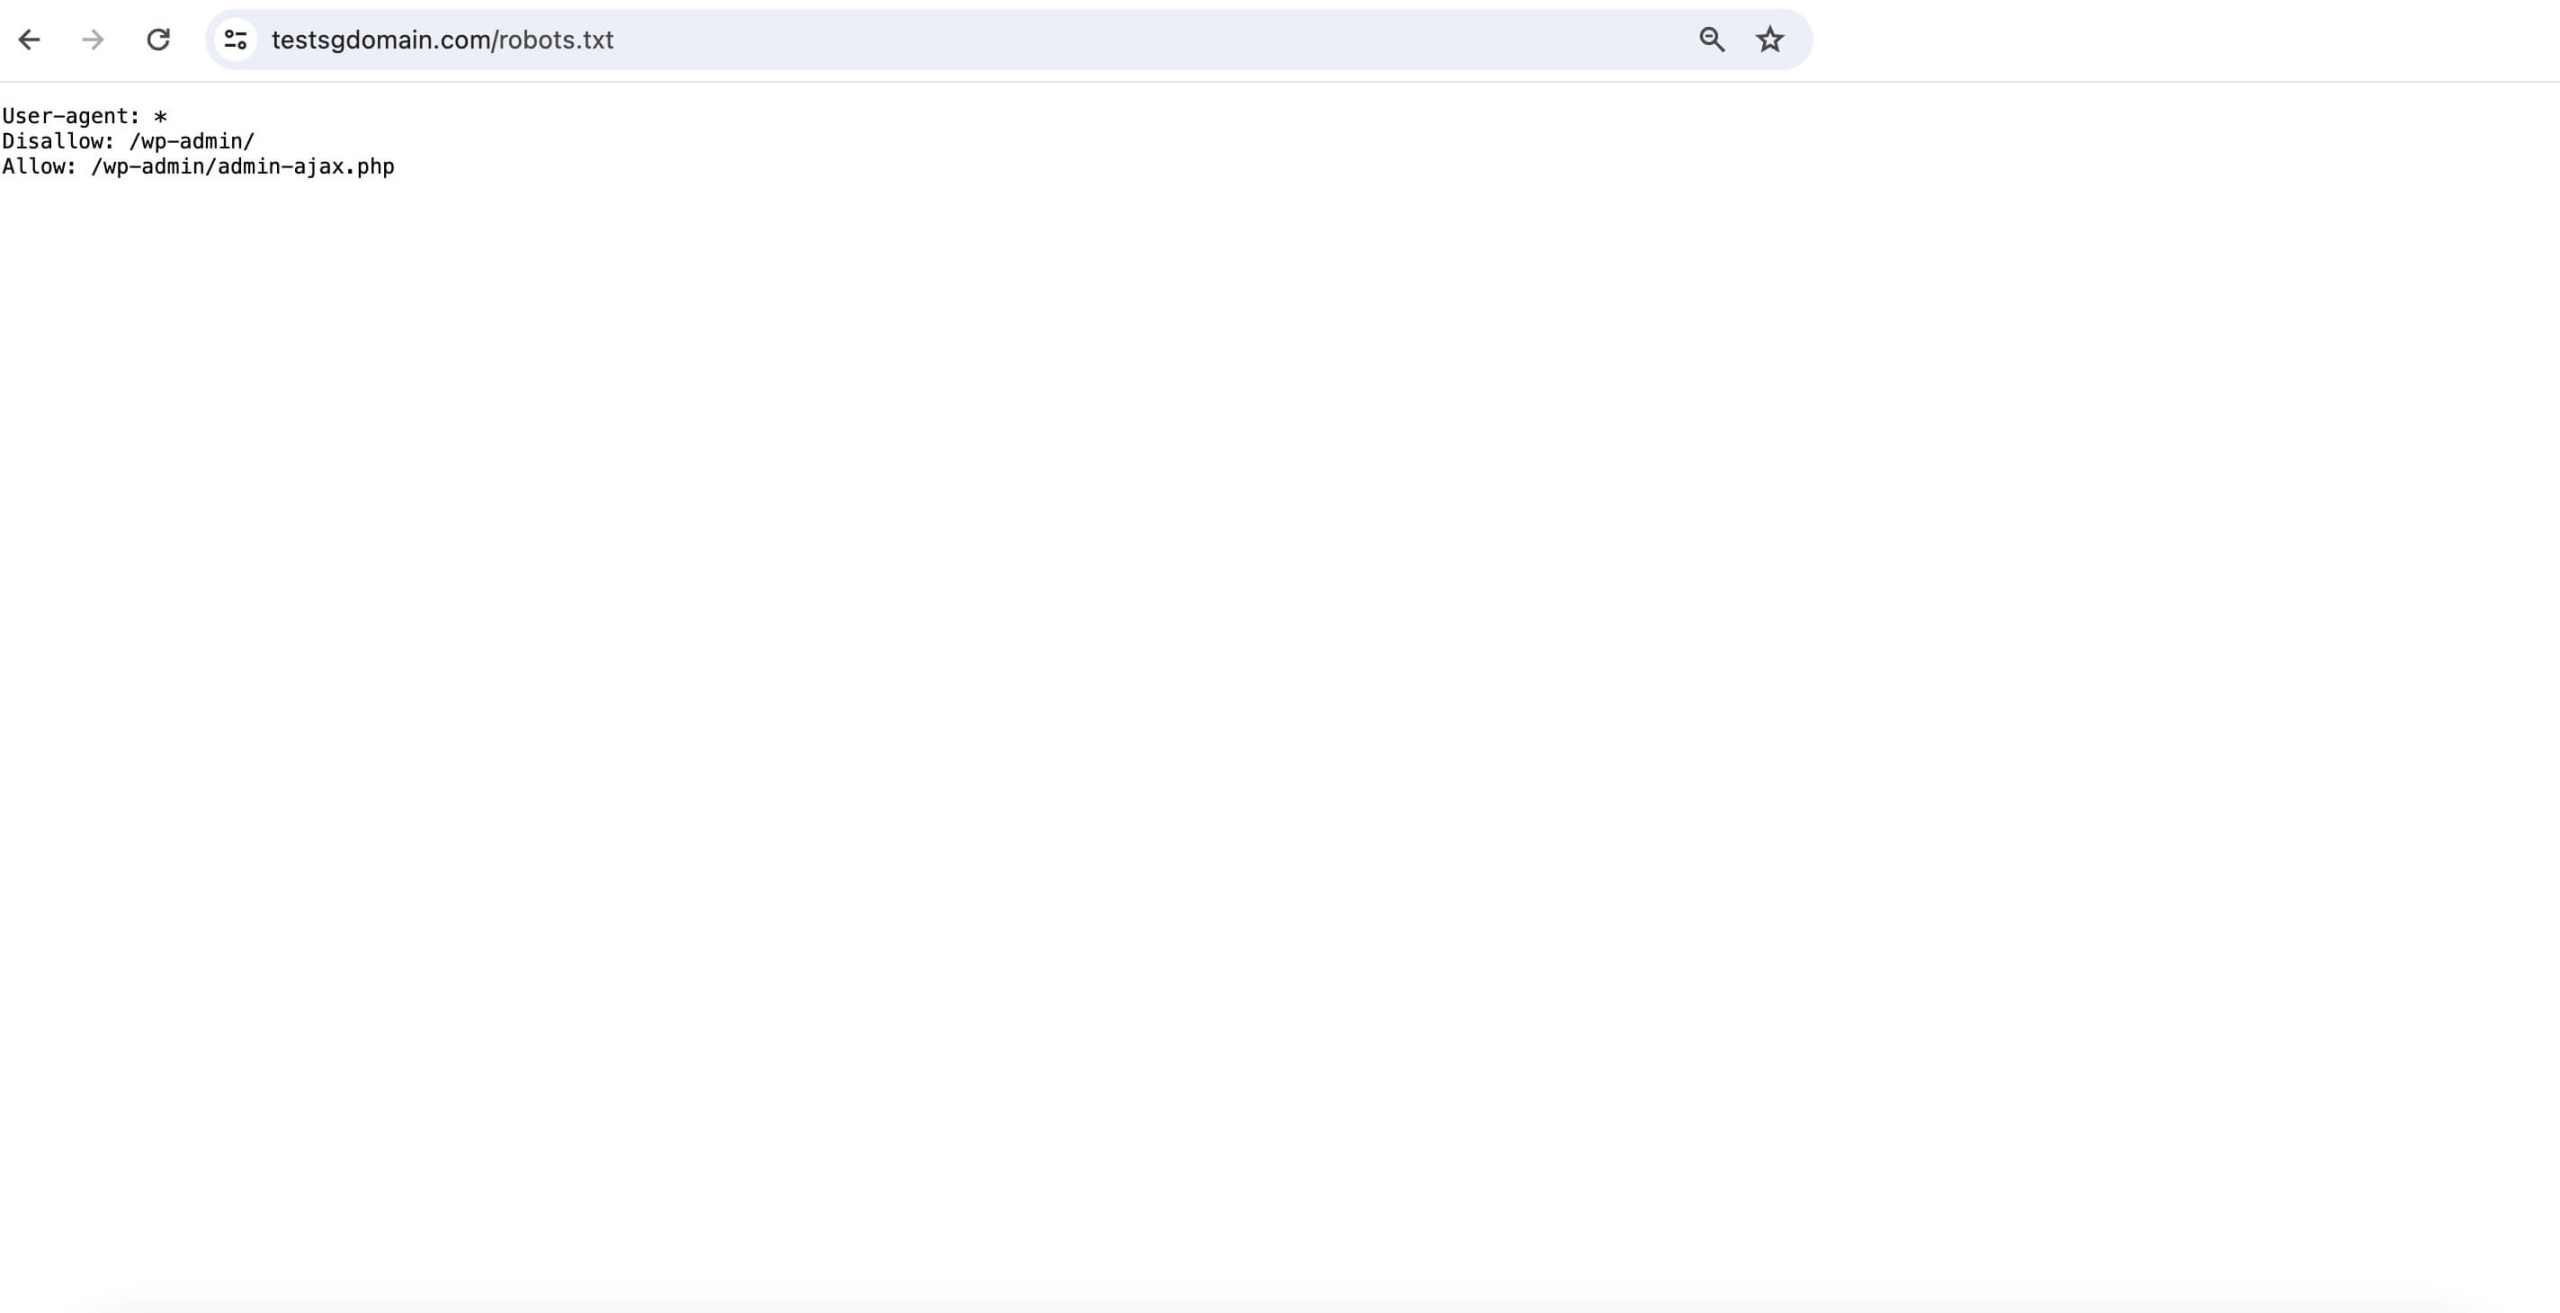
User-agent: *
Disallow: /wp-admin/
Allow: /wp-admin/admin-ajax.php
Here’s what these default rules mean:
- User-agent: *: This line applies the rules to all web crawlers and bots, indicated by the asterisk (*).
- Disallow: /wp-admin/: Tells bots not to crawl the WordPress admin area. This directory is not necessary for search engine indexing and contains private information.
- Allow: /wp-admin/admin-ajax.php: Although the wp-admin directory is disallowed, this line explicitly allows bots to access the admin-ajax.php file. It is used to process asynchronous requests on the front end, even if they originate from the admin area.
Impact of the robots.txt file in SEO
The robots.txt file plays a crucial role in SEO for WordPress sites, guiding search engines on how to crawl the content. A properly configured WordPress robots.txt ensures that only the key pages are crawled, enhancing their presence in search engine results.
While the robots.txt file doesn’t directly affect rankings or page speed, it does influence which web pages are indexed. Site owners can use it in combination with the robots meta tag to prevent search engines from indexing specific WordPress pages or sections.
Moreover, by controlling the crawl traffic, robots.txt can help maintain site performance. Additionally, it indirectly supports Core Web Vitals – a set of metrics that measures the user experience of web pages and influences SEO. For in-depth information, read this complete guide on Core Web Vitals.
How to locate the WordPress robots.txt file
WordPress has a default robots txt file that is virtual and not present in your website’s root directory. This means that you can’t access it using a File Manager or FTP client.
However, you can view it by accessing a similar URL in your web browser.
https://yourdomain.com/robots.txtIf you prefer to set your own rules for web crawlers, you can create a physical robots.txt file.
Once you upload this physical file to your site’s root directory, it will replace the virtual one WordPress generates.
Accessing it Through the Yoast SEO Plugin
Using a plugin simplifies the process of managing your robots.txt file. This method is more accessible for site owners who may not be as tech-savvy or who prefer a centralized approach to their site’s SEO.
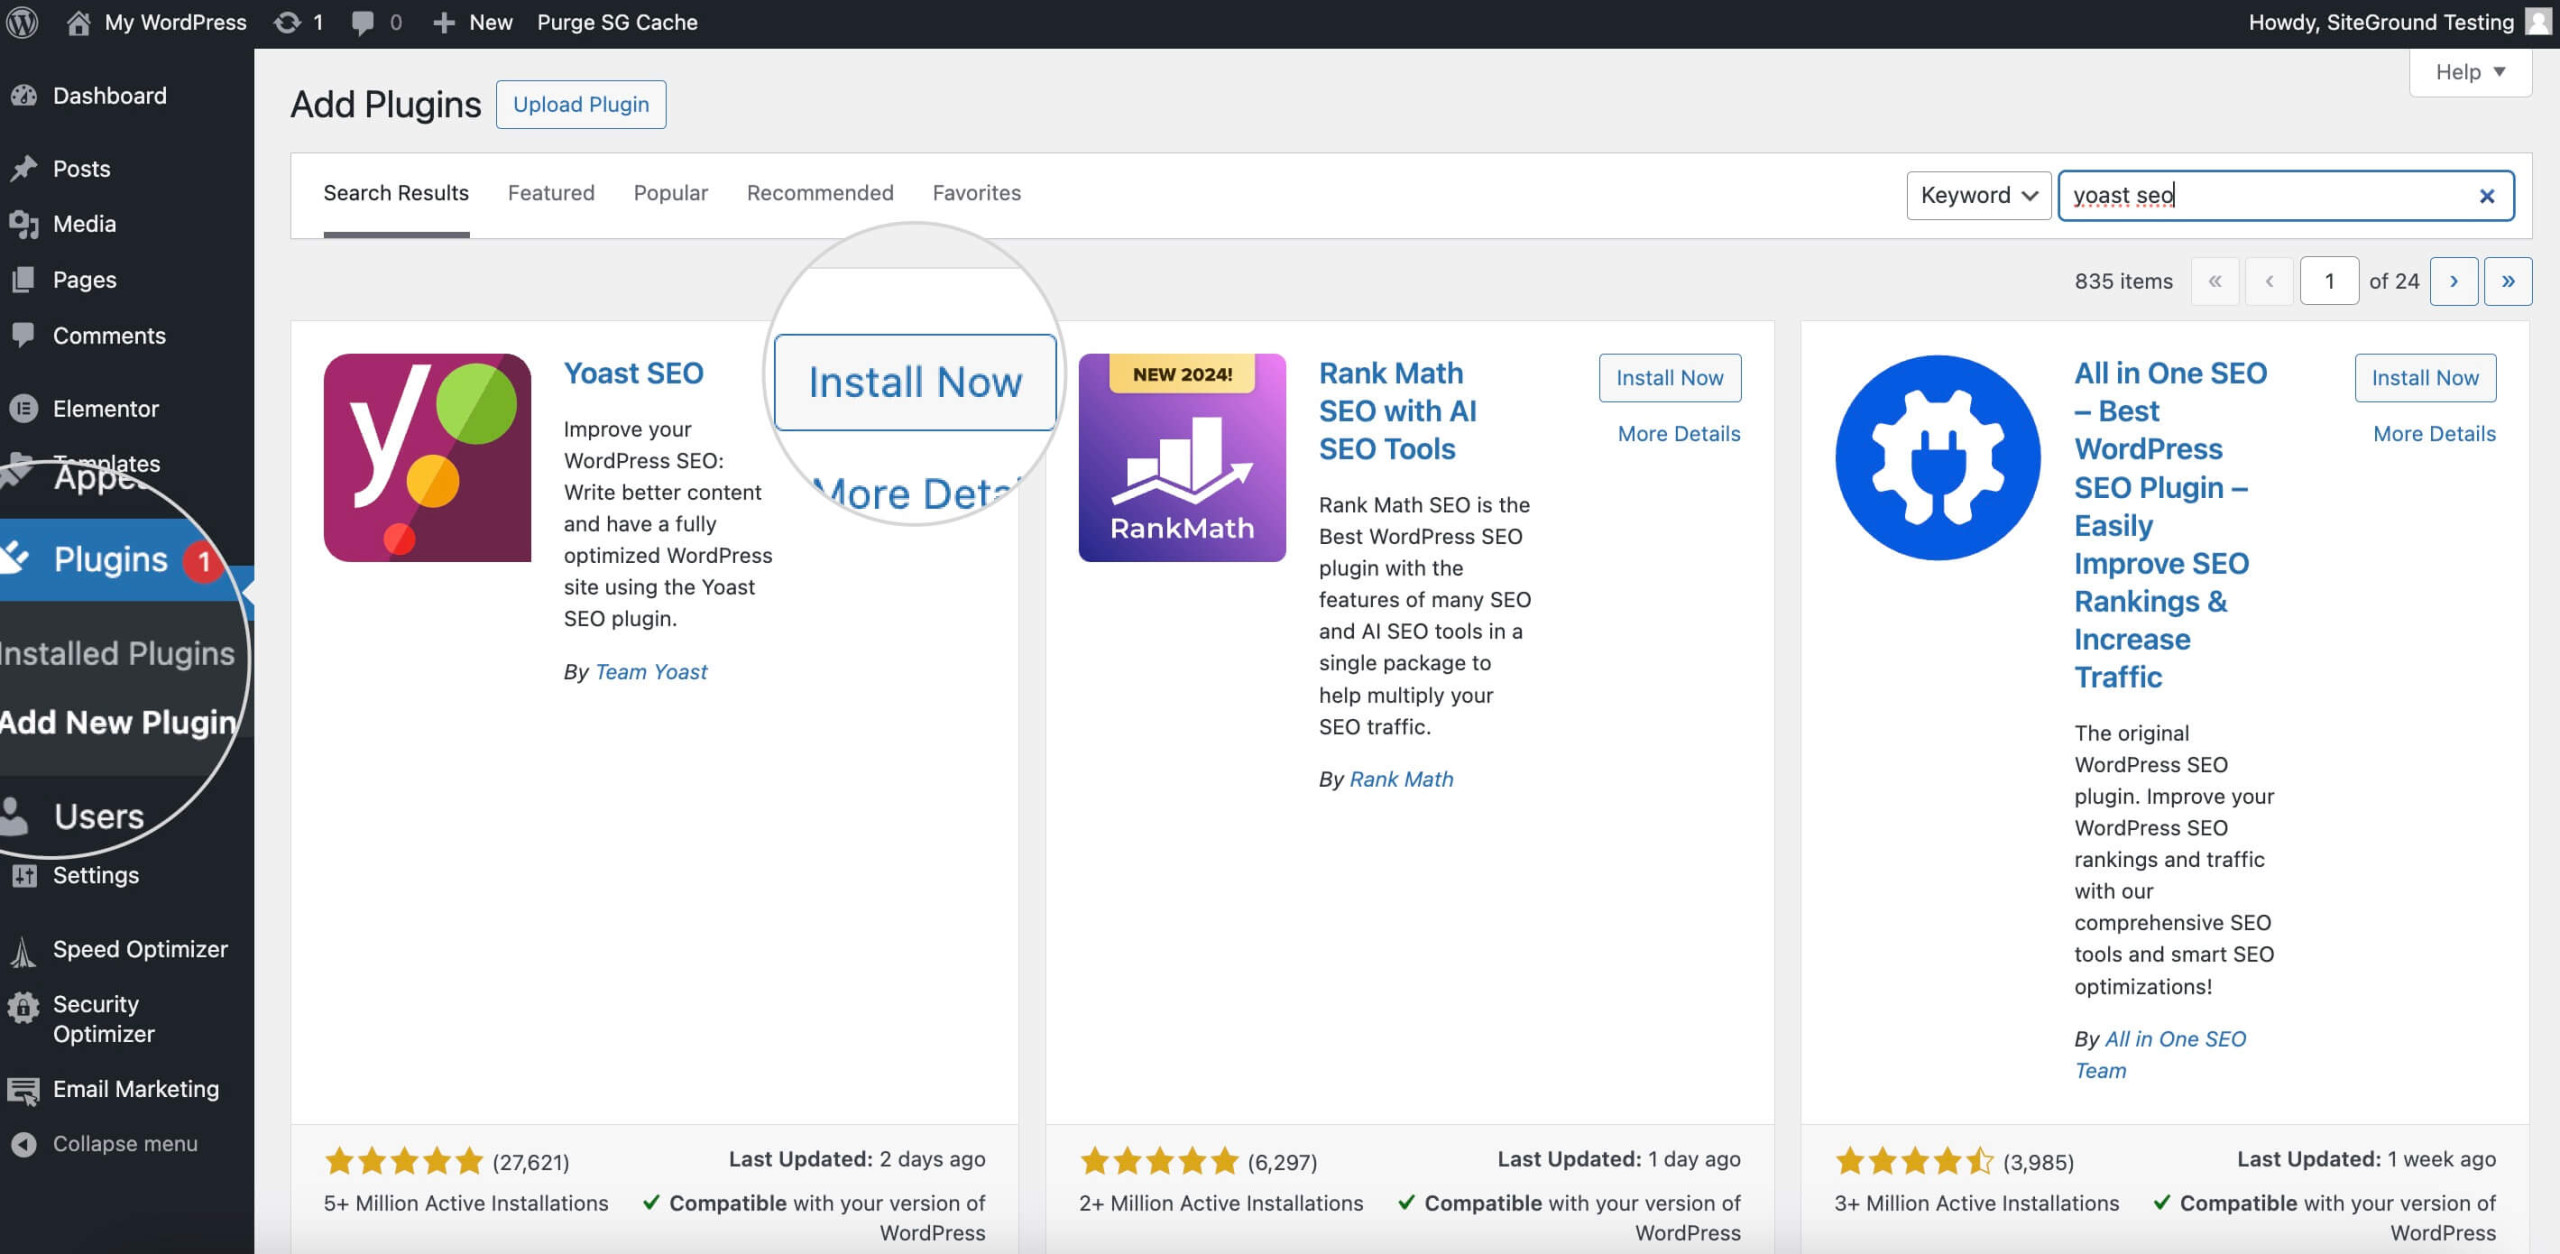
You can create and access your robots.txt file using Yoast SEO. To do that, follow the steps below.
- Log into your WordPress Dashboard.
- Install and activate the plugin from Plugins > Add New.
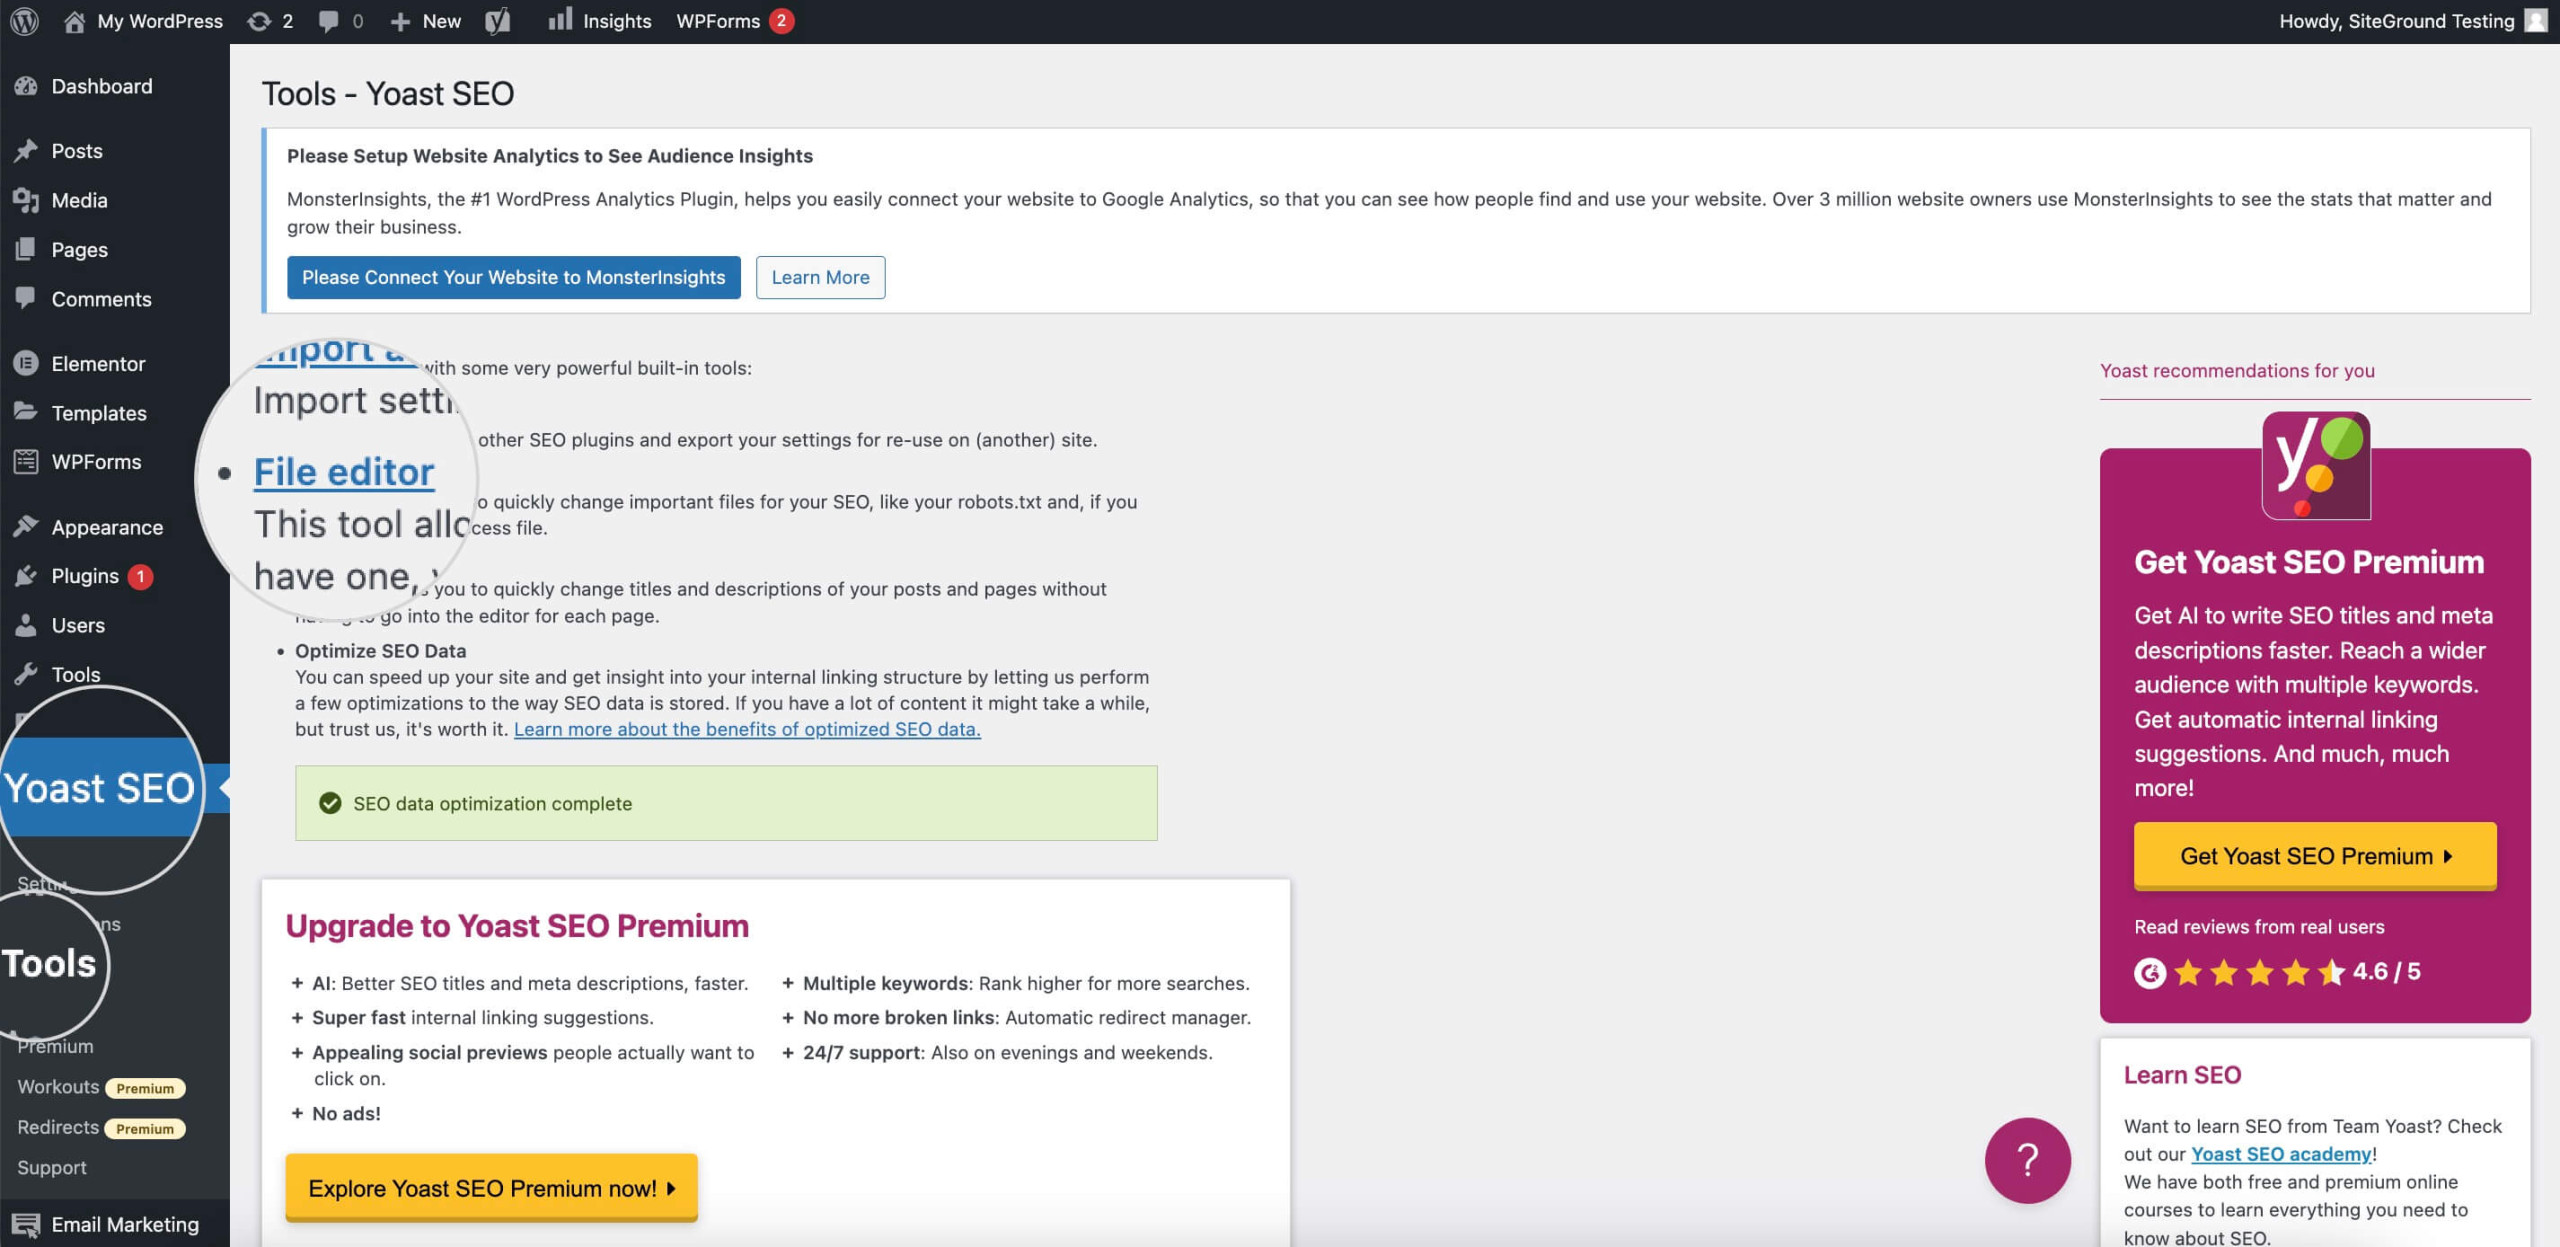
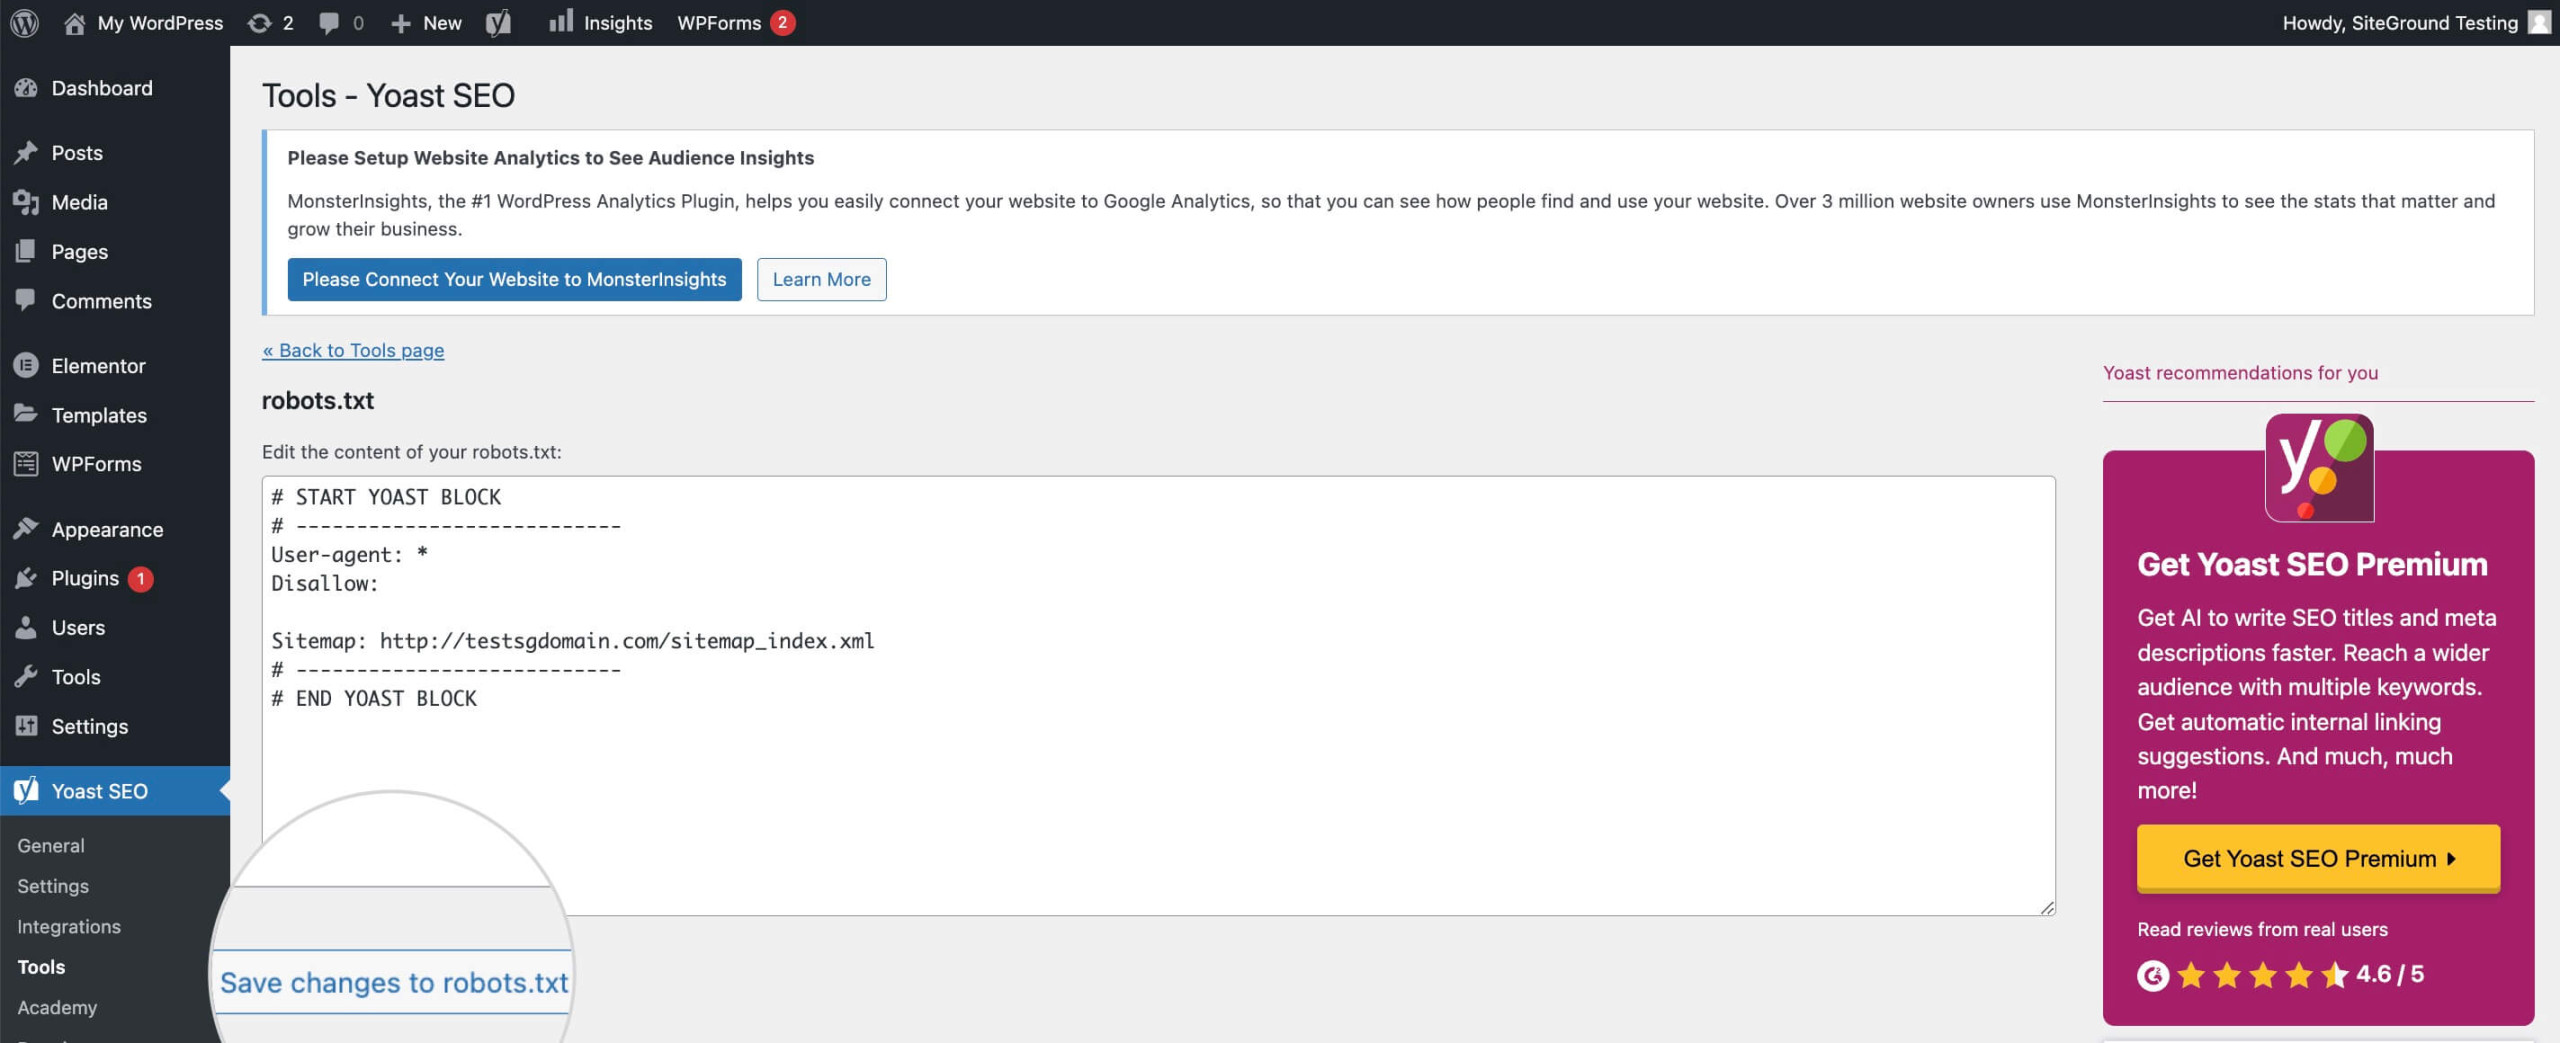
- Navigate to Yoast SEO > Tools and click File Editor.
- Create robots.txt file using the button.
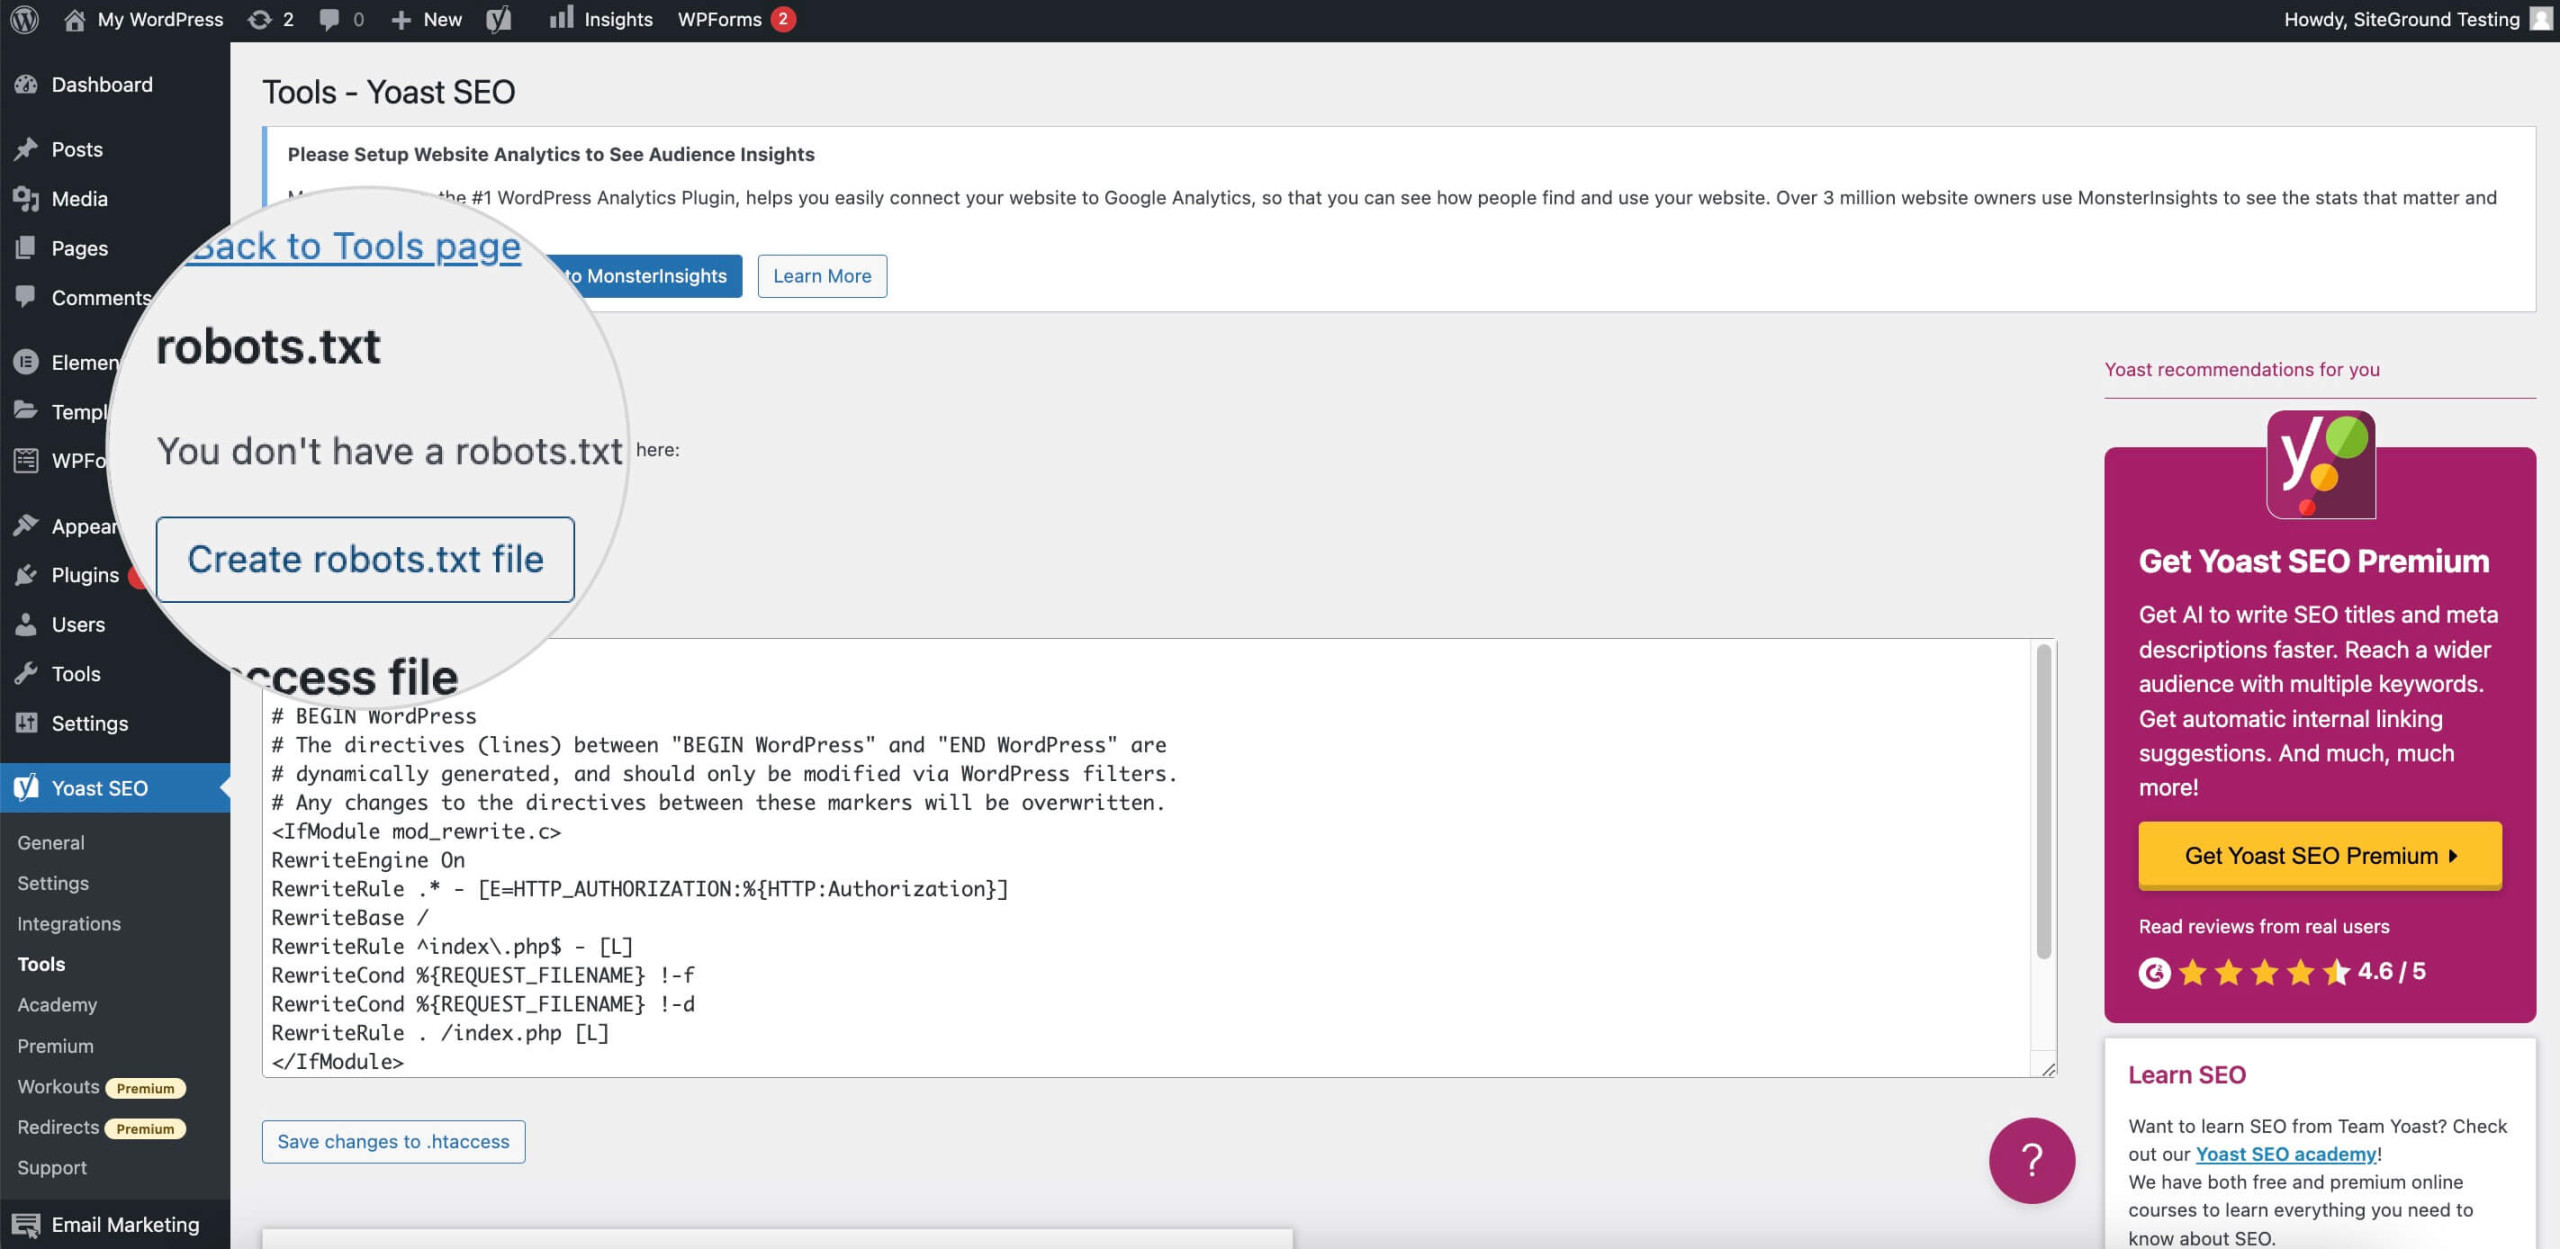
- Edit the file and Save the changes.
How to Create and Edit a Robots.txt File in WordPress
The robots.txt file is a simple text (.txt) file used by WordPress sites to guide user agents’ crawling. If you want to customize the directives of the default virtual robots.txt, you can create your own file manually.
Keep in mind that the robots.txt you create will override the virtual file of WordPress.
To create your robots.txt file manually, follow the steps below:
- Create a plain text file using any text editor, for example, Notepad. Or simply log in to your WordPress hosting account’s File Manager to use its file editing feature.
- Locate the root folder of your site (public_html) and create a file by clicking the New File option.
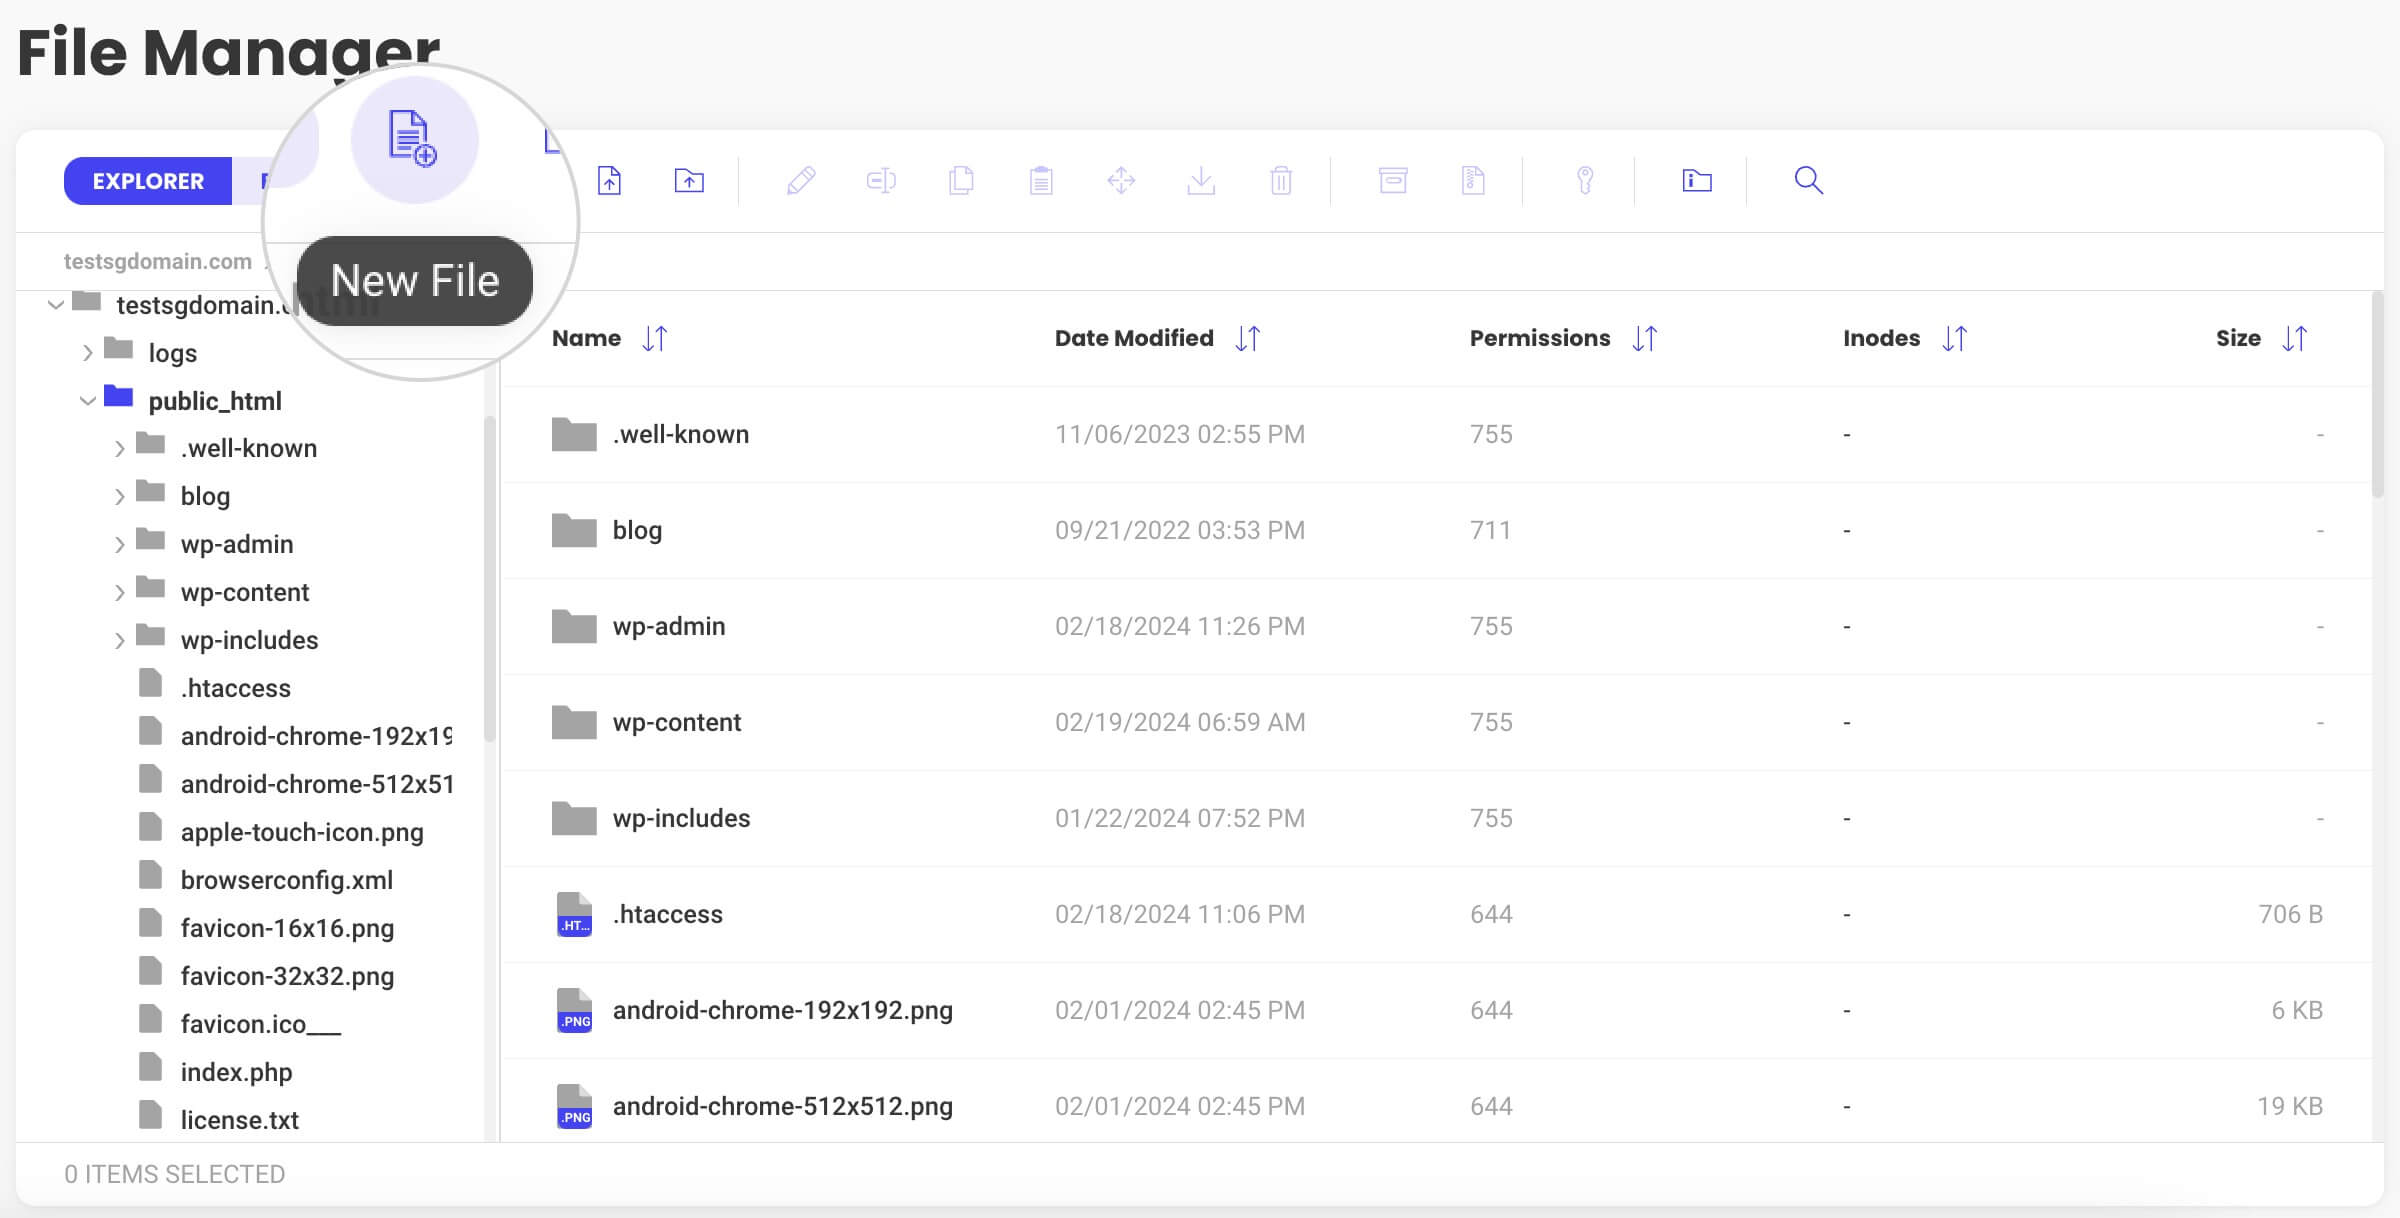
- Name the file robots.txt and save it.
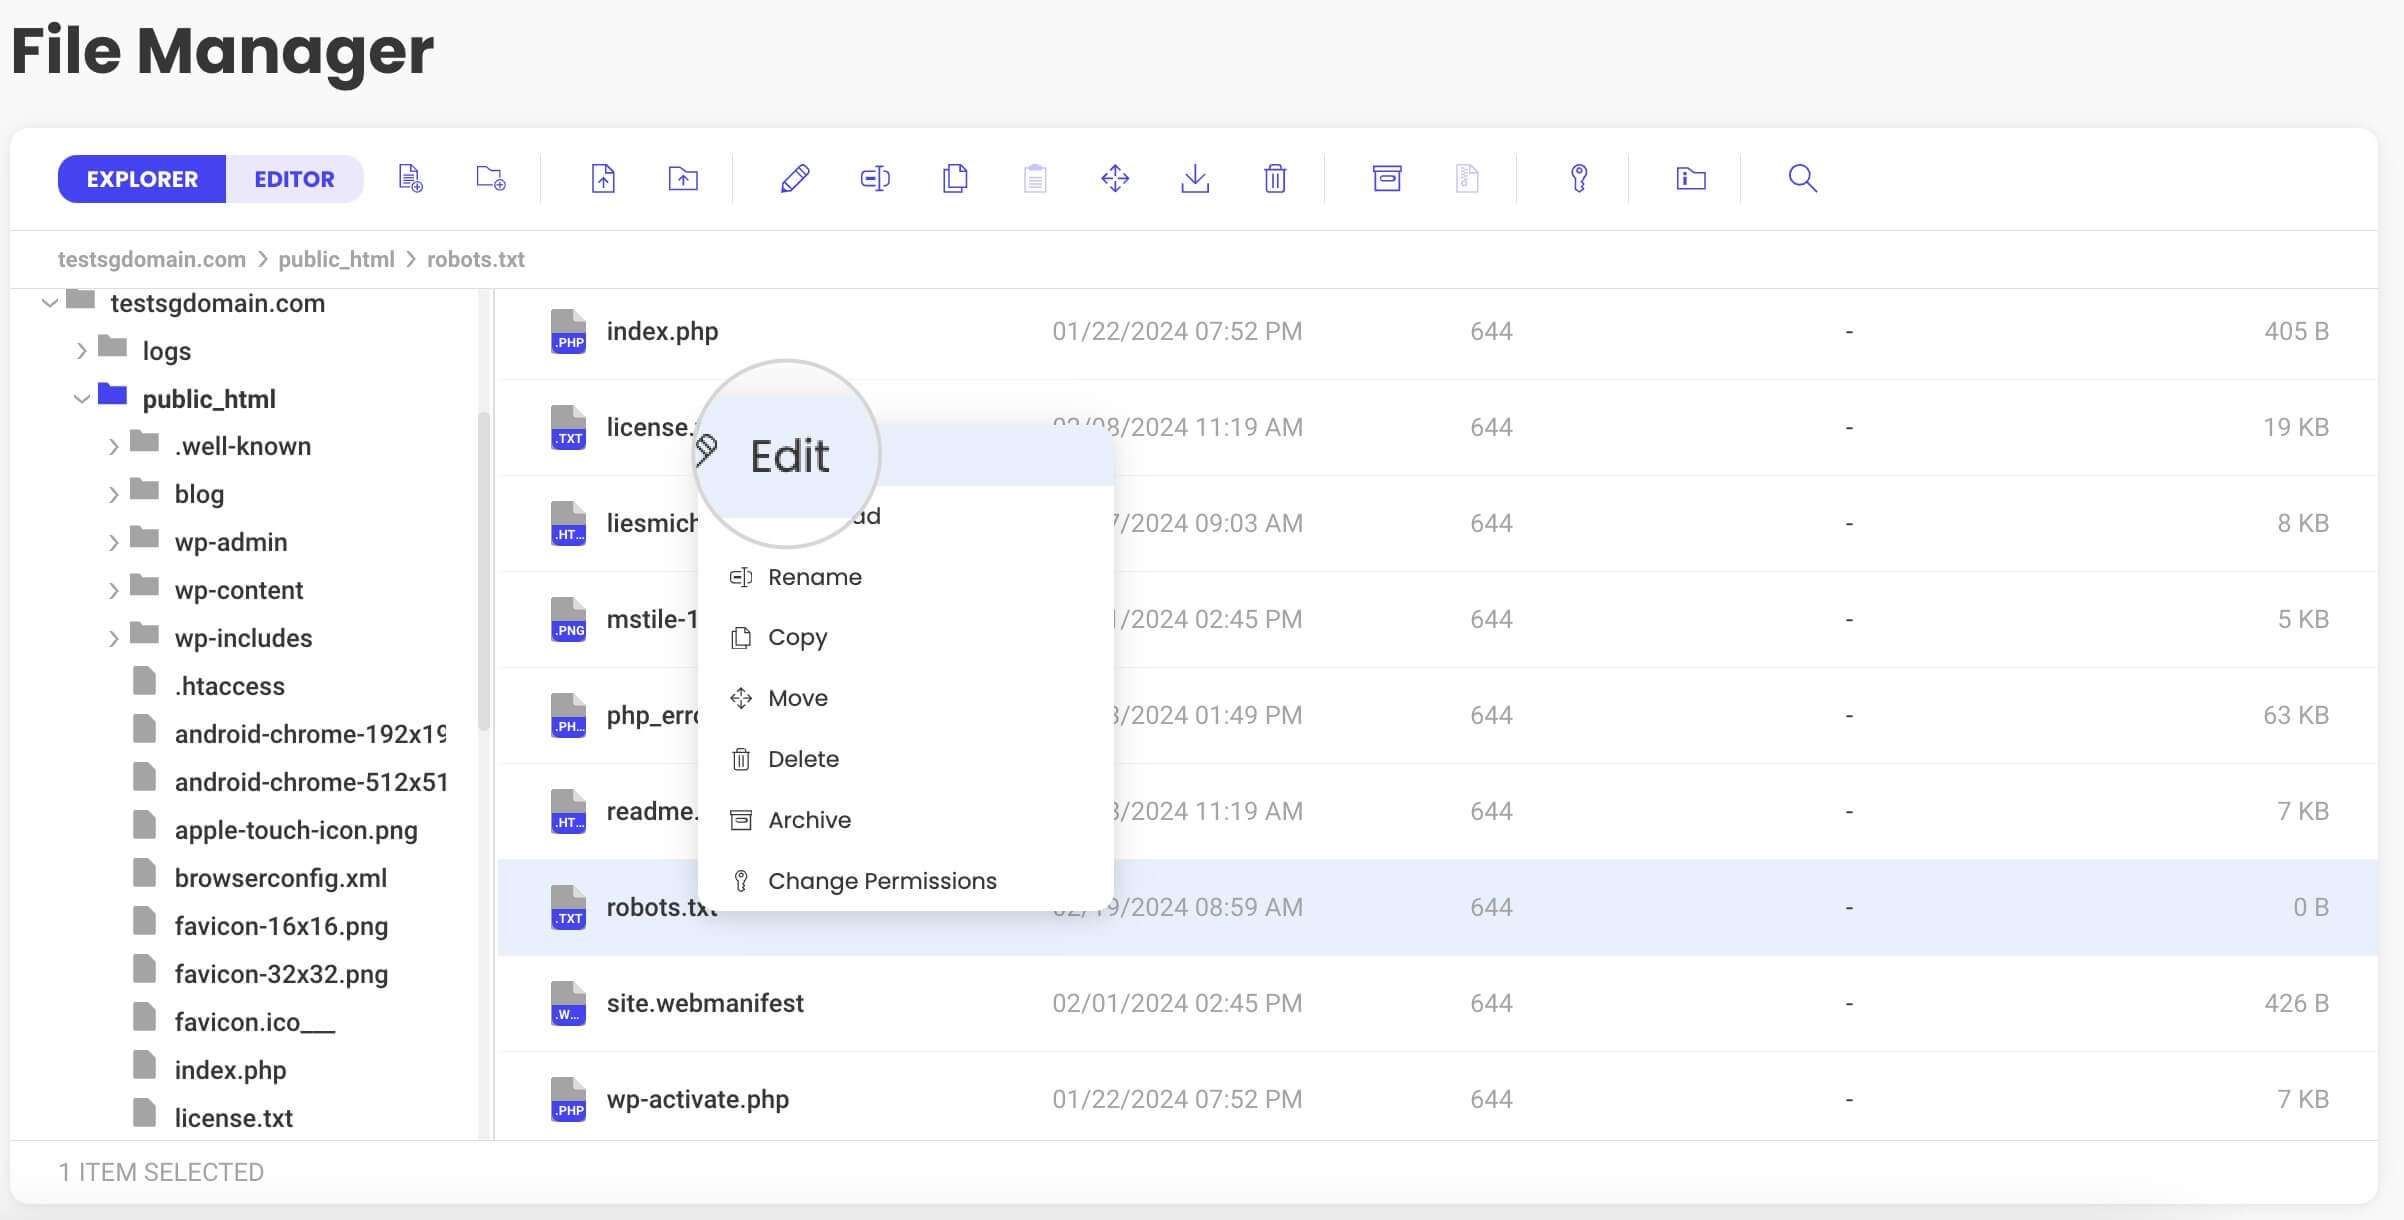
- Edit the robots file.
- In the empty file, paste these robot instructions:
User-agent: *
Disallow: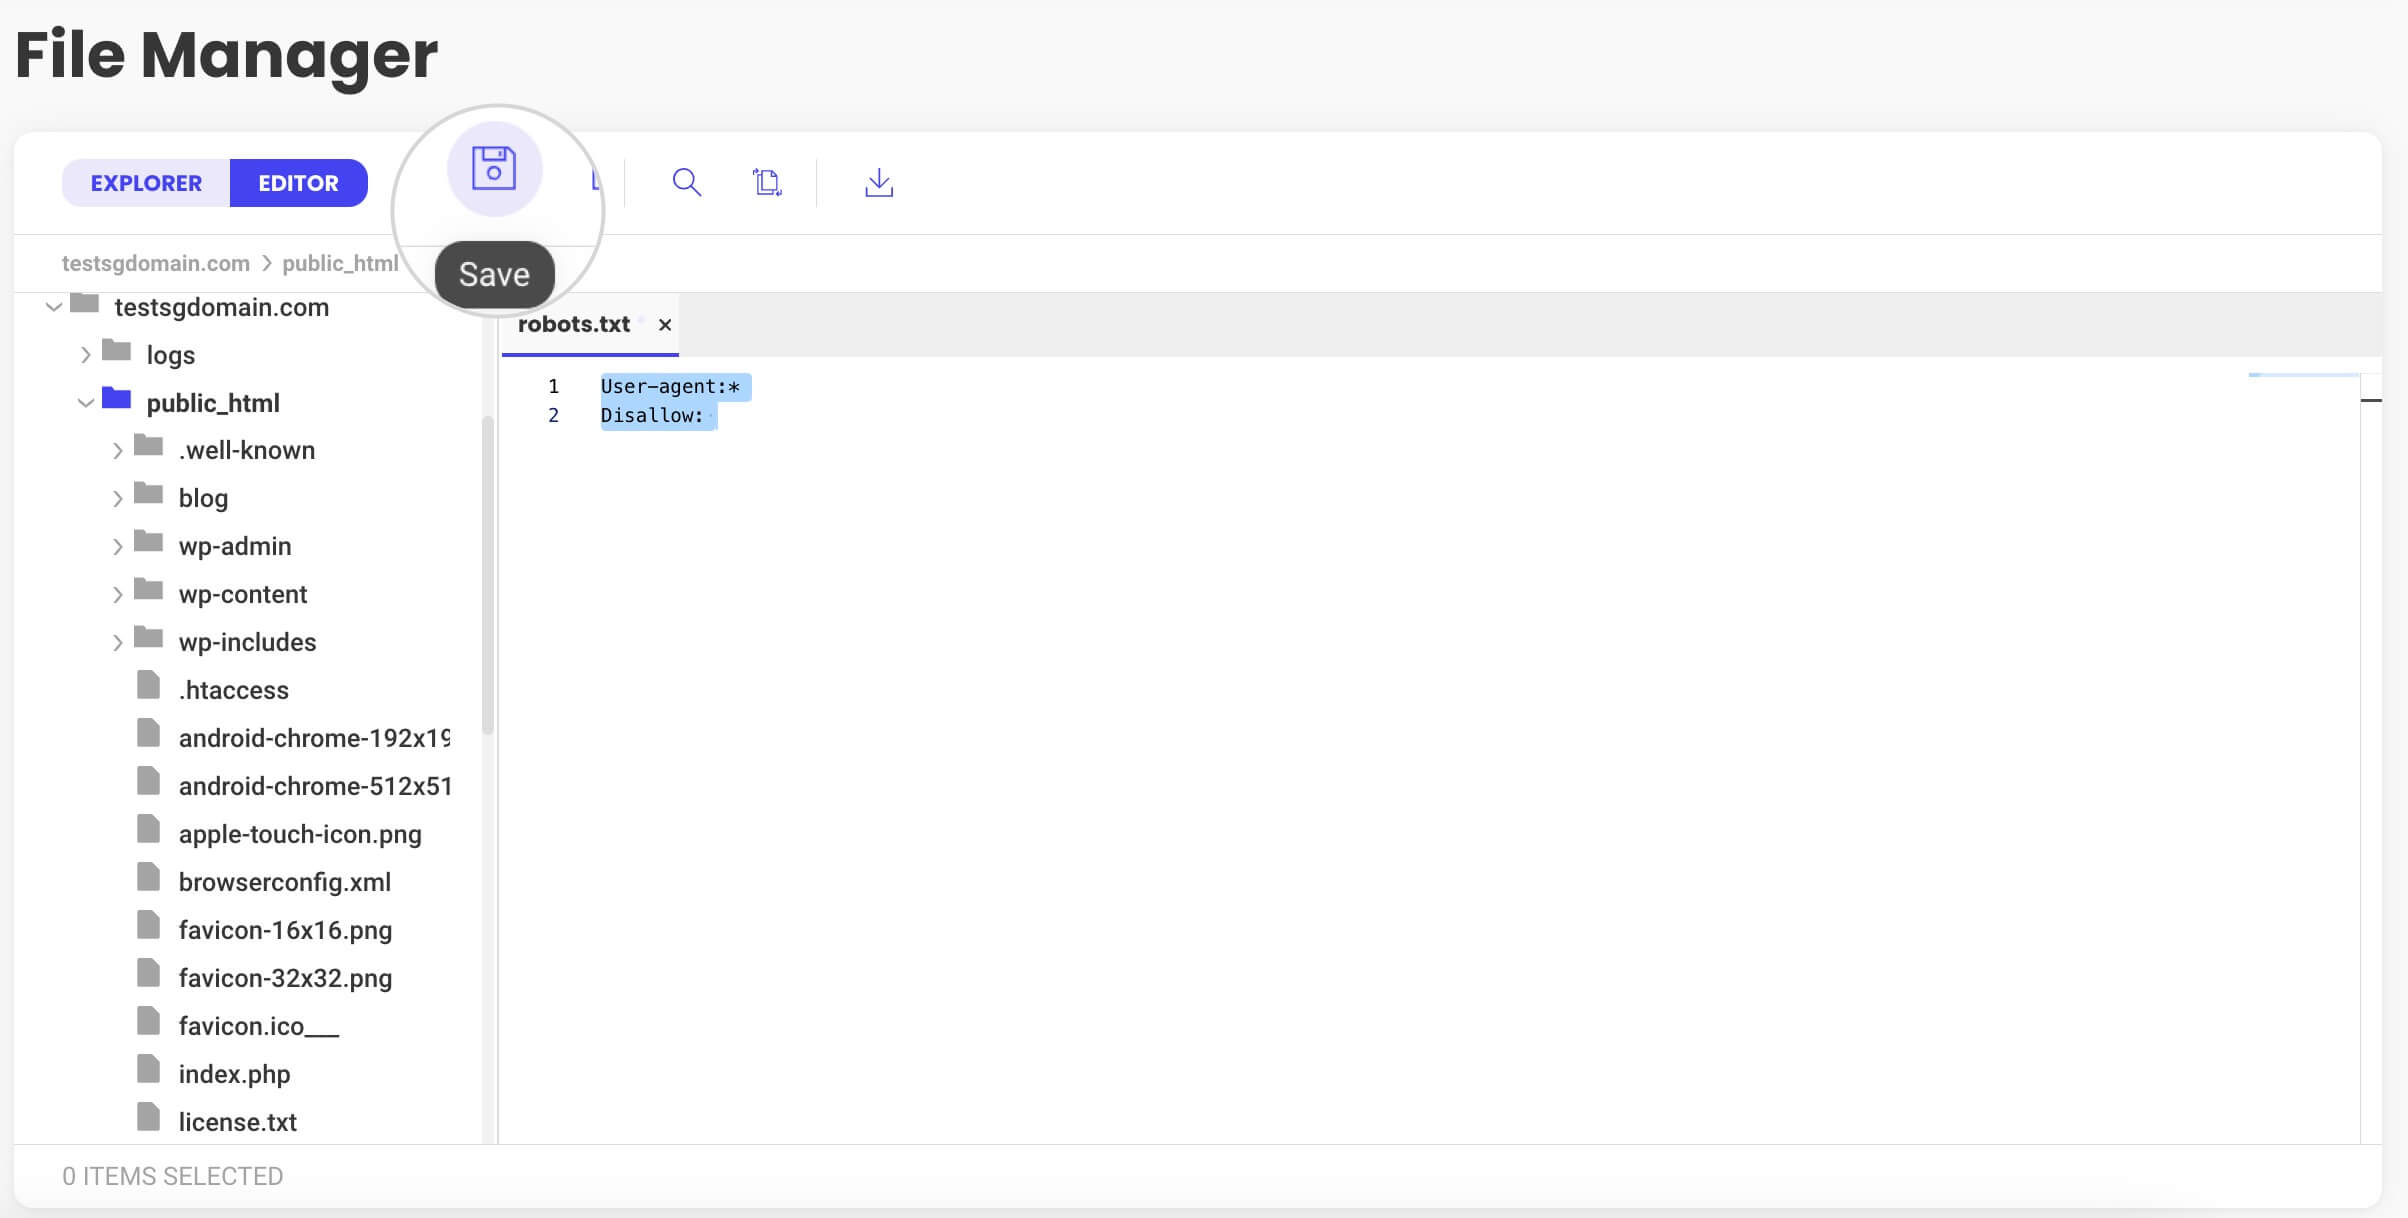
Once you’re ready, you’ll be able to edit the robots.txt from your WordPress hosting from the same directory path. Alternatively, you can use an FTP connection to edit robots.txt.
How to use the Robots.txt in a WordPress site – Best Practices
Mastering your robots.txt file is a crucial step toward successful WordPress SEO. In this part, we’ll touch on the best practices that steer search bots effectively. Implement them to enhance your site’s presence in Google’s index.
Stick with us to learn how the right robots.txt moves can improve your search performance.
Allow Full Access to Search Engine Bots
Allowing search engine bots full access to the robots.txt file ensures that they can explore and index every part of your website. That can improve your site’s visibility and searchability. Full access helps search engines understand your site’s structure and content, potentially leading to better rankings and more traffic.
If you want to allow search engines to index all the pages of your site, add the following rule to your robots.txt:
User-agent: *
Allow: /
Or
User-agent: *
Disallow:
Allow Access to a Particular File in a Disallowed Folder
In case you want to allow bots to access a specific file in a disallowed folder, use a similar snippet.
User-agent: *
Disallow: /wp-admin/
Allow: /wp-admin/admin-ajax.php
In the example, we’re allowing bots to crawl the admin-ajax.php, located under the wp-admin directory.
Restrict Bots From Crawling WordPress Search Results
To keep your WordPress site SEO-friendly, it’s wise to prevent bots from crawling WordPress search results. These pages can create duplicate content and eat up your crawl budget, offering little to no value for your search rankings.
User-agent: *
Disallow: /?s=
This directive ensures that the time and resources of search bots are spent on crawling the prime content of your site, not the transient site search results.
Block Access of Search Engine Crawlers to Your Entire Site
If you want to prevent search engine crawlers from indexing your site, use the snippet below.
User-agent: *
Disallow: /
The “Disallow: /” line tells bots that they are not allowed to access any part of the website. The forward slash (/) represents the root directory of the site and everything after it, which is essentially the whole site.
Block a Specific User Agent From Crawling Your WordPress Website
There might be times when you want to prevent a specific bot from crawling your site. Each user agent accesses your website with the intention of indexing content.
However, some bots may be consuming too many server resources. Also, there are malicious bots that aim to scrape your content or look for vulnerabilities to attack.
Thus, it’s best to block crawler access to such bots using the code below in your robots.txt file.
User-agent: MJ12bot
Disallow: /
Note that if you are planning to block more than one user agent, the best practice is to use a separate disallow rule for each in the robots.txt. That rule should include the user-agent name and the disallowed directory.
Prevent Access to a Specific Folder or File
When you want to restrict bots from accessing specific pages or files, drop another Disallow line in robots.txt, specifying the file/folder path.
User-agent: *
Disallow: /wp-admin/
Disallow: /wp-login.php
Site owners block specific pages or files to keep sensitive or non-essential content out of search results. This focused approach conserves bandwidth and boosts SEO by highlighting the site’s most important areas.
Specify your XML Sitemap Location for Search Engines
Direct search engines to your website’s blueprint by specifying the location of your sitemap in your robots.txt file. This helps search engines like Google find and use your sitemap to index your site faster and more efficiently. Simply add a line like the one shown below, specifying the location of your sitemap.xml
User-agent: *
Disallow: /wp-admin/
Allow: /wp-admin/admin-ajax.php

Sitemap: https://testsgdomain.com/wp-sitemap.xml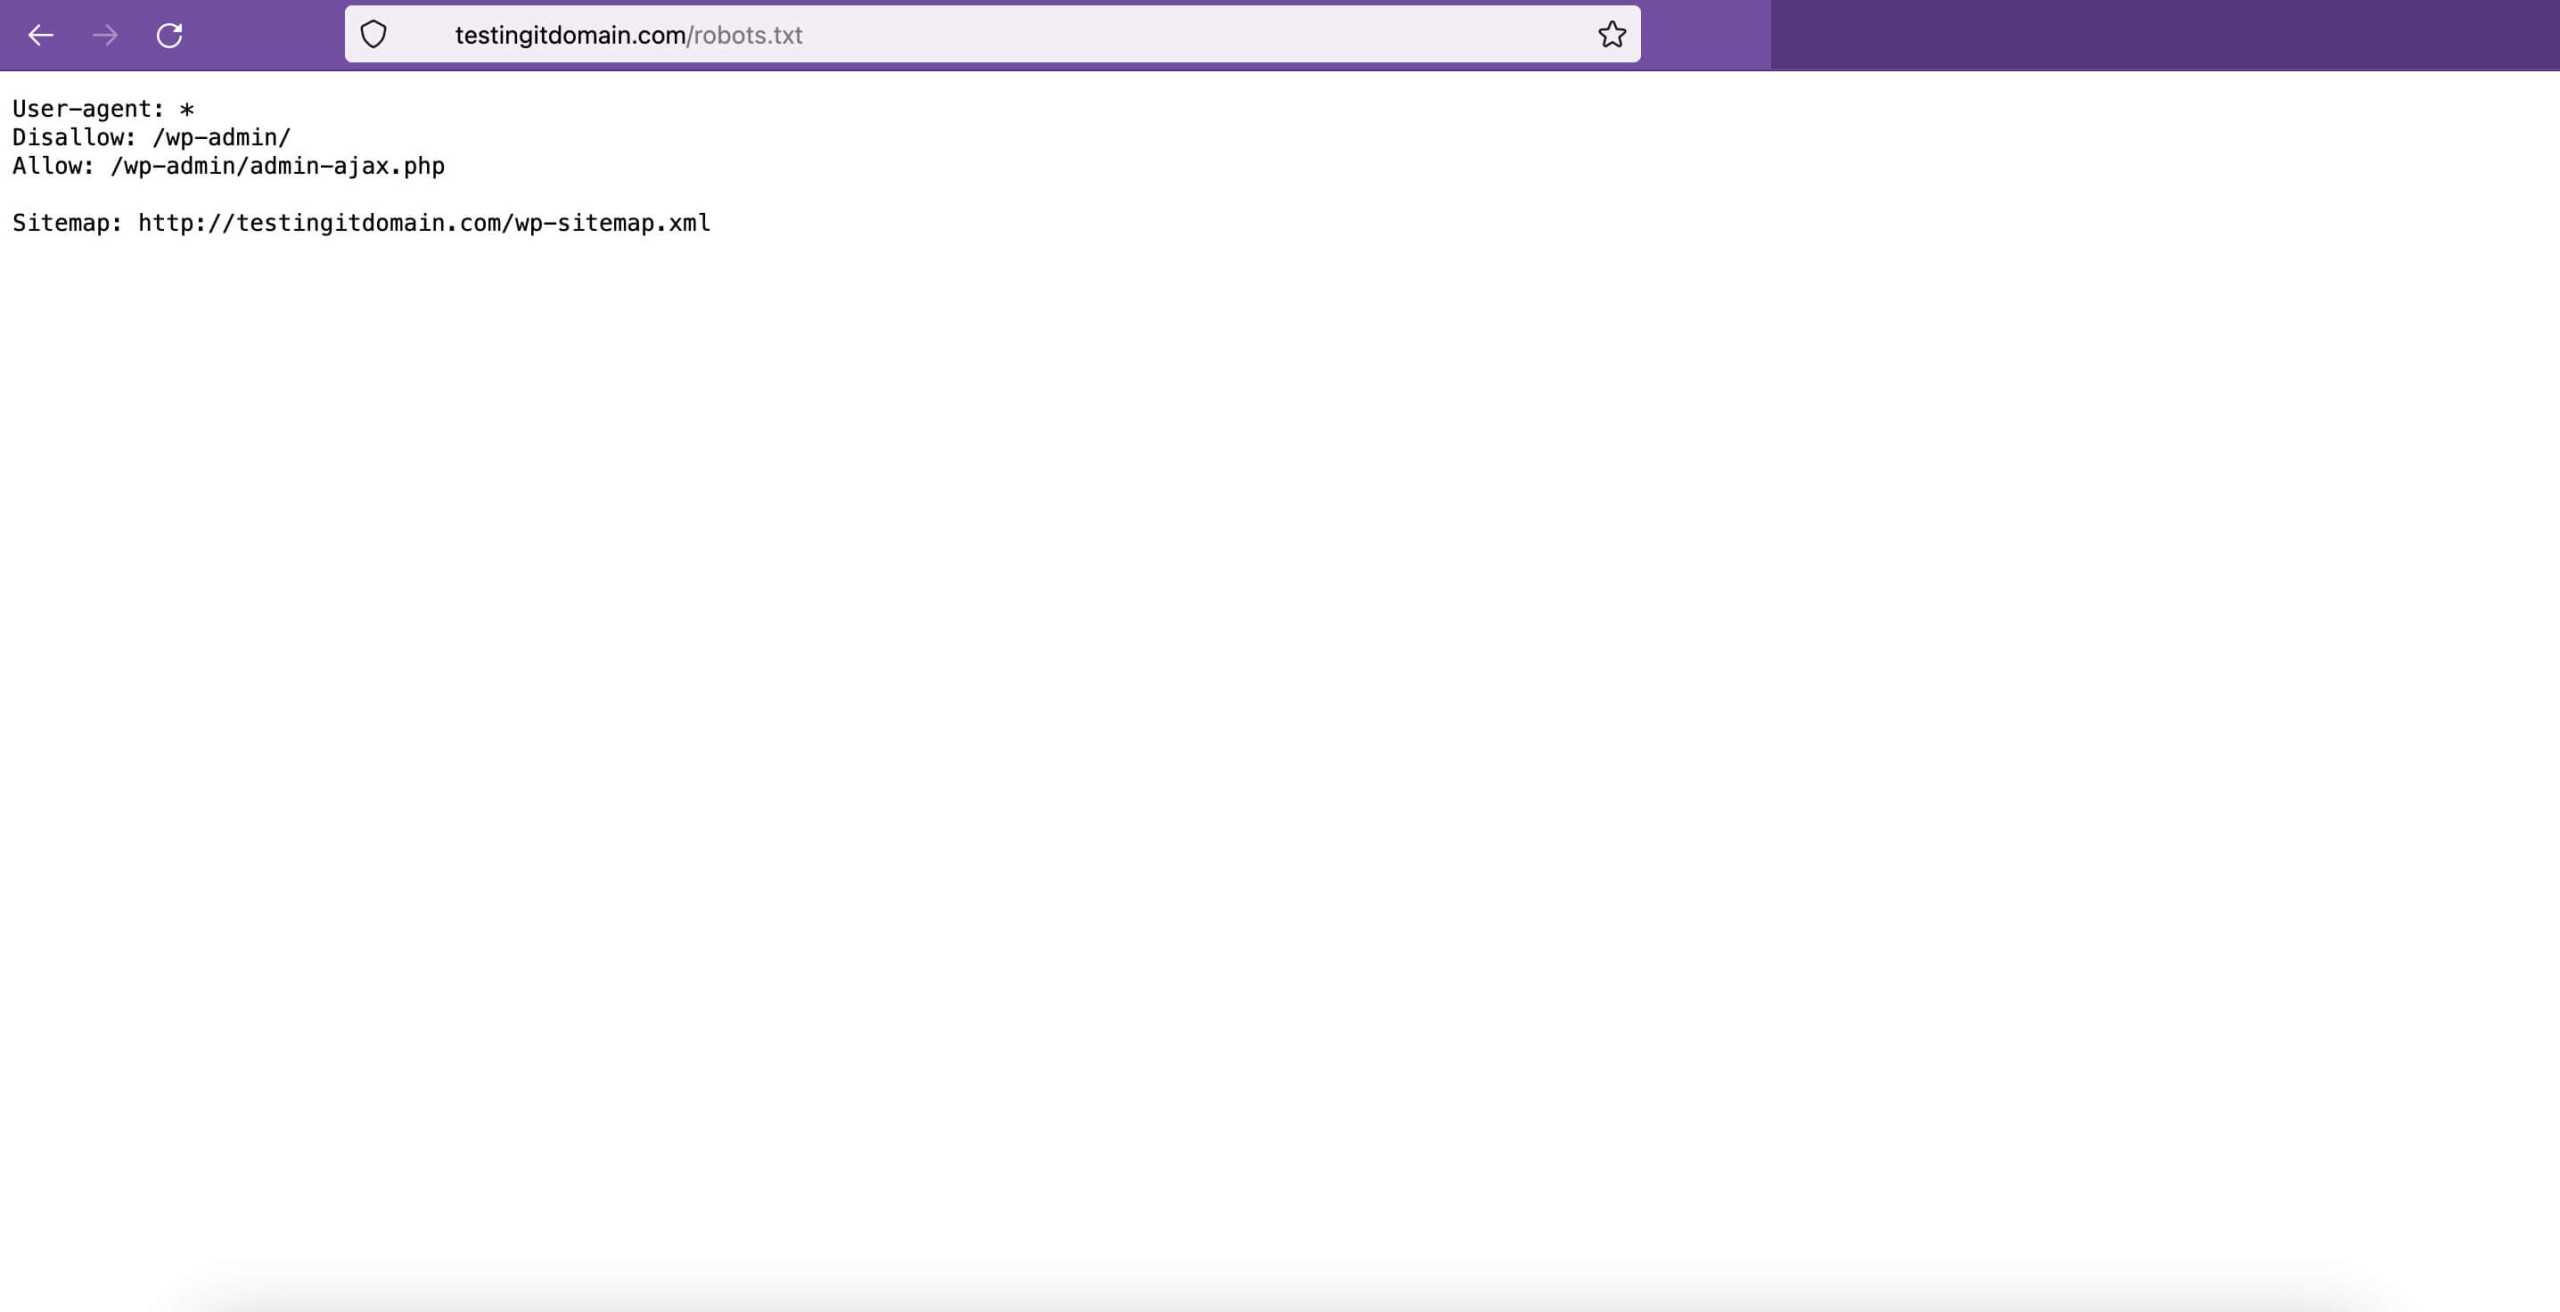
You can also include multiple sitemaps in your robots.txt to help search engines index different content areas on your site. Add lines such as Sitemap: http://www.yourdomain.com/sitemap-posts.xml and Sitemap: http://www.yourdomain.com/sitemap-pages.xml. This provides a clear index of your content for more effective crawling.
Testing and Troubleshooting Your WordPress Robots.txt File
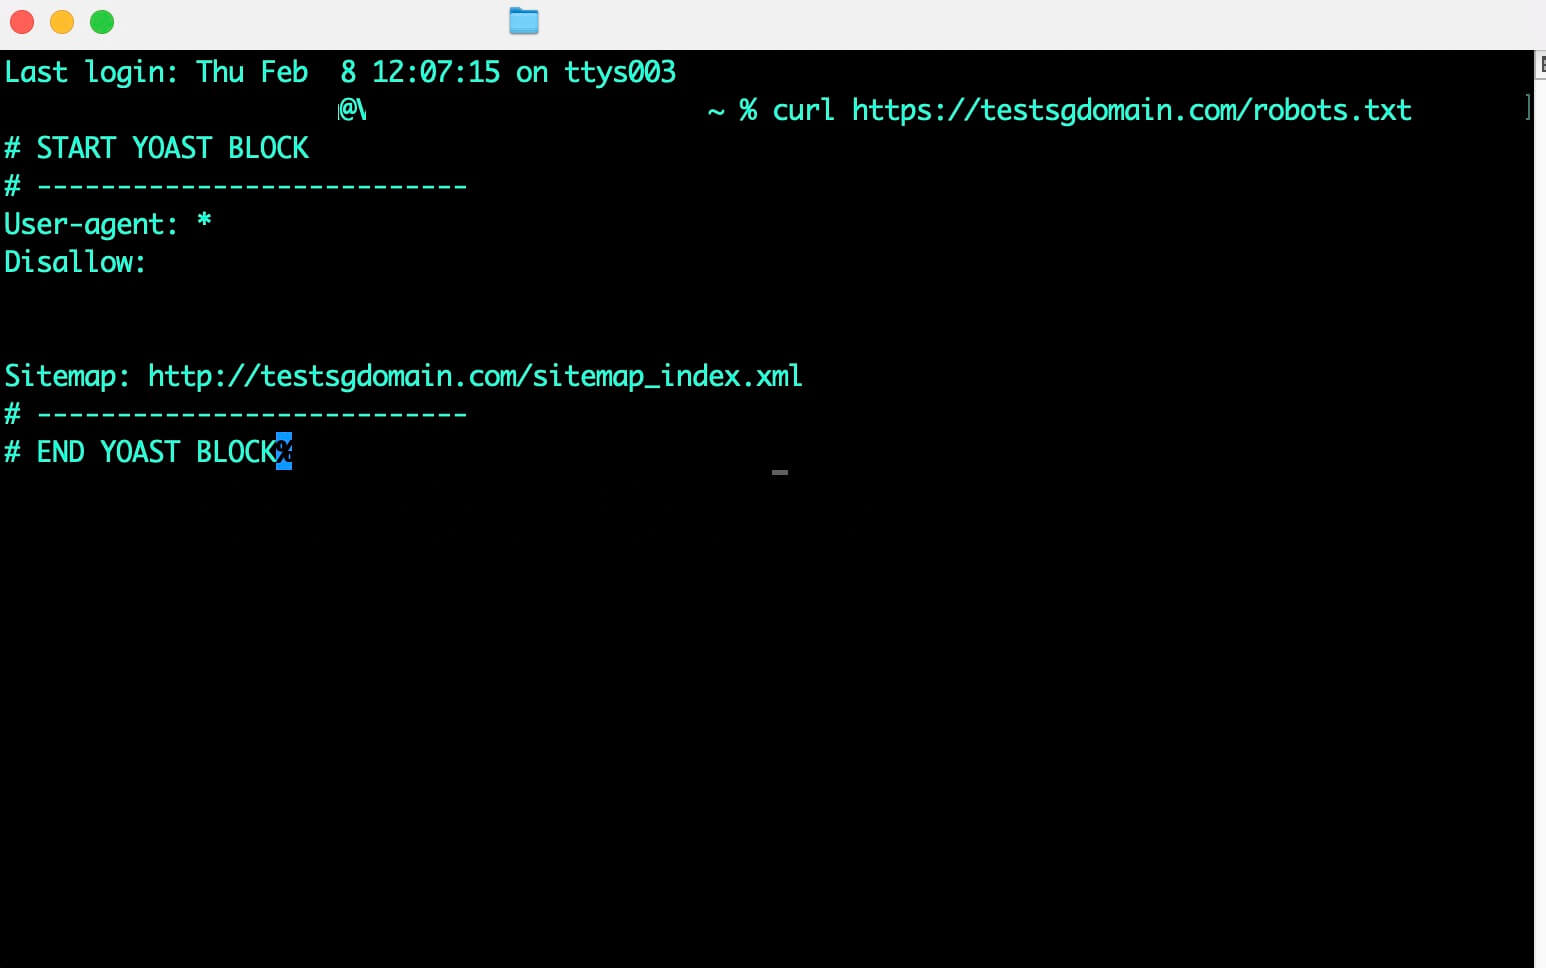
Your WordPress robots.txt navigates search engine crawlers. Thus, you want to make sure your site is accessible and robots understand what they can look at and what’s off-limits. Moreover, Googlebot needs to be able to fetch your robots.txt file successfully for better indexing.
You can test if your WordPress robots.txt is accessible by typing the URL https://www.yourdomain.com/robots.txt in the browser. Another option is to make a Curl request to the file from your Terminal, as in the screenshot below.
To verify that user agents can process your robots.txt, test it with Google’s robots.txt tester. Besides fetching your file, the tool shows you if there are any issues with it. The steps are as follows:
- Log into your Google Search Console account by hitting the Start Now button.
- Navigate to Settings and scroll down to Open Report for your robots.txt
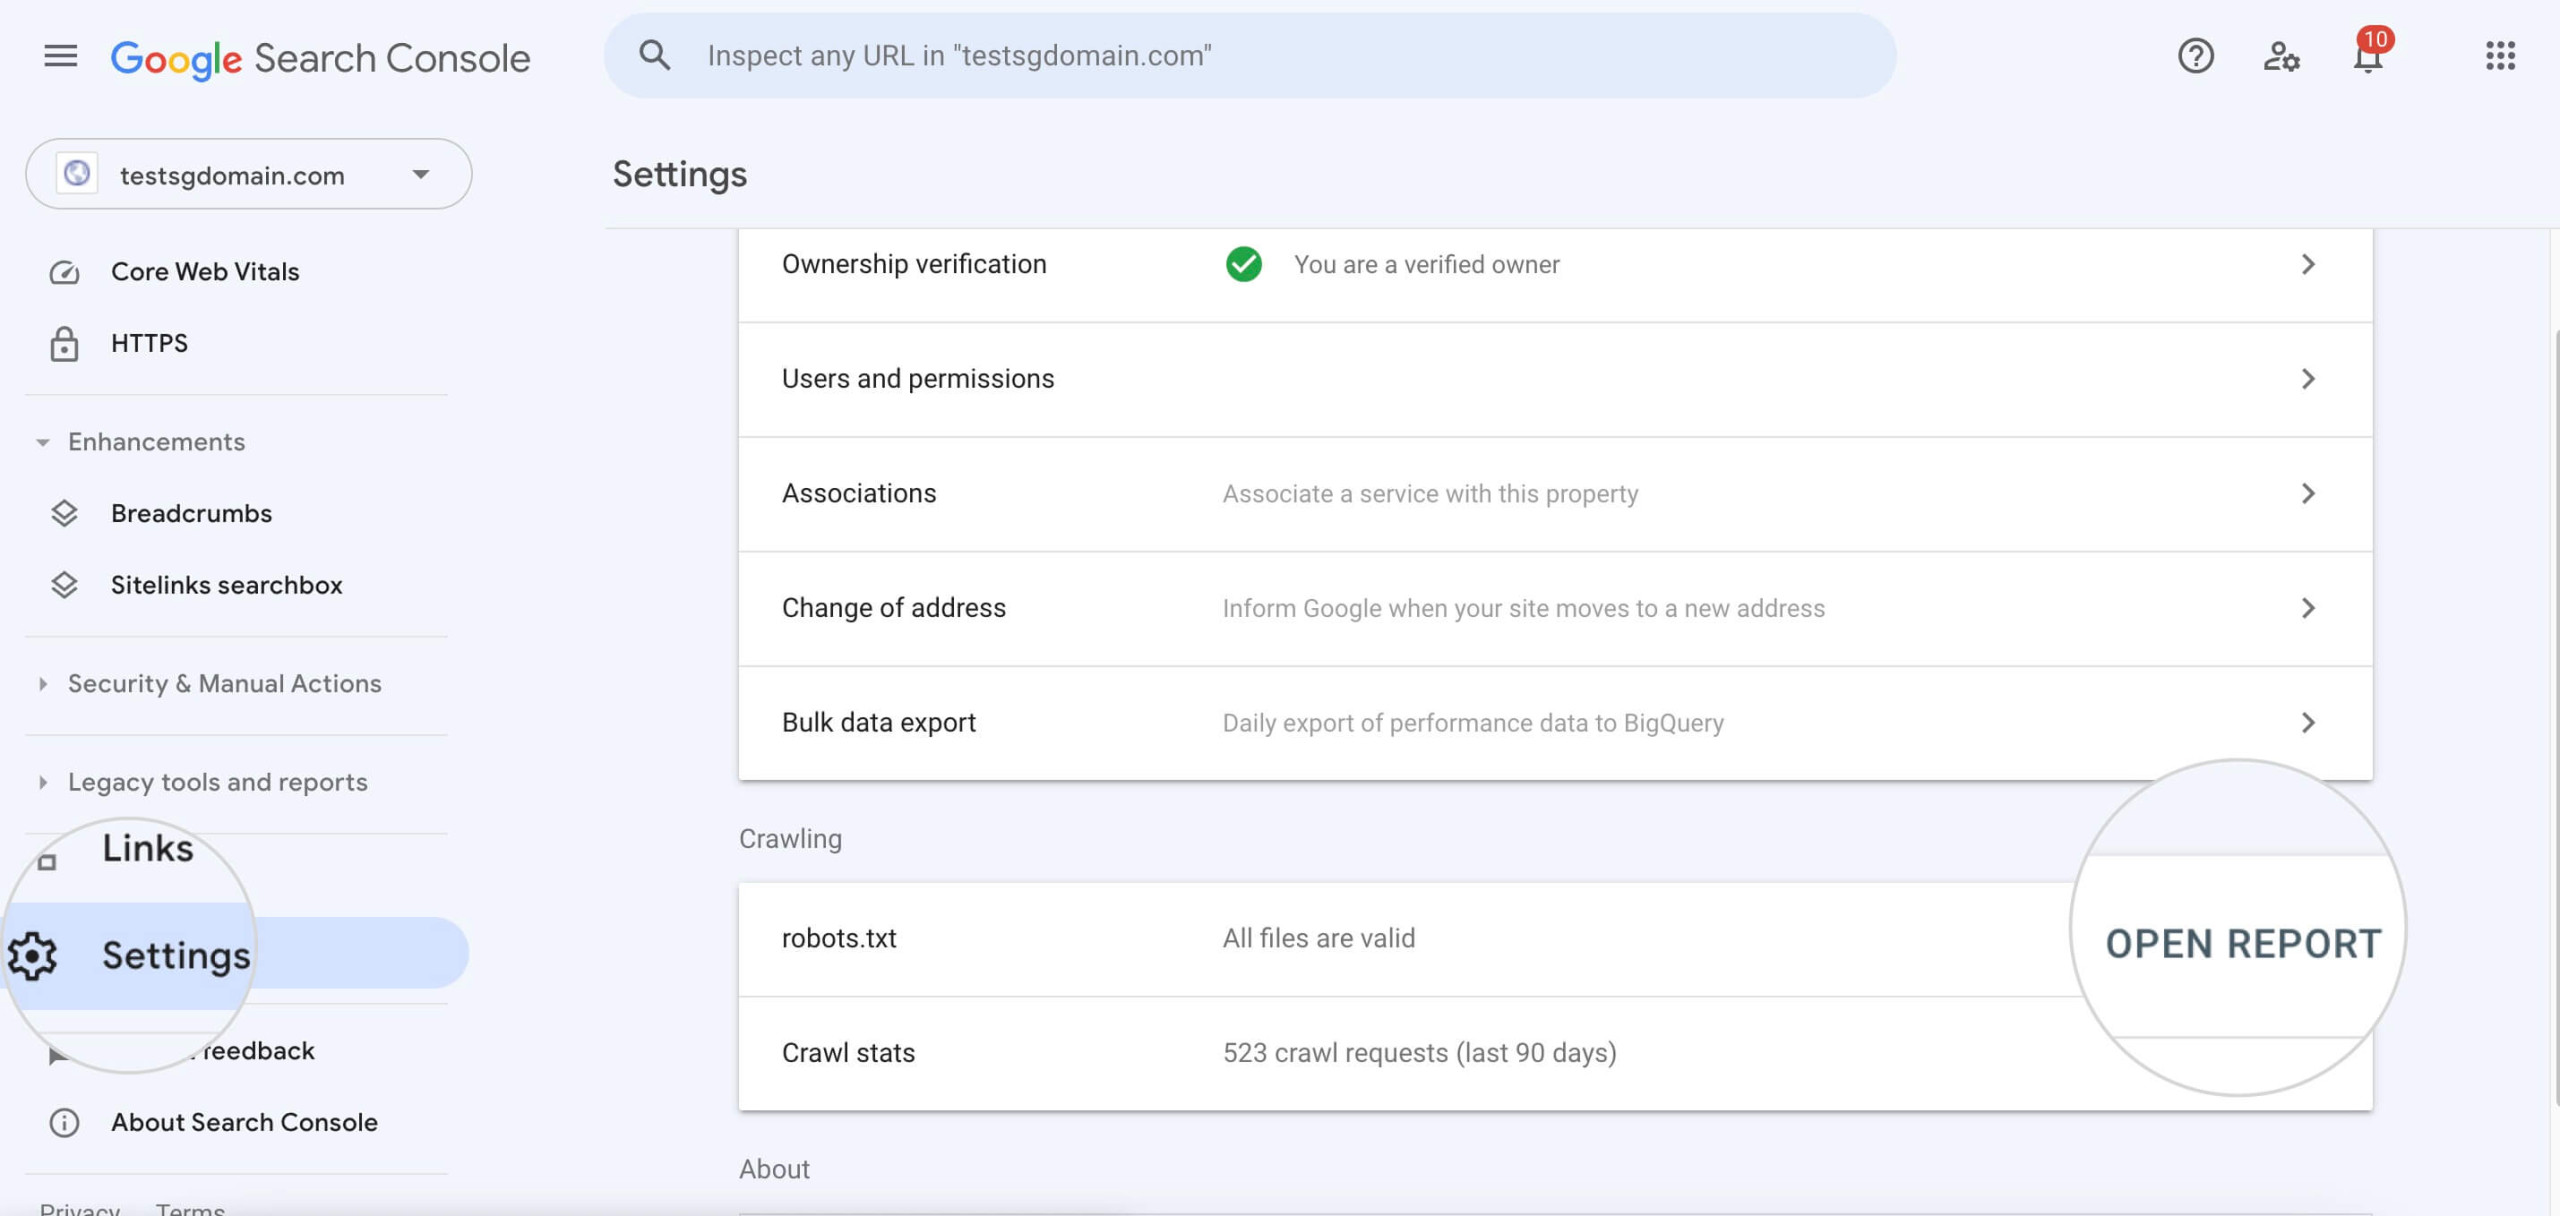
- See if the particular site’s robots.txt from your list is Fetched and if Google Search Console detects any issues with it.
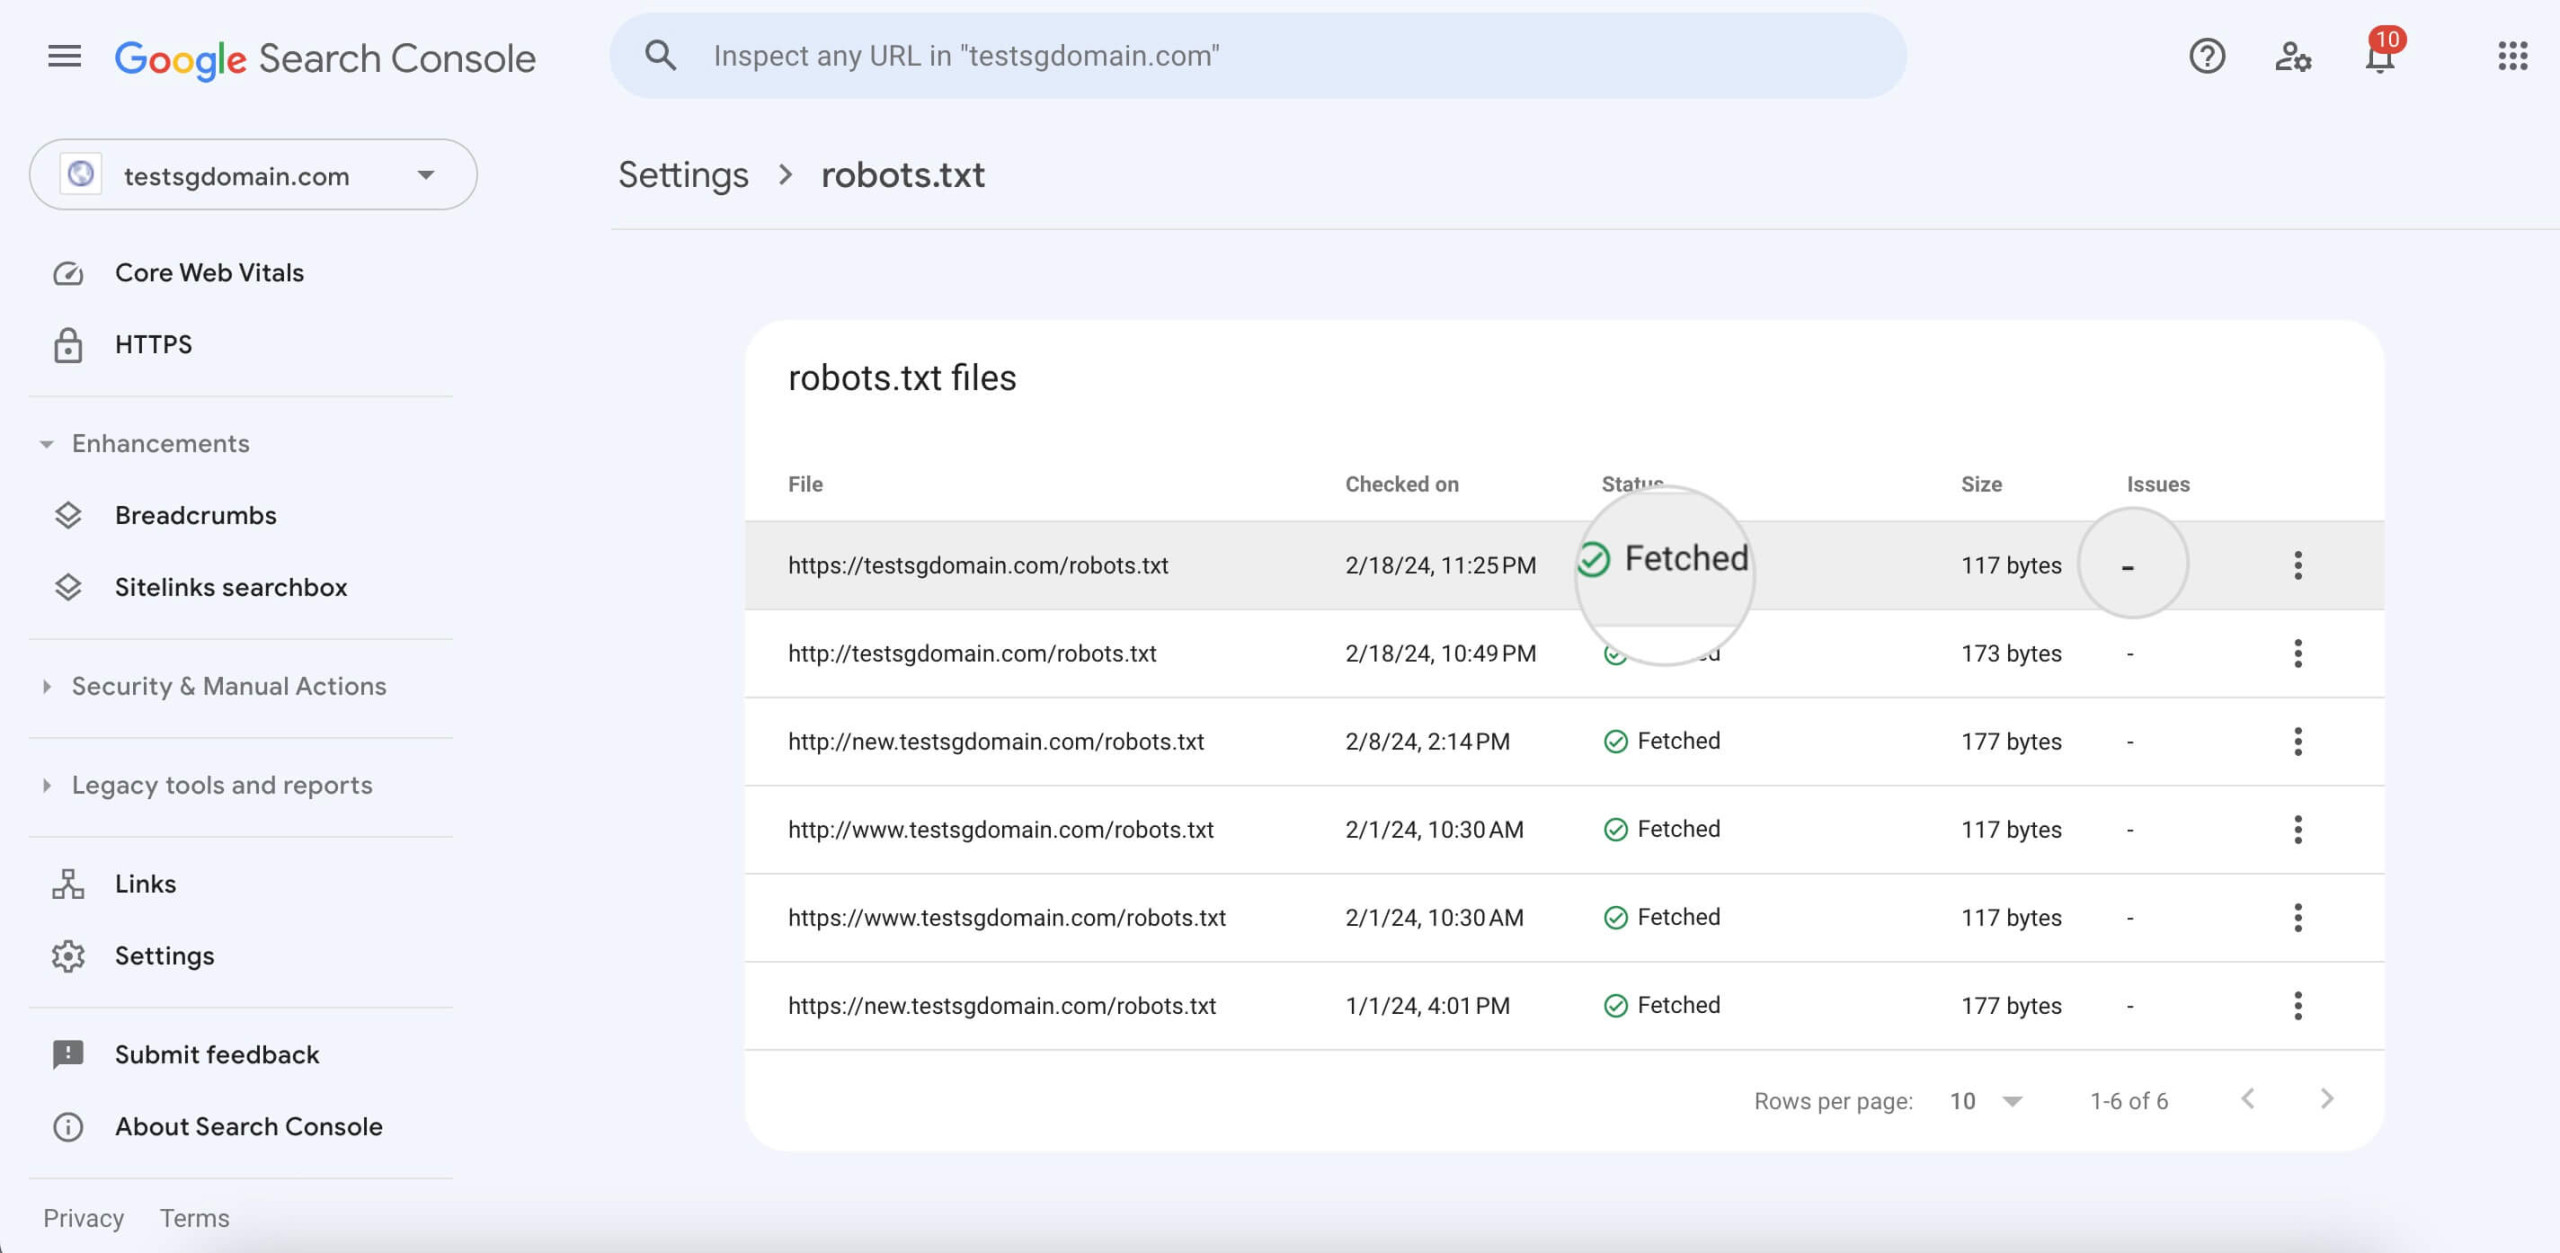
- Click on the file to check how Google reads your robots.txt.

Troubleshooting robots.txt
When troubleshooting your robots.txt, ensure search bots aren’t inadvertently barred from essential content. An overly restrictive robots.txt file may lead to important pages going unnoticed. Google Search Console can show you if you’ve blocked anything important.
- Ensure your robots.txt syntax is correct to avoid file processing issues due to incorrect rules.
- Check if your WordPress robots.txt file permits access to key resources like CSS and images, which are critical for site presentation.
- Directives should be precise, targeting only the intended bots to prevent miscommunication.
- Additionally, with the prevalence of mobile browsing, confirm that your robots.txt settings are optimized for mobile crawlers.
Keep an eye on it, and you’ll be good to go!
Conclusion
In wrapping up, remember that the user-agent directives in your WordPress robots.txt file guide search engine bots through your site. The default instructions fit the needs of most WordPress sites. However, you can tailor them to optimize how search engines interact with your content.
Make sure your robots.txt is clear, allows access to your sitemaps, and only restricts areas that should remain private. With these steps, you’ll ensure your site is crawled effectively for better visibility and SEO performance.