4 Fixes for “Your PHP Installation Appears to Be Missing the MySQL Extension, Which Is Required by WordPress.”
Table of Contents
Is your WordPress throwing the “Your PHP installation appears to be missing the MySQL extension” error? This error message blocks your WordPress dashboard access, and visitors may encounter issues when browsing your site.
When this MySQL extension error occurs, it prevents WordPress from connecting to the MySQL database. As a result, certain features or functionalities of your WordPress site may not work as expected.
In this guide, we’ll walk you through the 4 solutions to fix this issue and ensure your WordPress website runs smoothly again. So, let’s dive in and tackle this error head-on!
This error occurs when the PHP interpreter cannot find or load the necessary MySQL extension, which is essential for PHP to communicate with MySQL servers.
How to Fix the “Missing MySQL Extension” Error on a WordPress Site (4 Methods)
To address the WordPress MySQL extension error effectively, you must implement the proper solutions.
In this section, we will explore 4 practical techniques to fix this error message and restore the functionality of your WordPress website.
Let’s dive into the details and learn how to overcome the WordPress MySQL PHP extension error.
Method 1: Check your PHP version
Begin tackling this WordPress error by checking what PHP version is running on your installation. This way, you can determine the compatibility between your PHP version and the PHP extension required by WordPress.
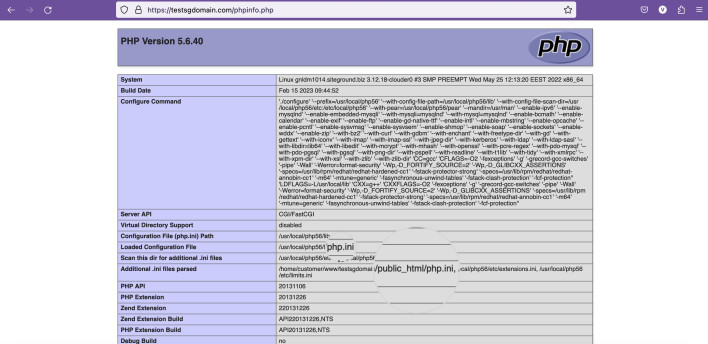
Check the version by creating a phpinfo file via FTP connection or from the File Manager in your web hosting control panel. This phpinfo file is a PHP file that provides detailed information for your PHP configuration when executed via the browser.
Create a serverinfo.php file
In this example, we’ll show you how to set up a phpinfo file from your File Manager, so follow the steps below.
- Log into your hosting account and navigate to Site Tools > Site > File Manager.
- Expand the public_html (root directory) for your WordPress site and click the New File button.
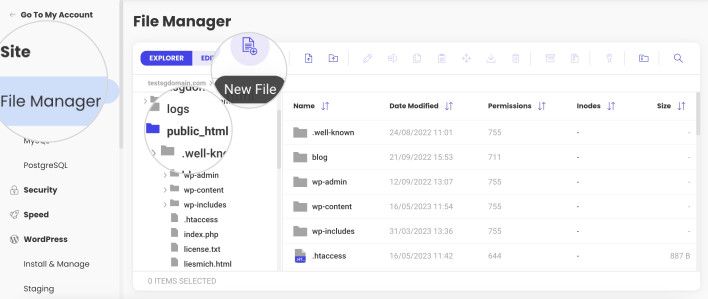
- Name the file serverinfo.php and click Confirm.

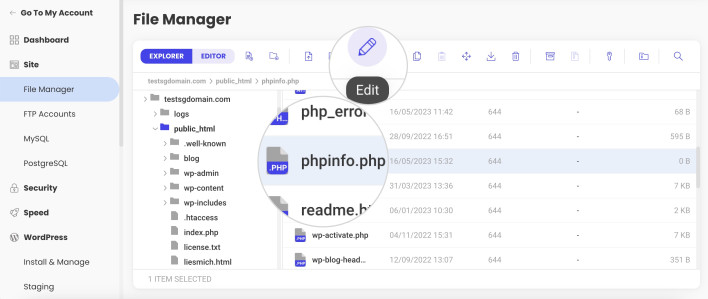
- Locate the file in public_html and click the Edit button from the toolbar above.
- Paste the following code snippet and Save the changes.
<?php phpinfo(); ?>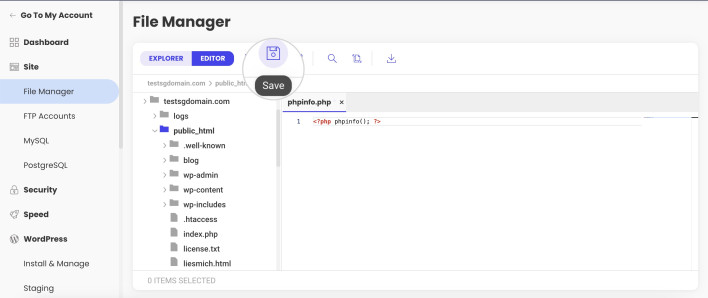
- Once you save the PHP code, you can execute it in your browser by adding “/serverinfo.php” after your domain name in the address bar. For example, if your website is named yourdomain.com, you can open the file by typing the address yourdomain.com/serverinfo.php.
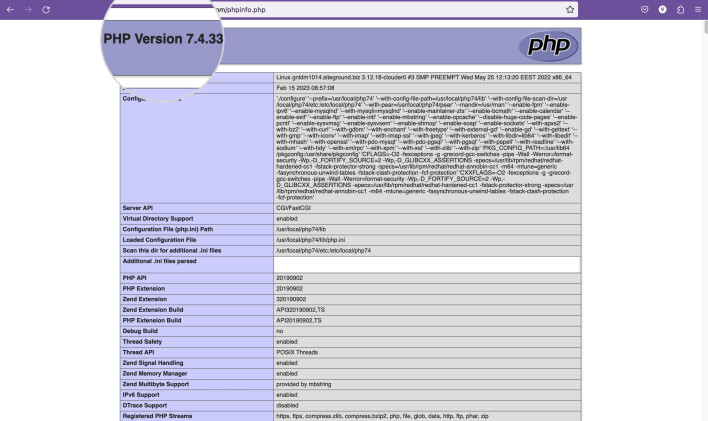
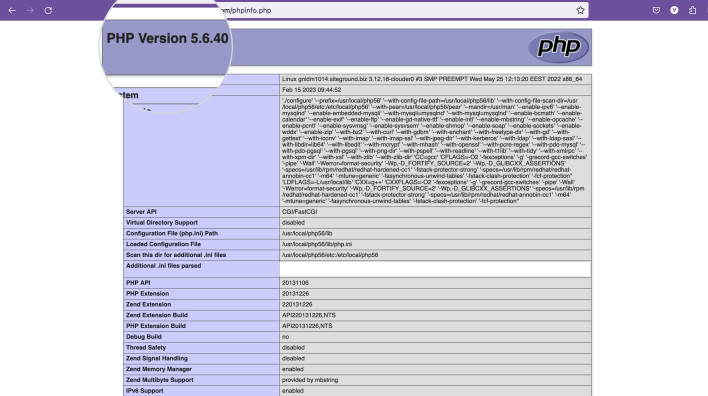
As you can see in the screenshot above, our version for the sample site is PHP 7.4.33. This version is compatible with the latest WordPress version and supports MySQLi extensions. Therefore, the Missing MySQL extension issue is due to outdated WordPress software.
Switch to a modern version of PHP
If you see PHP 5.6 or older displayed on the PHP info page – your WordPress installation throws the error message due to an outdated MySQL extension. Therefore, you must update your PHP to the current version.
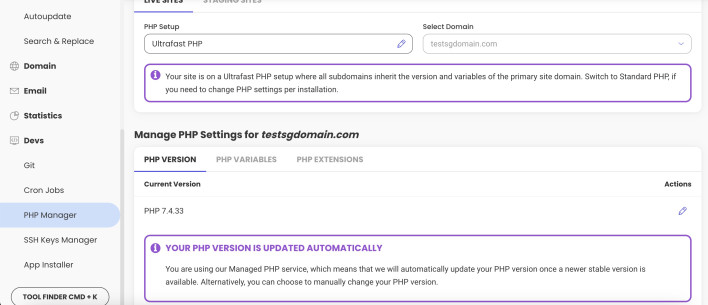
At SiteGround, we support PHP 7.3 and above, while the default version on our servers is PHP 7.4. Our Managed PHP service is enabled by default on all SiteGround accounts. This service sets the latest stable version and automatically updates it when a new one is confirmed stable.
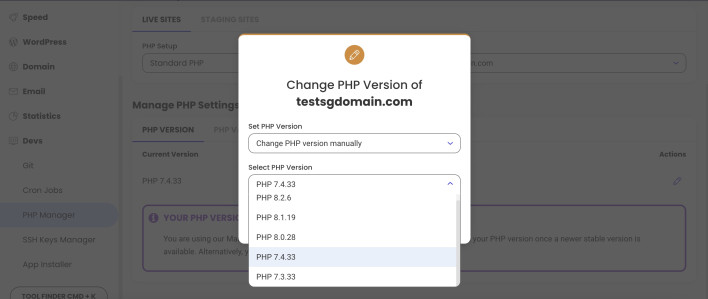
To change your current PHP version manually, follow the steps below.
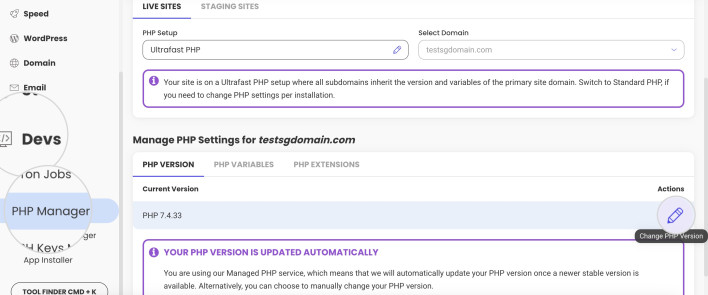
- Navigate to Site Tools > Dev > PHP Manager in your SiteGround account.
- Click on the pencil icon next to the current PHP version to change it.
- Select PHP version from the respective dropdown menu.
Method 2: Update your core WordPress version
In case your server uses PHP 7+, the error you are dealing with is likely caused by older WordPress software. Thus, you must update WordPress to resolve the “Missing the MySQL extension” issue.
You can update WordPress manually, automatically, or from the WordPress Dashboard.
To update your WordPress site from the WordPress Admin area, follow the steps below.
- Log into your WordPress Dashboard.
- Navigate to the WordPress Updates section and check if there are available updates.
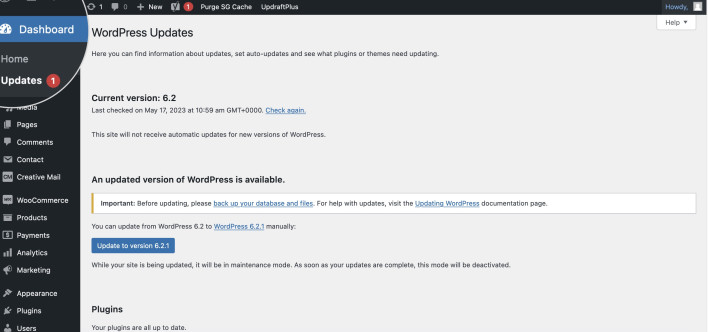
- Backup your WordPress files and database or create a Staging copy to test the update on it.
- Click the “Update to version…” button and allow WordPress to work its magic.
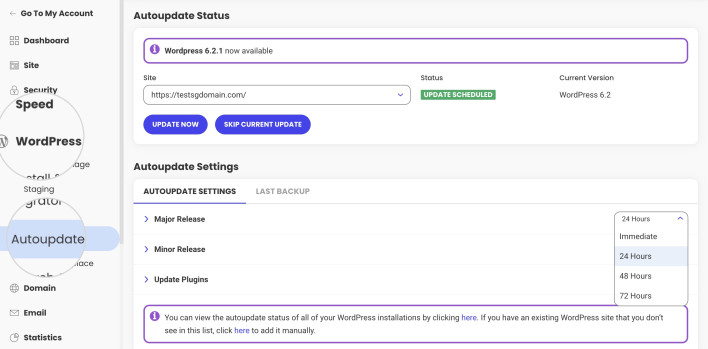
Alternatively, SiteGround clients can use our
After updating your WordPress core version, update all outdated plugins and themes to prevent any incompatibilities.
When all your software is up to date, the “PHP installation appears to be missing the MySQL extension” message should be resolved.
Method 3: Ensure the MySQL extension is installed
The third method to fix your PHP installation is to determine if the PHP MySQLi extension is missing. You can check the error logs or use the phpinfo() function to view the PHP server configuration and extensions.
If the MySQLi extension is marked as missing, it is either unavailable or not configured correctly on your server. For example, if your server still uses PHP 5.6 or an older version, it would be missing the MySQL extension, which is required by the WordPress software.
To ensure the MySQL extensions are installed, go back to the PHP information page and scroll down to the MySQL section. If the extension is installed, you can find its version next to the “Client API library version.”

If you can’t find the extension listed in the respective section, it means that it is not installed. To fix your PHP installation, you must contact your hosting support to have them install it for you.
Method 4: Check if the PHP extension is configured properly
When you confirm the extension is installed, but you still see the PHP installation appears to be missing the required extension message, there may be a configuration issue. This happens when trying to run a php.ini for Windows servers on a Linux server, or vice versa.
Another possible cause is that the php.ini file may contain incorrect file paths. In both cases, you must locate and delete the faulty file to solve this WordPress error.
You can find the file path to php.ini next to the Loaded Configuration File section on the phpinfo() page and next to Additional .ini files parsed.
After deleting the faulty php.ini, the WordPress MySQL extension error should be resolved.
3 Main Reasons Causing The WordPress MySQL Extension Missing Error
The WordPress MySQL Extension Missing Error is a common database connection error with WordPress sites. It indicates that the MySQL extension, required for WordPress to communicate with the MySQL database, is not present or properly configured in the PHP installation.
Keep reading to learn more about the 3 main triggers of this error.
1. Outdated Version of WordPress with PHP 7+
Older WordPress core versions may not be fully compatible with newer PHP versions, specifically PHP 7 and above, which can cause the MySQL extension error message.
Using an outdated version of WordPress with a newer PHP version can pose security risks. WordPress releases regular updates introducing new features, addressing vulnerabilities, and enhancing security. If your WordPress version is out of date, it may be missing the most recent security patches. As a result, your website is more vulnerable to hacking attempts and malware.
PHP versions 7 and higher have introduced significant improvements and performance boosts. However, these enhancements may be incompatible with older WordPress versions.
In this regard, the MySQL extension has been replaced by MySQLi since PHP 7.0. So, the MySQL extension won’t be found if you’re running an older WordPress version with PHP 7+. Thus, you’ll get the “PHP installation appears to be missing MySQL extension” error.
2. Missing PHP MySQLi extension
The absence of the PHP MySQLi extension is the second cause of the “Missing MySQLi extension” error. The PHP MySQLi extension is a collection of functions that allows PHP to communicate with MySQL databases. It offers a more user-friendly interface and additional capabilities than the older MySQL extension.
When the PHP MySQLi extension is missing, the necessary extension files (mysqli.so or php_mysqli.dll) are either not included in the PHP distribution or not loaded dynamically. This problem can occur if the extension is not enabled or the PHP installation is not properly configured.
3. Using PHP 5.6 or Lower
The third possible cause for missing the MySQL extension is using PHP 5.6 or lower for your WordPress installation. PHP version 5.6 and older versions support the PHP MySQL extension.
However, new WordPress installations use the latest core version, so PHP MySQLi is the extension that is required.
Hence, if you are running the latest version of WordPress, but your web server is configured with an older PHP version, you may get the MySQL extension error.
5 Tips for Preventing the MySQL extension error in WordPress from happening again
Tip 1: Use the latest stable PHP version
Using the latest stable PHP version ensures your WordPress website has the necessary features, improvements, and security updates. Additionally, it minimizes the chances of encountering compatibility issues, such as the MySQL extension error.
The perfect approach to using the latest version of PHP is to enable SiteGround’s Managed PHP service. It is active by default for all accounts and automatically updates your PHP once we determine that the newer version is stable.
Tip 2: Keep WordPress and plugins up-to-date
Regularly updating your WordPress installation and plugins is crucial for maintaining a secure and functional website. Updates often include bug fixes, performance enhancements, and patches for vulnerabilities.
Outdated plugins can cause a lot of damage to your site and overall brand reputation by making it vulnerable and unstable. Keep your plugins up to date to ensure your site runs smoothly and provides a secure and seamless user experience.
Tip 3: Regularly Backup Your Website
Create a safety net for your site by doing regular backups for your WordPress website. This way, if your PHP installation appears to be missing the extension that is required all of a sudden- you can restore WordPress from a backup.
SiteGround generates daily backups automatically for all websites, and you can restore your site with a few clicks.
Tip 4: Test updates in a Staging environment
Adopt the habit of trying out new changes in a Staging environment before applying them to your live website. A staging environment is a separate copy of your website where you can experiment with updates, plugins, or theme changes in a controlled setting.
SiteGround clients can benefit from our Staging tool to test new features and changes before pushing them to the live site. Staging your WordPress site allows you to identify and resolve issues like the Missing MySQL extension error without affecting your live site.
Tip 5: Optimize your MySQL database
Over time, databases can accumulate unnecessary data, leading to slower performance and potential errors. Optimize your database by cleaning up unused tables, optimizing queries, and removing unnecessary data.
Database optimization improves your WordPress performance, efficiency, and stability. Moreover, it reduces the chances of database errors like the MySQL extension error.
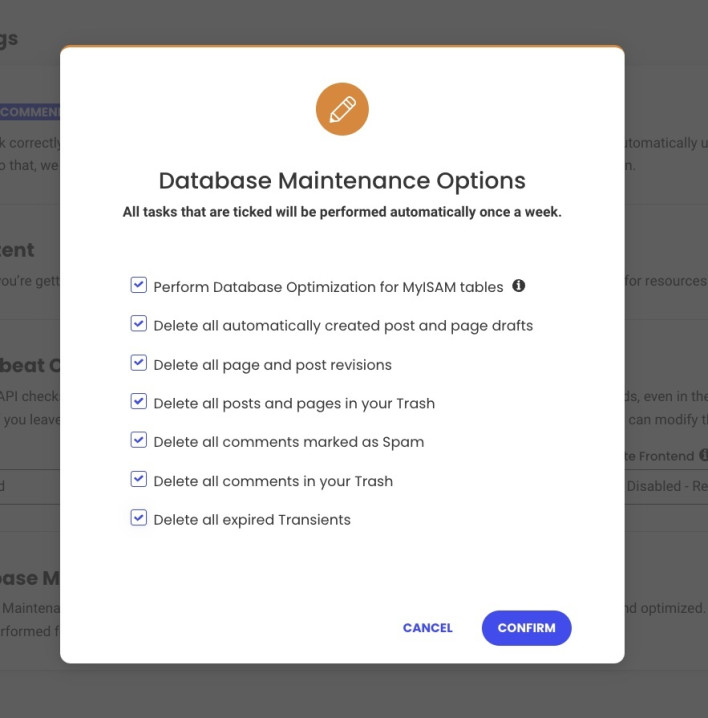
You can also benefit in this regard by using the Speed Optimizer plugin. It has the functionality of performing scheduled database maintenance.
Activate it from your WordPress dashboard by navigating to Speed Optimizer > Environment > Scheduled Database Maintenance.
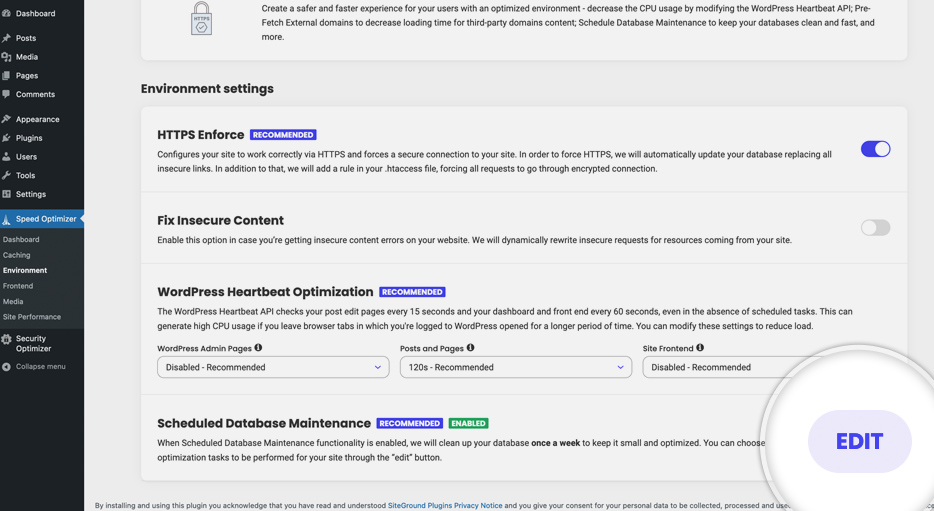
Click the Edit button, and in the following pop-up window, select the actions that the scheduled maintenance should perform.
Summary
Encountering the dreaded error message “Your PHP Installation Appears to Be Missing the MySQL Extension Which Is Required by WordPress” can be incredibly frustrating. But fear not! With the methods outlined in this guide, you’ll be able to tackle the issue head-on and restore your WordPress site to its full functionality. Say goodbye to the troubles and hello to a smooth and seamless experience for both site owners and visitors.