Google PageSpeed Insights Guide - 21 Ways to Improve Your Score
Table of Contents
In the dynamic, fast-paced, and ever-changing world of the internet, millions of websites are vying for visitors’ attention. This fierce competition has put a strong emphasis on speed optimization and user experience, which are critical factors that can make or break your website.
This is where you can put Google PageSpeed Insights (PSI) to good use. In this guide, we will explore what PageSpeed Insights is and how it can help you get your website ahead in search engine result pages.
By entering your website URL, PSI will evaluate your website’s performance and break down the results into several key metrics.
These results can help you understand what’s slowing your site down and what you can do to improve your website.
What is the Importance of Google PageSpeed Insights Score?
In the competitive digital landscape, having a faster website can give you an edge over slower competitors. Having a fast, steady, well-designed, and easy-to-navigate website leads to higher conversions and sales.
Google PageSpeed Insights checks your website against several key metrics and assigns scores to each to easily understand how your site fares. A higher PageSpeed Insights score can help you attract more visitors and position your website ahead in the SERP(Search Engine Results Page). Using the tool regularly, you can monitor your site performance and focus on specific areas that need refinement to keep up with your competitors.
Nevertheless, you should not obsess about getting 100/100 readings on all metrics. Even the most popular websites can’t achieve a perfect score. Increasing your score should not come at the expense of the user experience.
You should strive to get as high a score as possible, but as long as your website hits the marks “in the green” on all metrics, you should rest easy. This is especially true if you’ve already surpassed the 90% threshold. Trying to increase the score above 90 often has no practical benefits, and investing time and resources might not be worthwhile.
Google PageSpeed Insights vs. Google Lighthouse
Both PageSpeed Insights and Lighthouse are tools developed by Google that measure your website’s performance. However, they employ different evaluation methods:
- Google PageSpeed Insights undertakes a more general approach – it derives data from the experience of real-time visitors to your website. In addition, PSI evaluates your website in a controlled environment, which provides results that developers will find useful. Thus, PageSpeed Insights paints a broader picture of your website’s performance.
- Lighthouse focuses on assessing your website on a simulated connection with the same preset conditions – the same network and predefined devices. It provides more technical data, which is particularly useful to developers who need to debug websites.
How Does My Google PageSpeed Insights Score Affect SEO?
When calculating your SEO score, Google doesn’t run your website through PageSpeed Insights. Thus, the PSI score doesn’t directly impact your ranking.
That being said, PageSpeed Insights measures metrics, which are key ranking factors for your SEO score. Thus, using PSI, you can improve your site speed, accessibility, and user experience, which will inevitably bump up your SEO score.
How to Use the Google PageSpeed Insights Tool?
Using Google PageSpeed Insights is pretty straightforward. You just have to enter your page URL in the address bar on the screen. The tool will assess your website and visualize the results. Below are the step-by-step instructions.
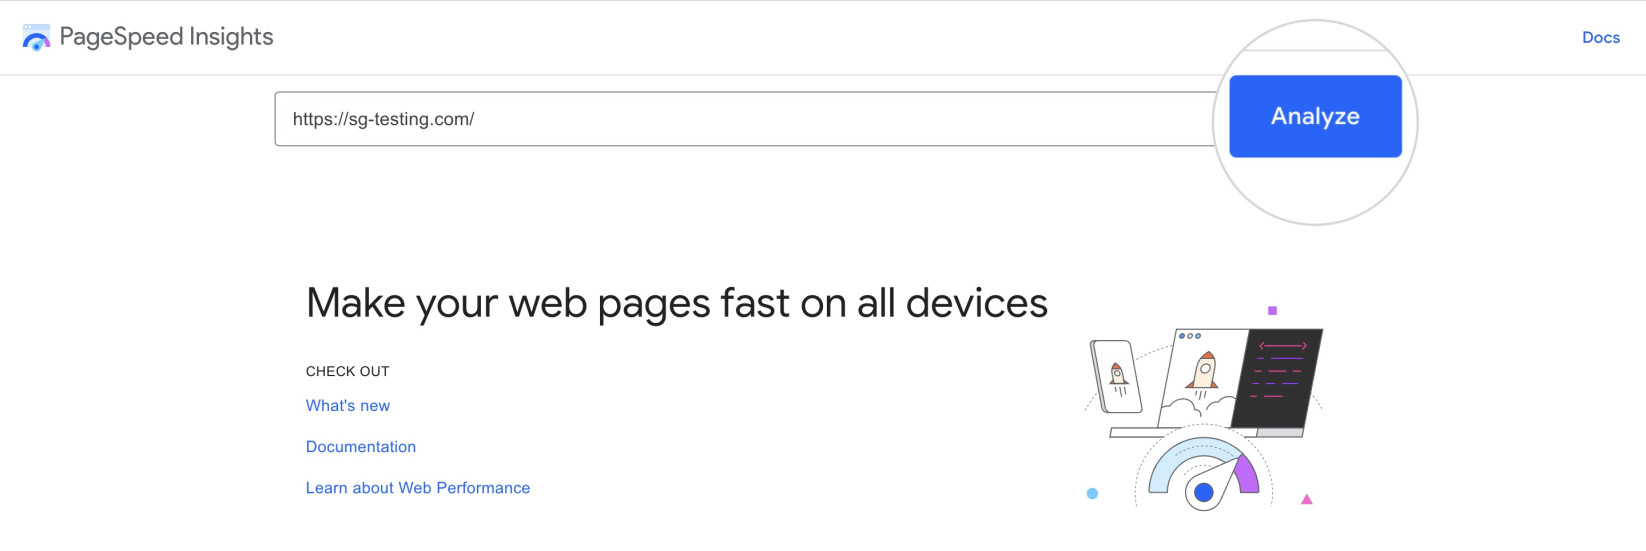
- Open the PageSpeed Insights page.
- Type your website URL in the address bar and press Analyze.
- PageSpeed Insights will crawl your website for a few minutes and visualize its performance metrics. Examine the speed test results for both Mobile and Desktop devices.
You can switch between This URL (shows results for the specific page you submitted) and Origin (shows results for the entire domain/website).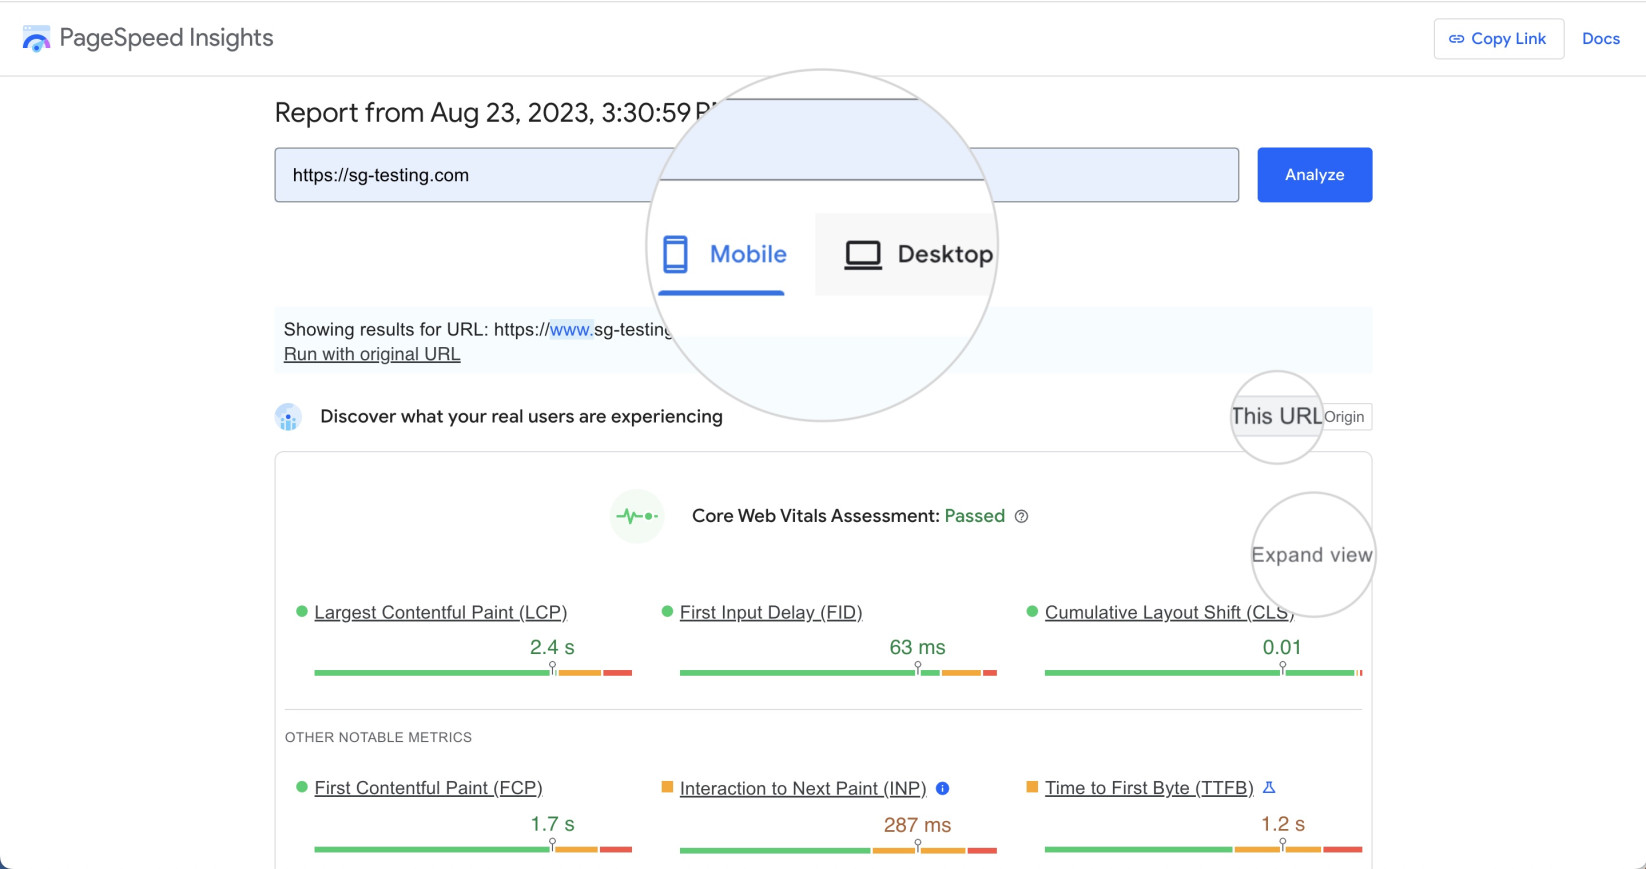
- Click on Expand view for a detailed view of the Core Web Vitals metrics.
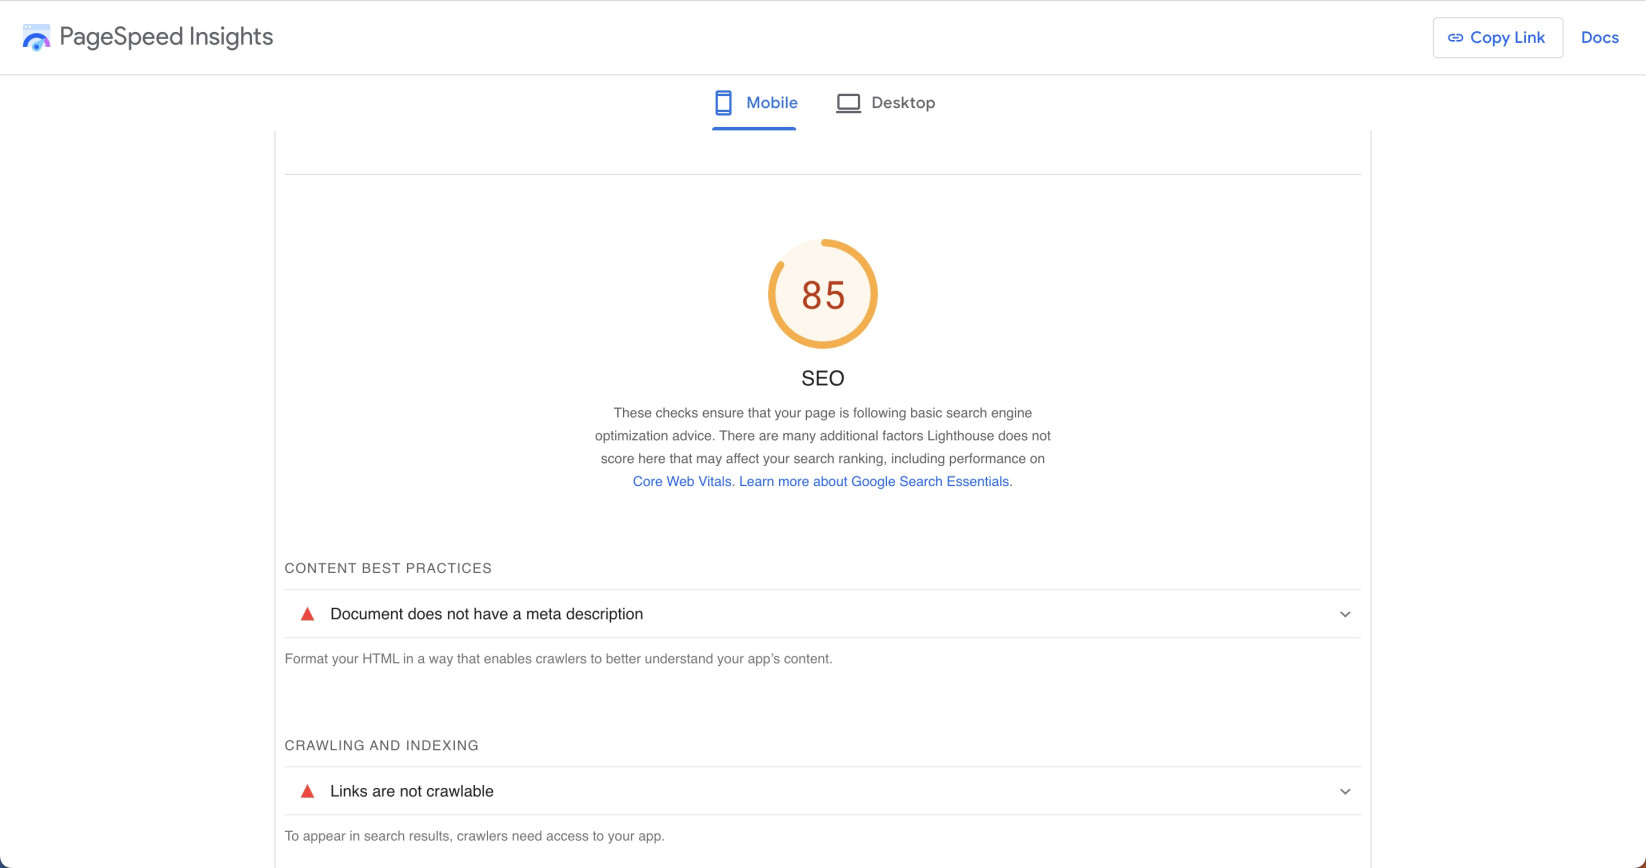
- Move down to the Lighthouse results and click on one of them to view outstanding issues.
PageSpeed Insights will list problems related to the selected metric.
- Scroll down to the Opportunities section to see suggestions for general improvements and estimations of how much loading time each one would save if applied.
Inspect the Diagnostics section as well, which suggests advanced improvements.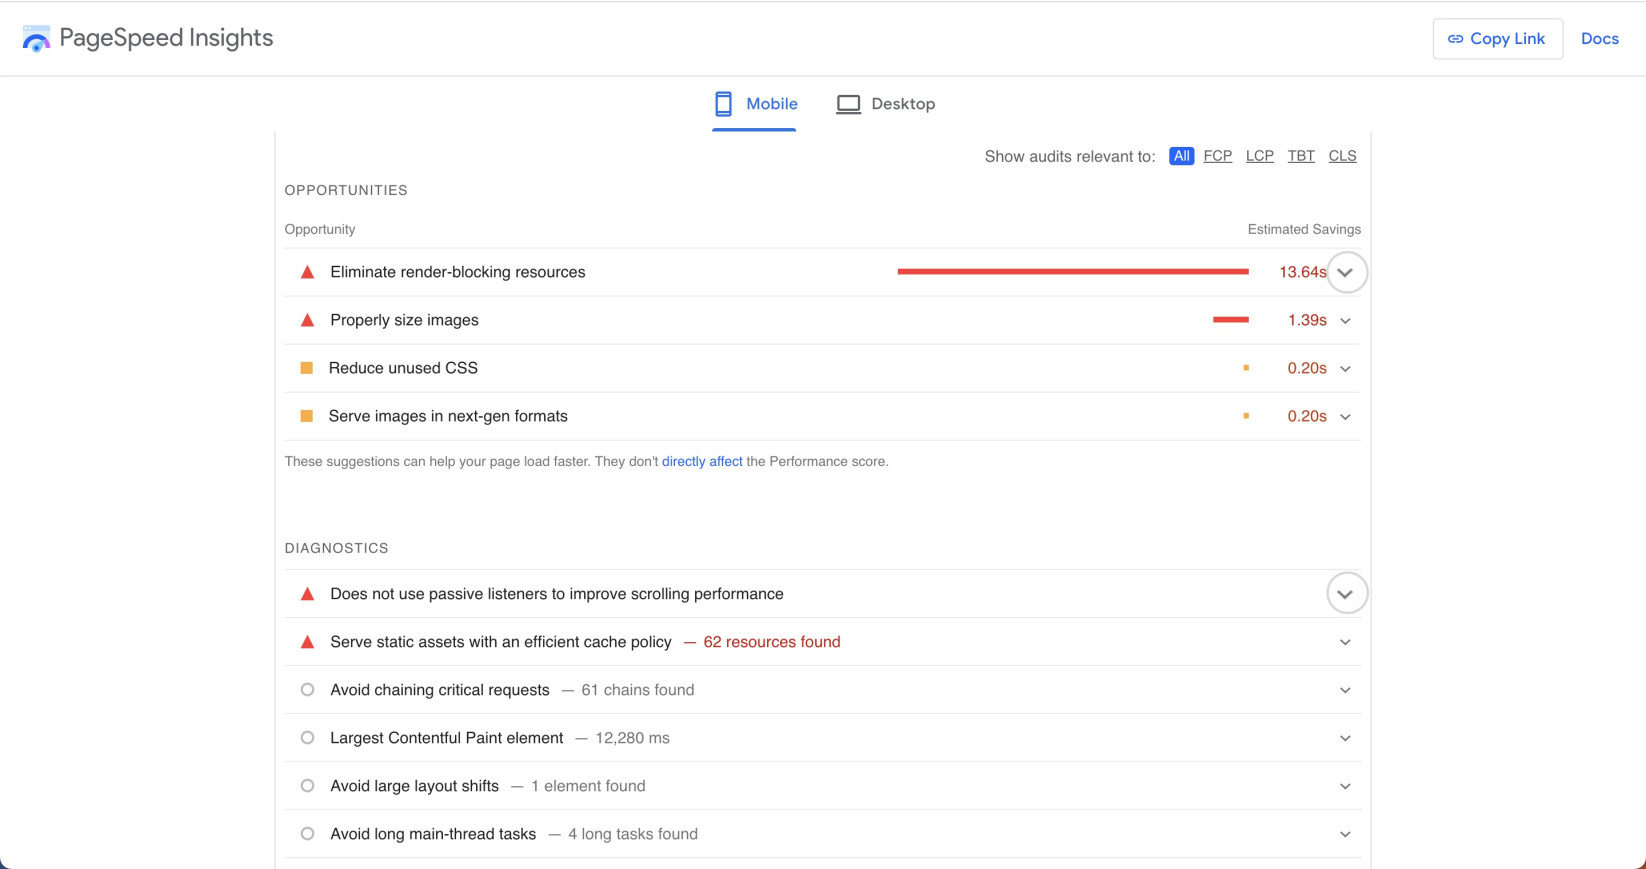
- Click on the arrow next to each problem to view its detailed report.
Understanding PageSpeed Insights Scores and Reports
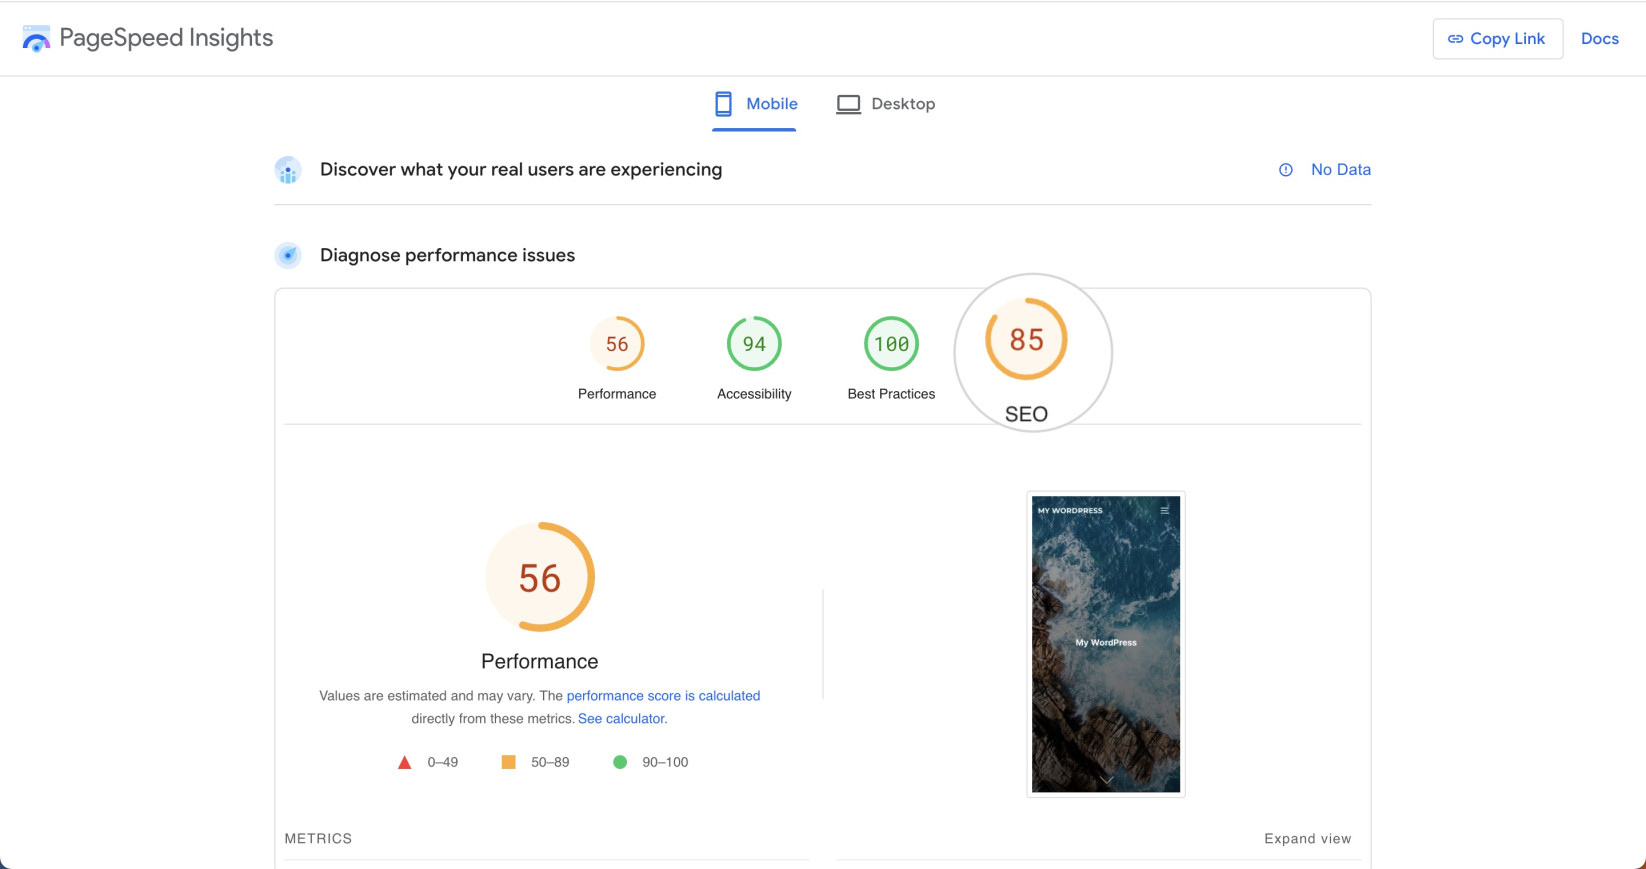
Google PageSpeed Insights scores and reports provide a comprehensive analysis of your webpage’s performance, considering various metrics and benchmarks.
After it audits your web page, PSI assigns a score between 0 and 100 based on its performance. This score is categorized as follows:
- 0 to 49 (poor) – Indicates that the page speed needs serious improvement.
- 50 to 89 (average) – The page performance is decent, but could be improved.
- 90 to 100 (good) – The web page is well-optimized.
The higher the score, the better your webpage performs and the better the user experience.
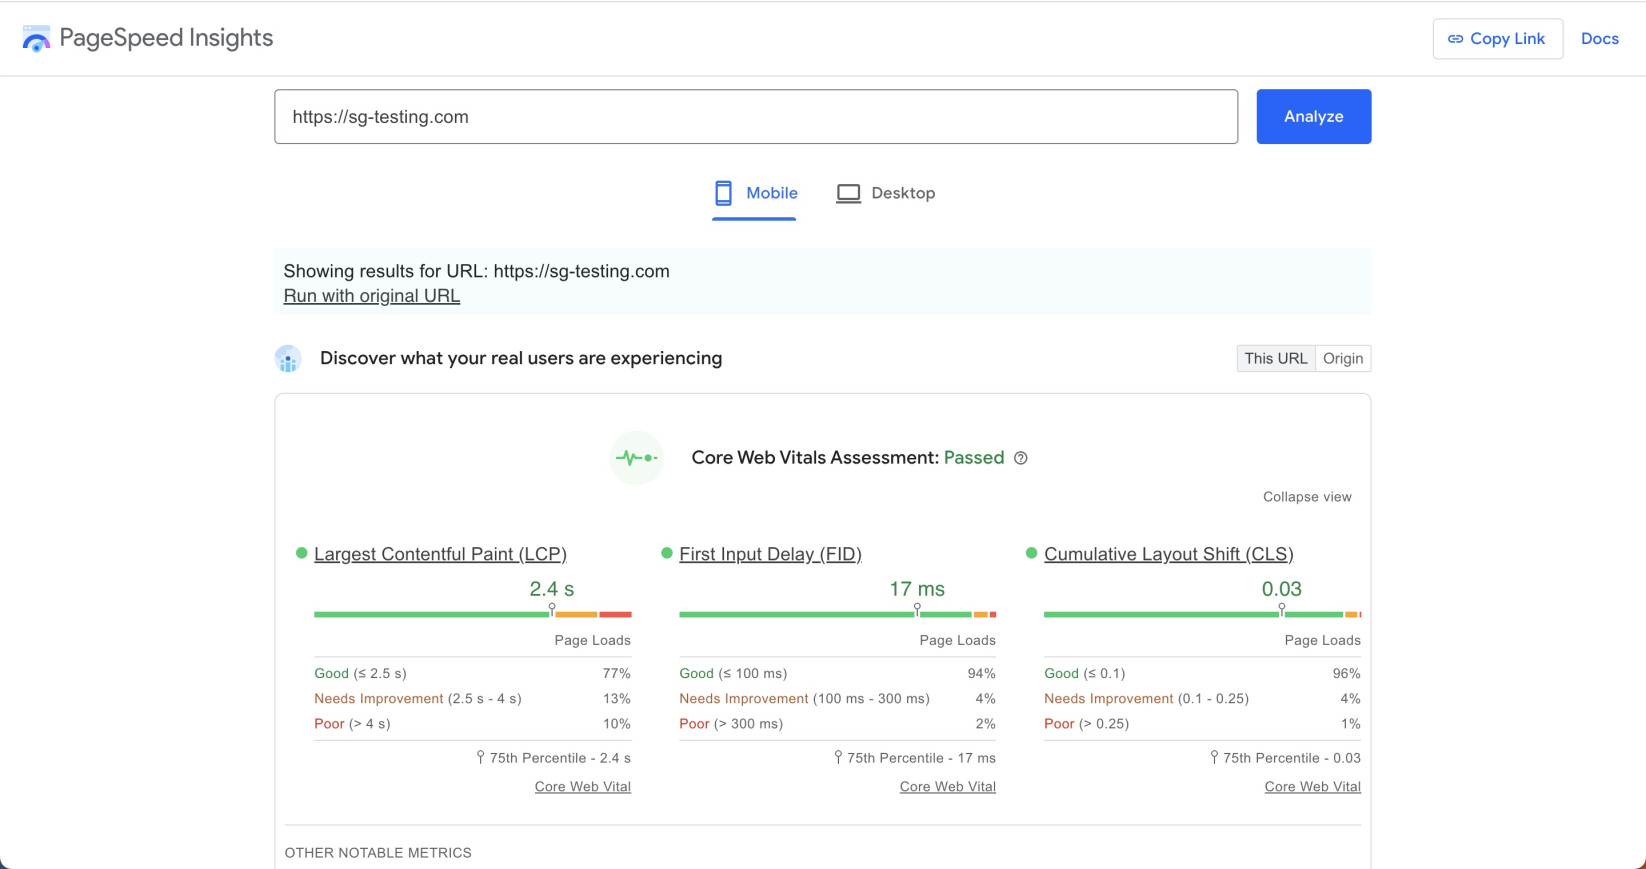
Core Web Vitals Assessment (Field Data)
Field data provides a snapshot of your webpage’s performance using real-world data collected from actual users through Chrome User Experience Report (CrUX). These include First Contentful Paint (FCP), Largest Contentful Paint (LCP), First Input Delay (FID), and Cumulative Layout Shift (CLS).
- First Contentful Paint (FCP) – Measures the time from the moment the page starts loading to when any part of the page’s content is rendered on the screen.
- Largest Contentful Paint (LCP) – Measures the time the main visual page element loads on the screen. It is a good speed performance indicator.
- First Input Delay (FID) – Indicates how interactive your site is. Specifically, it measures the time it takes for your website to respond to the first user interaction, like clicking a button or link.
- Cumulative Layout Shift (CLS) – Represents the visual stability of your web pages. It measures how often a visitor experiences unexpected layout shifts when the page loads.
- Time to First Byte (TTFB) – This metric measures the time it takes for the first byte of a website response to user requests to arrive. TTFB is an indicator of a web server’s responsiveness and speed.
- Interaction to Next Paint (INP) – A new metric that will replace First Input Delay (FID) in March 2024. It assesses the overall responsiveness of a web page to user interactions like clicks, taps, and keyboard inputs performed during the visit. The final result represents the longest interaction measured during a single visit.
These results illustrate the real-life visitors’ experience with your website. PageSpeed Insights considers that your website passes the Core Web Vitals test for either mobile or desktop devices if you surpass the 75% score threshold.
Lab Data
Lab data offers insights into your web page’s performance based on tests in a controlled environment. The results are generated by Google Lighthouse, which simulates a connection on a predefined network and selected desktop and mobile devices.
It’s useful for debugging performance issues and offers metrics like Speed Index, Time to Interactive, and Total Blocking Time.
Opportunities, Diagnostics, and Passed Audits
Opportunities are Google PageSpeed Insights recommendations of general improvements of the page load speed.
On the other hand, the Diagnostics section provides additional information about how a page adheres to the best web development practices.
Passed audits are the factors that your webpage already excels in, indicating the aspects of your website that are well-optimized.
21 Steps to Improve Google PageSpeed Insights Score
Step 1. Reduce Server Response Times (TTFB)
By reducing server response time or Time to First Byte (TTFB), you can improve your website’s performance and increase your Google PageSpeed Insights score.
TTFB is the amount of time it takes for a user’s browser to receive the first byte of data from your web server after a request is made. A high TTFB can lead to a lag in web page rendering, causing a noticeable delay for the user. Google recommends a TTFB of under 200 milliseconds.
Below are the most critical strategies to reduce the server response time.
- Choose a Reliable Hosting – The most crucial factor in reducing the server response time is choosing a reliable host with high-performance hardware and software solutions. SiteGround has top-of-the-line servers and various speed improvement solutions that ensure your website’s optimal performance and fast loading speed.
- Enable Server Caching – Server caching stores a version of your website on the server, reducing the time it takes to generate a page.
- Optimize Your Database – A poorly optimized database can result in slow server response times. Regularly clear out old or unnecessary data, and consider using an indexing solution to speed up database queries.
WordPress users can consider using plugins that do scheduled database maintenance, like Speed Optimizer. To activate this feature, log into your dashboard and go to Speed Optimizer > Environment > Scheduled Database Maintenance. Click on the corresponding Edit button to select the maintenance options that the plugin will perform.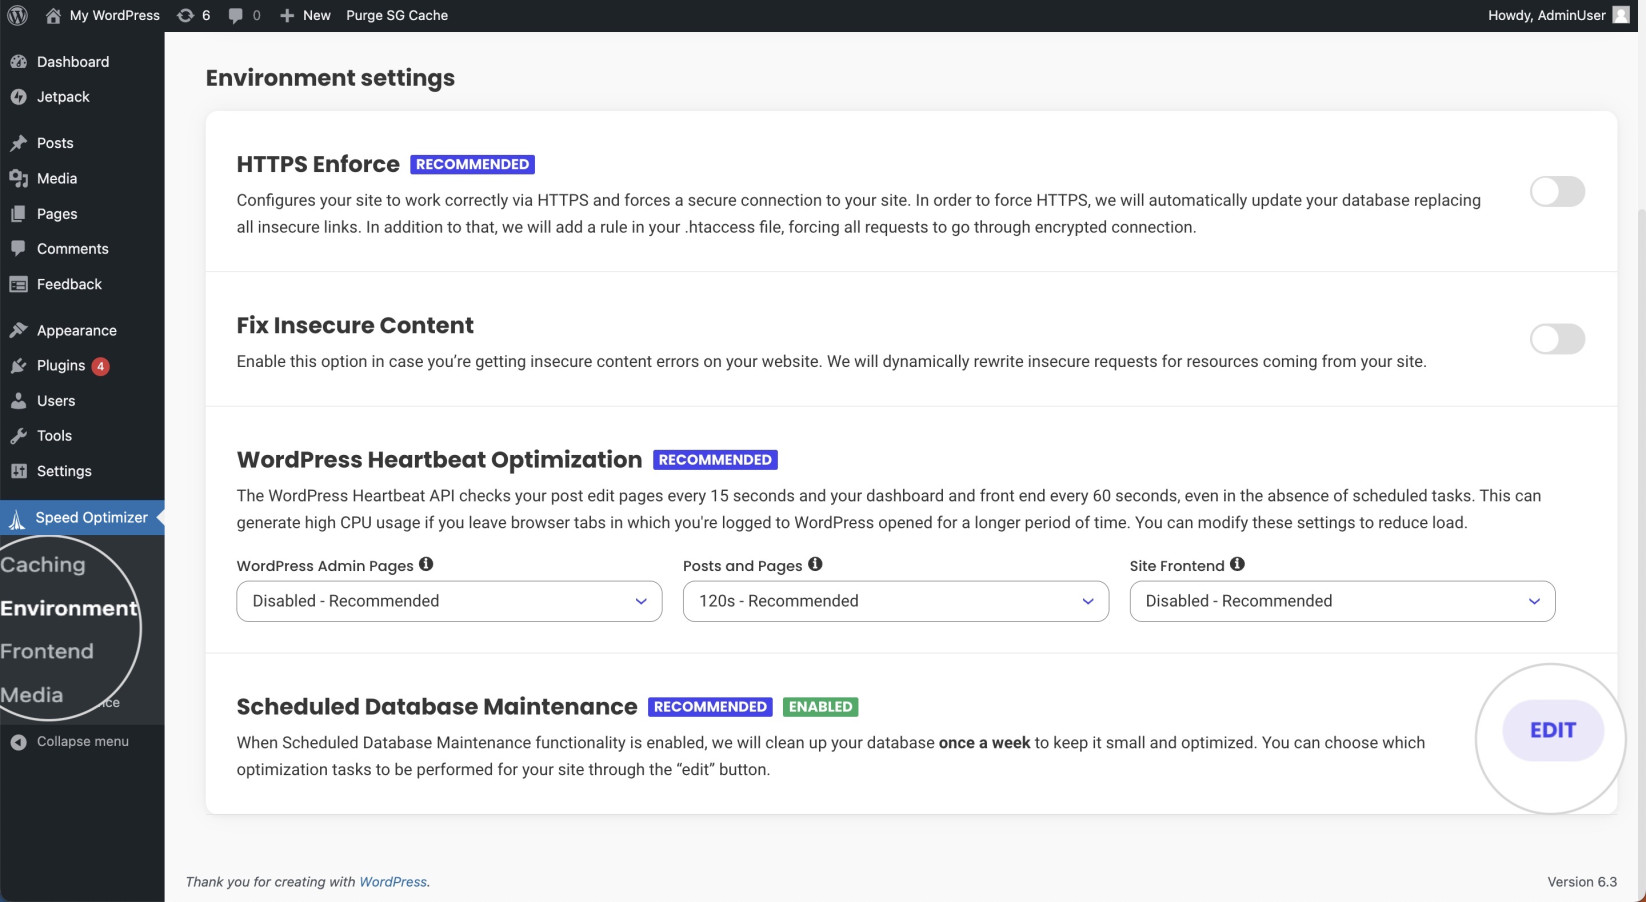
- Use a Content Delivery Network (CDN) – CDNs can cache your site’s content on servers around the world. This means a user’s request doesn’t need to travel as far, reducing TTFB.
- Optimize Your Application Code – Ensure the backend code of your website is clean, efficient, and doesn’t contain unnecessary tasks that could slow down response time.
What specific actions can you take to implement these steps? Find out in the following steps.
Step 2. Reduce CSS and JavaScript
Large and bulky CSS and JavaScript files can significantly slow down your website and lower your Google PageSpeed Insights score. Reducing the size of these files can speed up your website by decreasing the amount of data that needs to be downloaded, parsed, and executed. Below, you will find some of the most effective ways to achieve that.
- Minification – This is the process of removing all unnecessary characters from the source code without changing its functionality. For WordPress websites, consider the Minify CSS and Minify JavaScript functionalities of the Speed Optimizer plugin.
- Eliminate Unused Code – As your website evolves, there may be chunks of CSS and JavaScript code that are no longer needed.
- Use Compact Code Structures – Using shorthand CSS properties and optimizing your JavaScript code structure can drastically reduce the size of your files. Avoid writing out long, repetitive code where a more compact alternative is available.
Learn practical methods to reduce the JavaScript and CSS files in the following sections.
Step 3. Eliminate Render-Blocking Resources
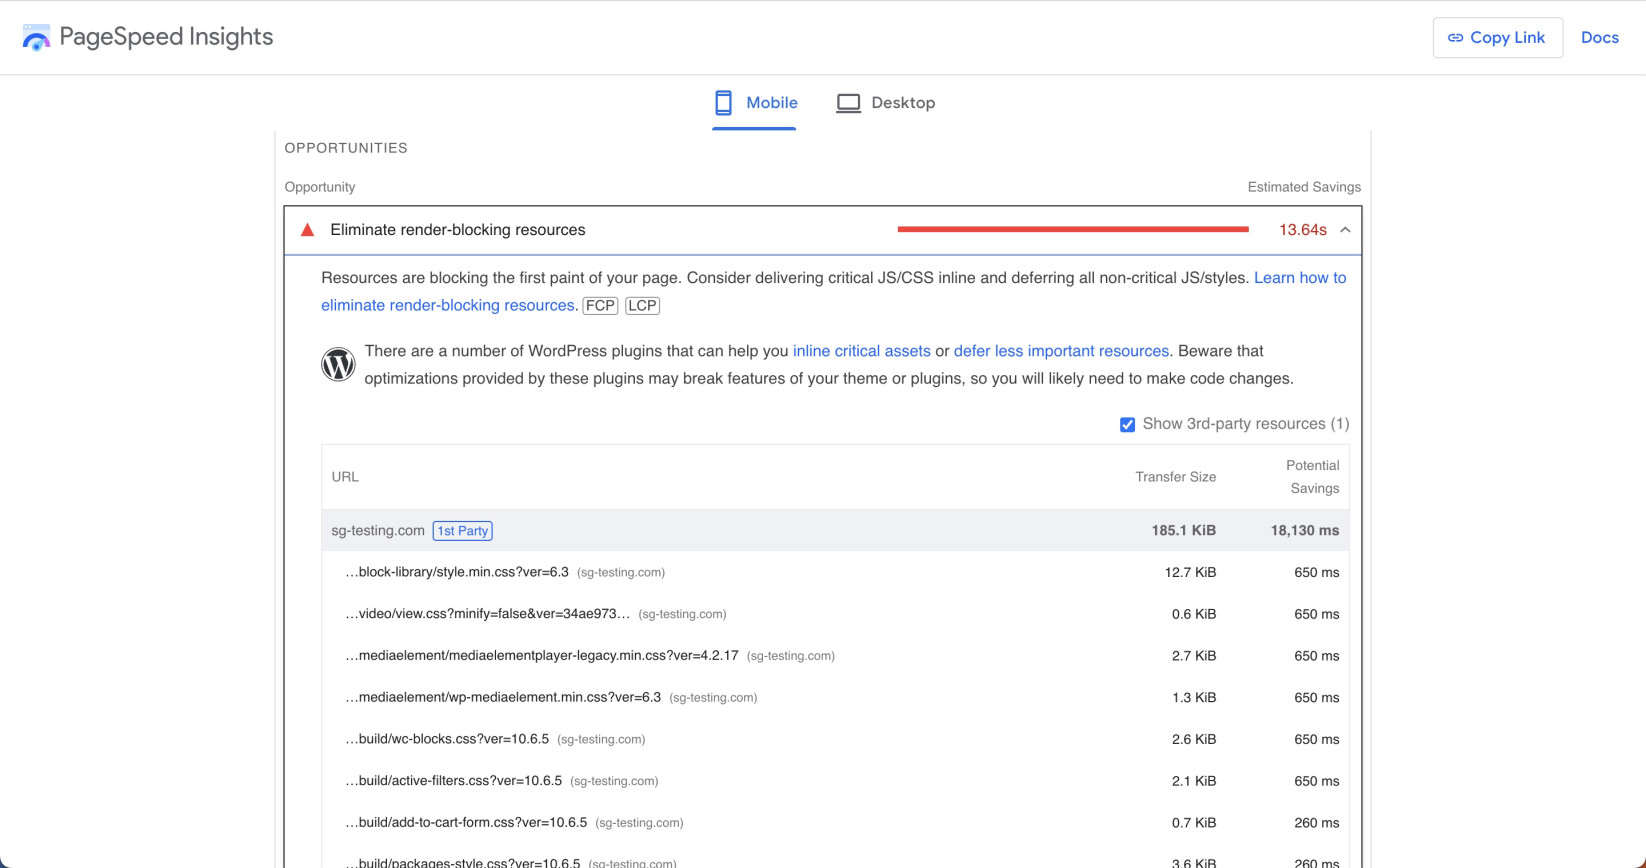
Render-blocking resources are files that prevent a webpage from displaying until they’ve been loaded. These typically include CSS and JavaScript files. Eliminating or minimizing these resources can significantly improve your site’s load times and overall performance.
You can identify the render-blocking resources from the PageSpeed Insights reports. Then, determine which are non-essential and remove them from the page. However, keep in mind that manually doing it requires you to be proficient in coding.
If your website is built in WordPress, you can use a WordPress plugin to defer such resources. We recommend the Speed Optimizer plugin, which can do that with a single click. Open your WordPress dashboard, navigate to Speed Optimizer > Frontend > JavaScript, and turn on the option Defer Render-blocking JavaScript.

Once you have finished eliminating the render-blocking resources, move on to the next step, which is minifying JavaScript.
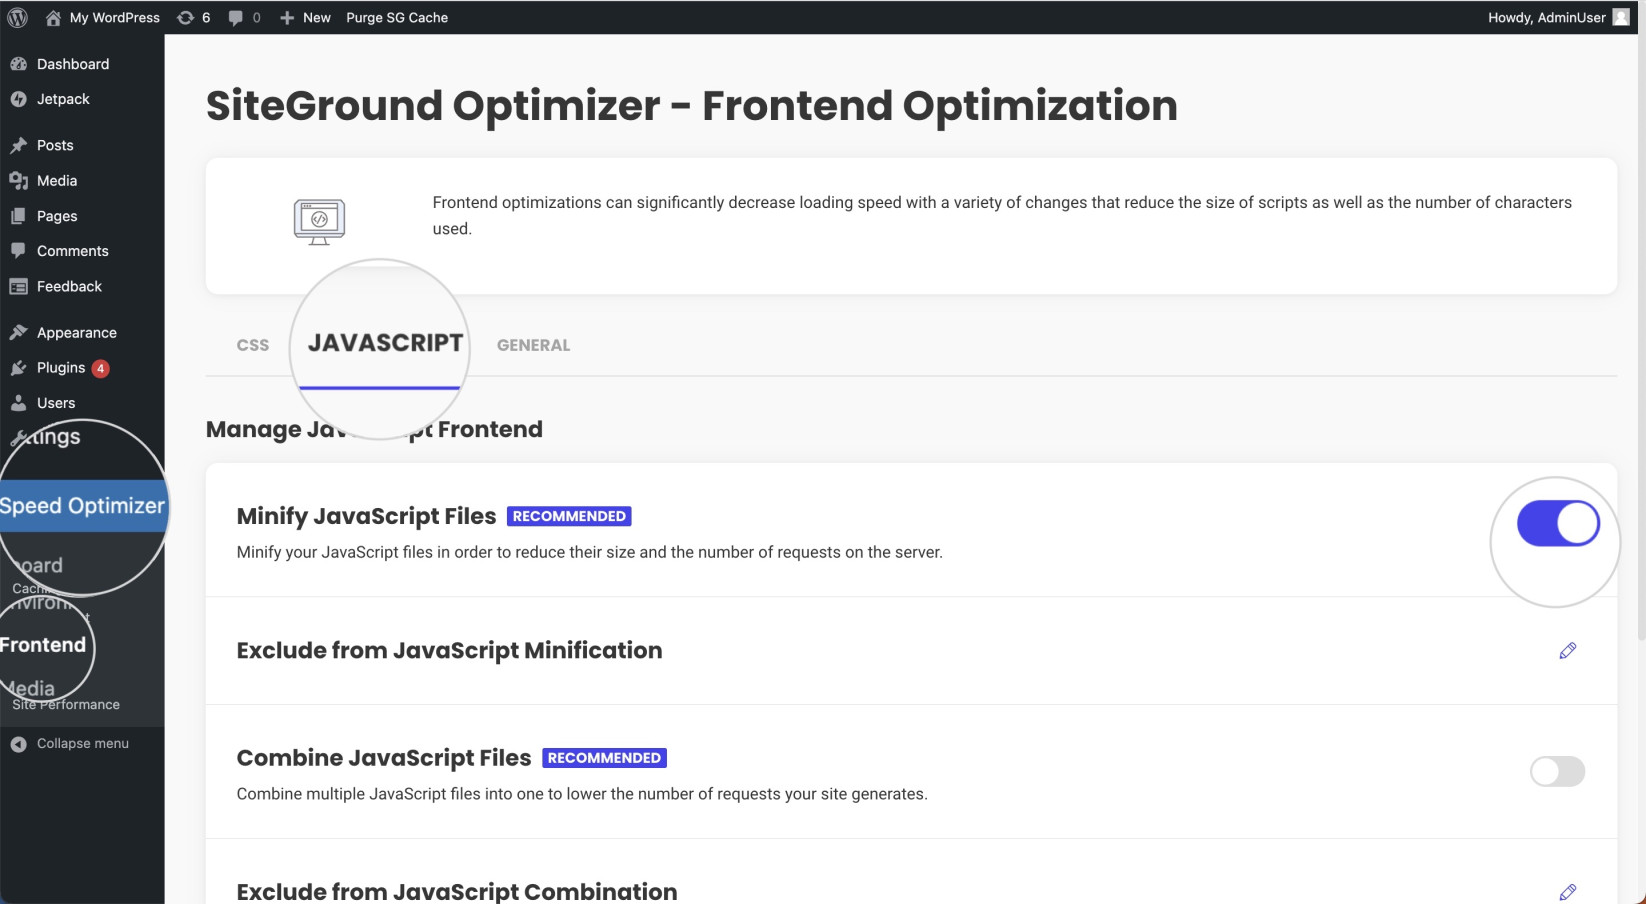
Step 4. Minify JavaScript
Minifying JavaScript is the process of removing unnecessary characters from your JavaScript files, such as white spaces, new line characters, and comments. As a result, you’ll reduce the time it takes to download and execute these scripts, improving your site’s overall performance.
Doing it on your own will take a significant portion of your time. However, Speed Optimizer will prove extremely useful if you are a WordPress user. If you’ve already installed it, go to your dashboard and select Speed Optimizer > Frontend > JavaScript. Turn on the option Minify JavaScript Files, and the plugin will minify the JavaScript files automatically.
After you are done minifying the JavaScript files, proceed to minifying the CSS code.
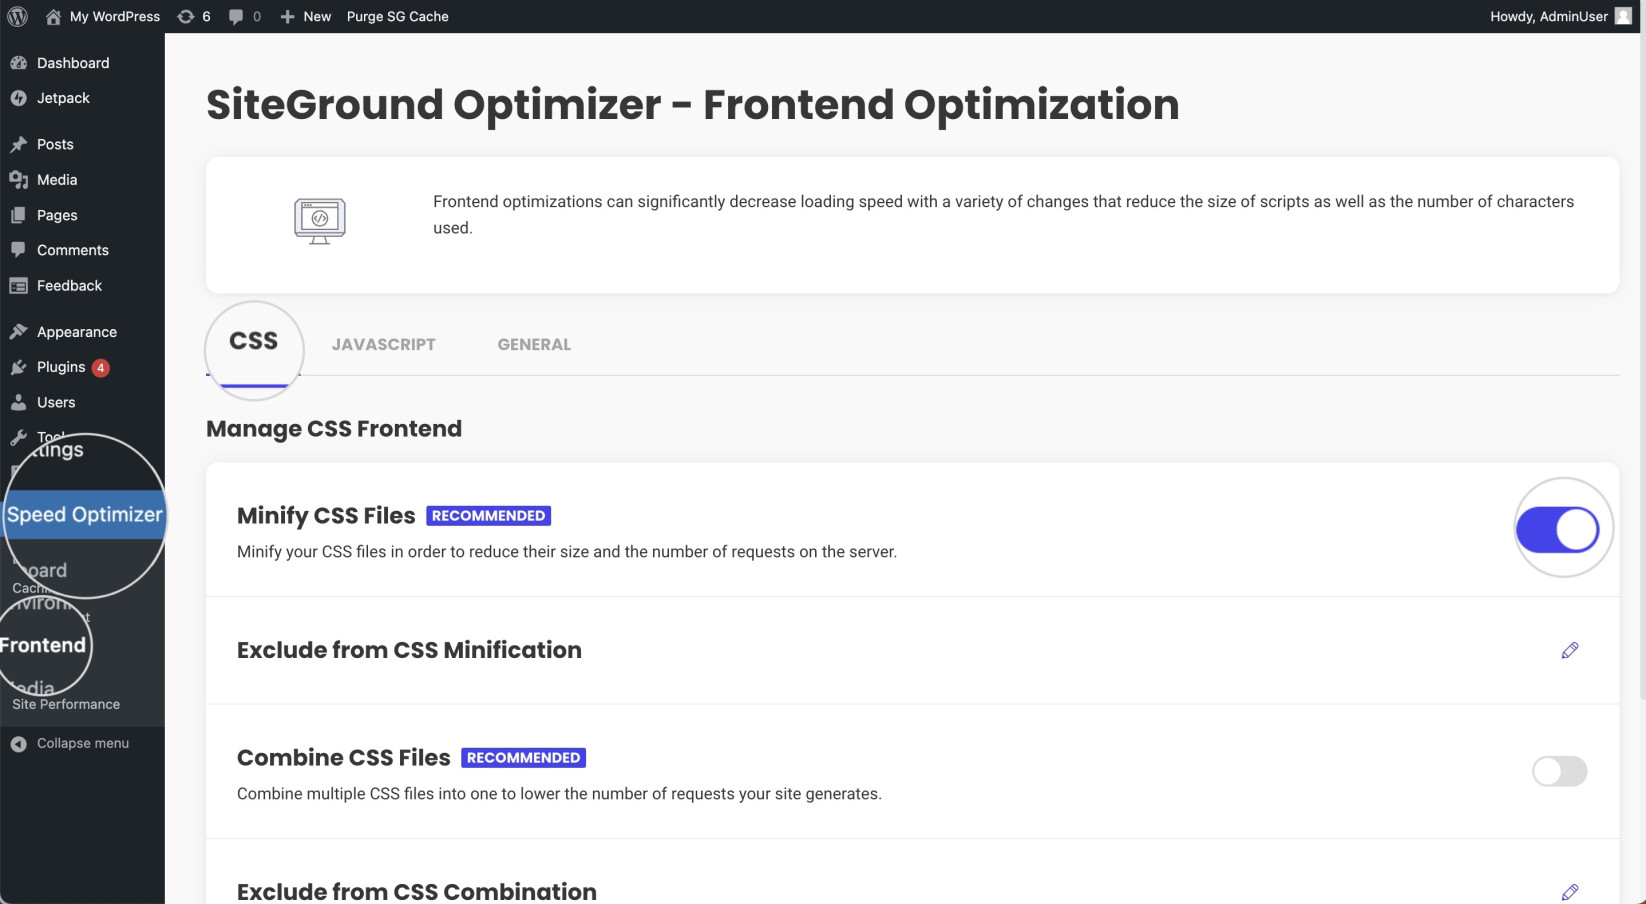
Step 5. Minify CSS
CSS (Cascading Style Sheets) is used for styling and layout of your web pages. Similar to JavaScript, CSS files may also contain white spaces and unnecessary characters, making them larger than needed. As a result, browsers take more time to read them, which affects the web page load speed.
By minifying the CSS style sheets, you will compress the code, improving your web page’s performance. WordPress users can use the Speed Optimizer plugin to minify CSS with a single click.
Log into your dashboard and navigate to Speed Optimizer > Frontend > CSS. Turn on the option Minify CSS Files to minify all your website’s CSS files.
Apart from minifying the CSS code, you may also want to remove unused CSS code. Learn how in the next step.
Step 6. Remove Unused CSS
Unused CSS refers to the style rules included in your CSS files that aren’t used to style or display your web pages. They could be remnants from previous designs, styles, or WordPress themes applied to components that no longer exist on your site.
These redundant style rules create unnecessary bloat, causing your CSS files to be larger than needed. This means more data for the user to download and more for the browser to parse, resulting in slower load times and a lower Google PageSpeed Insights score.
Removing this unused CSS is crucial for optimizing your website’s performance. You can use Google Chrome’s DevTools or other online tools to find which CSS rules are not used by your site.
Once you’ve identified unused CSS, the next step is to remove these unnecessary rules. If you’re unsure whether a rule might be used in the future, isolate it into a separate CSS file instead of deleting it.
After making changes, thoroughly test your website to ensure that removing unused CSS hasn’t affected the functionality or appearance of your site.
Now that you have optimized your website’s code, you should also consider implementing speed optimization techniques. Move on to the next steps.
Step 7. Enable GZip Compression
GZip compression is a vital performance optimization technique that can greatly improve your Google PageSpeed Insights score.
When a user visits your website, a request is made to your server to deliver the required files. The larger these files, the longer it takes for them to travel from server to browser. GZip compresses these files into a ZIP file, making them smaller and thus faster to deliver. The visitor’s browser downloads and uncompresses the files and uses them to render the website.
There are several ways to enable GZip compression for your website.
- Enable GZip on Your Server – This process will vary depending on your server. For Apache servers, you can use the .htaccess file to enable GZip compression. For Nginx servers, you will need to add the appropriate directives in your Nginx configuration file.
If your website is hosted with SiteGround, it already uses GZip compression. SiteGround has enabled GZip and Brotli compression on all servers by default. - Use a Plugin – Several plugins can enable GZip compression if your website is built with WordPress.
Another way to improve your website performance is by enabling browser caching. The next step covers the most common methods, so read on.
Step 8. Enable Browser Caching
Browser caching is a technique that can dramatically decrease your website’s load times for returning visitors, leading to an improved Google PageSpeed Insights score.
When a user visits a webpage for the first time, the browser caches many page elements, including stylesheets, JavaScript files, images, and the HTML document. Caching involves storing these files locally on the user’s device. When the user revisits the page, the browser doesn’t need to reload the entire page but can retrieve the majority of the files from the cache, thus reducing the load time significantly.
Here’s how you can enable browser caching:
- Leverage browser caching with .htaccess – If your site is on an Apache server, you can enable browser caching by adding directives to your .htaccess file. You’ll need to specify caching instructions for different file types according to how frequently they’re updated. For detailed instructions, read this guide on how to leverage browser caching for images, CSS, and JS.
- Utilize Cache-Control Headers – The Cache-Control HTTP header holds directives for caching in both requests and responses. The directives specify who can cache the response, under which conditions, and for how long.
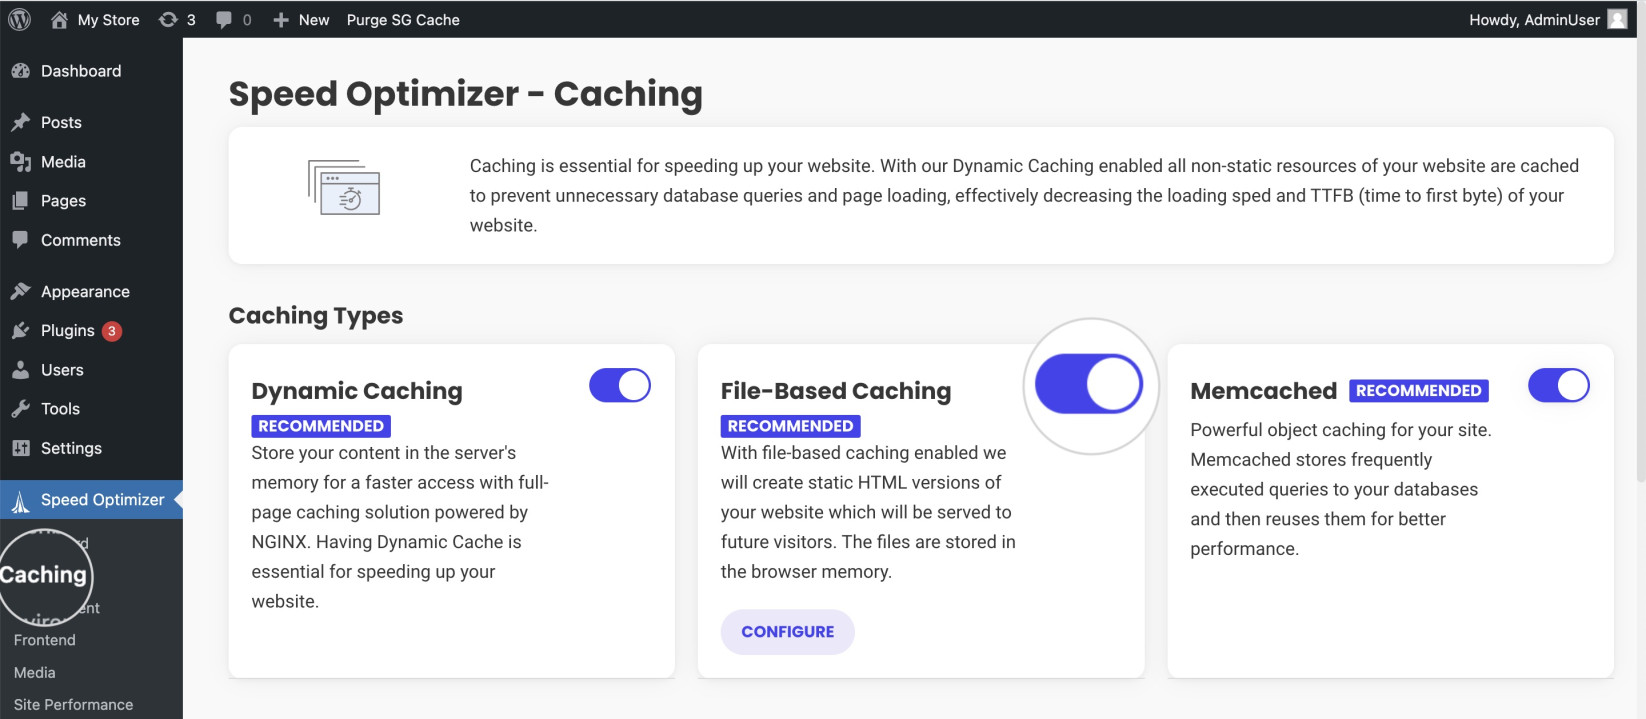
- Use a Caching Plugin – For WordPress, several plugins can enable browser caching with a few clicks. We recommend Speed Optimizer, which presents various caching and speed-improvement options. To enable the browser caching, go to your dashboard, open Speed Optimizer > Caching, and turn on the option File-Based Caching.
Apart from browser caching, you should also take advantage of your server’s caching capabilities. Move on to the next step for more information.
Step 9. Enable Server Caching
Server caching is one of the most effective techniques to boost your Google PageSpeed Insights score. It stores a cached copy of your website on the server and delivers it to the end user. This eliminates the need for the server to dynamically create that same page every time a visitor lands on it, thus significantly reducing server load.
Being a SiteGround user, you can boost your website speed with SuperCacher, an in-house solution with three caching layers – static, dynamic, and Memcached. Find out how it works in this SuperCacher tutorial.
Using a content delivery network (CDN) is another way to boost your site speed. Read the next step to find out how to implement it.
Step 10. Use Content Delivery Network (CDN)
A way to make the experience consistent for all users around the world is by using a content delivery network (CDN). A CDN will create copies of your website on its network of servers, and visitors will load the website from the nearest one. This will ensure stable performance and load time regardless of your visitors’ location.
SiteGround users can benefit from the SiteGround CDN as part of their hosting plan. To learn more about the service, read this guide on SiteGround CDN.
Next, optimize your website images to improve the loading speed. Follow the instructions in the next step.
Step 11. Optimize Your Images
Images often make up a significant percentage of a web page’s total size. Efficiently encoding and optimizing your images can lead to substantial improvements in load times and overall website performance. This, in turn, can positively impact your Google PageSpeed Insights score.
Image optimization involves choosing the right format, compression level, and resolution while maintaining an acceptable level of quality. Here are some strategies to efficiently optimize your images:
- Choose the Right Image Format – Different image file formats have different strengths. JPEG is a good choice for photographs or complex images with lots of colors, while PNG is best for images requiring transparency.
- Use Next-Generation Image Formats – Newer formats, such as WebP, offer superior compression and more features compared to older formats. Images saved in these formats are small while their quality is preserved.
If your hosting server supports WebP, use images in this format to improve your site speed and performance. SiteGround has long implemented WebP on all servers.
If your website is built in WordPress, consider using a plugin to convert all existing images in your Media Library to WebP. Speed Optimizer is one of these plugins. In addition, it has a fallback mechanism that enables your website to display the old image files instead of WebP in case the visitors’ browsers are incompatible with WebP.
To convert the images, open your dashboard, navigate to Speed Optimizer > Media, and turn on Use WebP Images.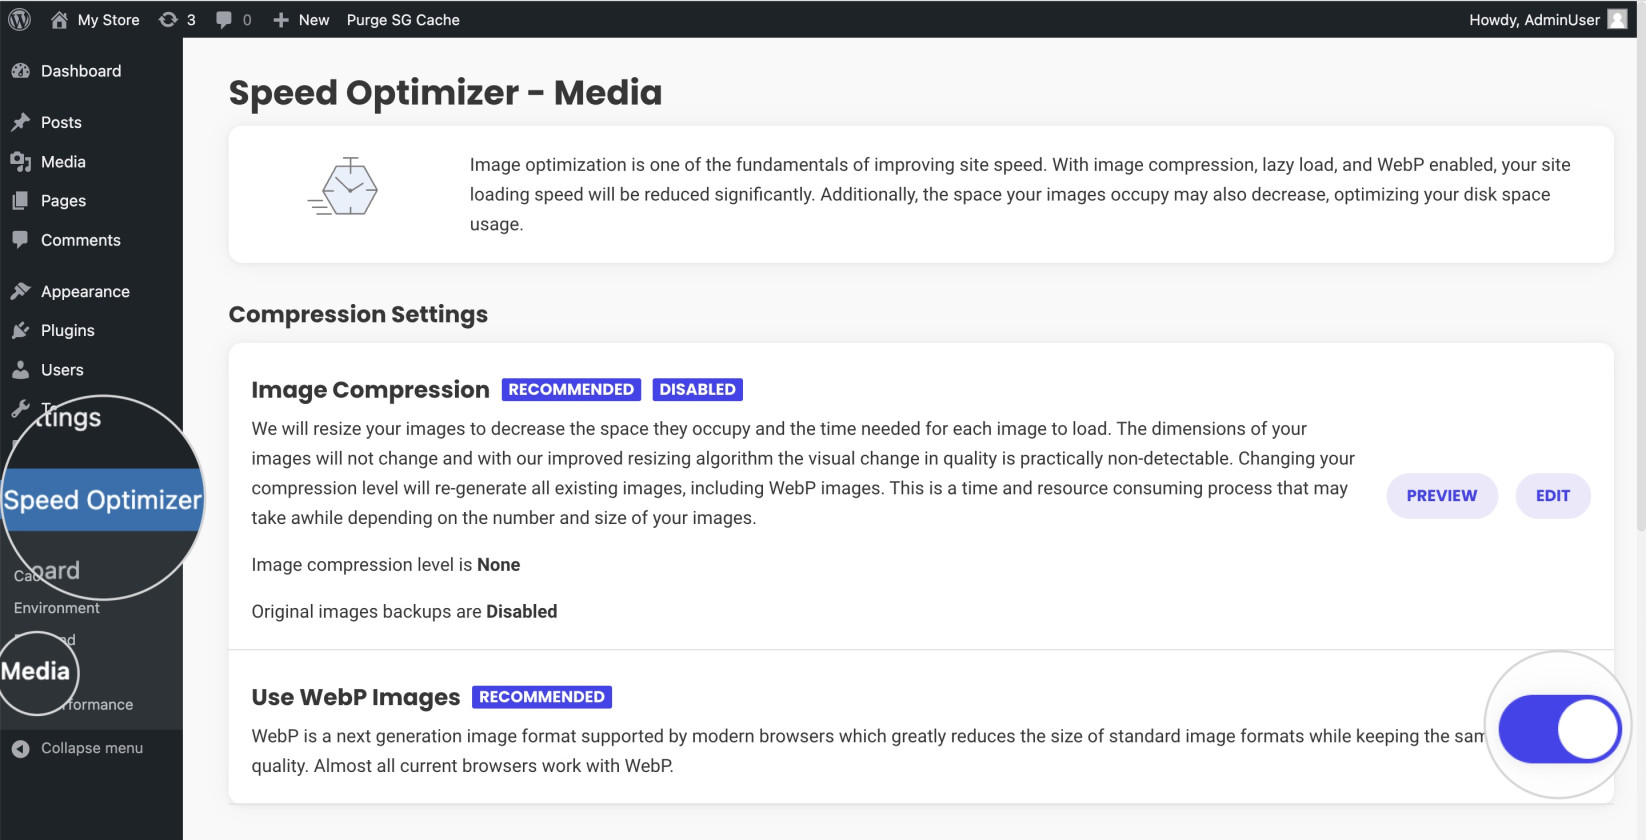
- Apply Compression – The smaller the image files are, the faster your website loads. Many image-editing tools, plugins, and online services offer options to compress images, reducing their file size. Be careful to balance compression with image quality, though.
Speed Optimizer can also come in handy for WordPress users in this regard. It can optimize all existing images and provides several compression settings. From your dashboard, navigate to Speed Optimizer > Media, and press the Edit button next to Image Compression. In the following pop-up window, you can choose the settings of the new compressed images.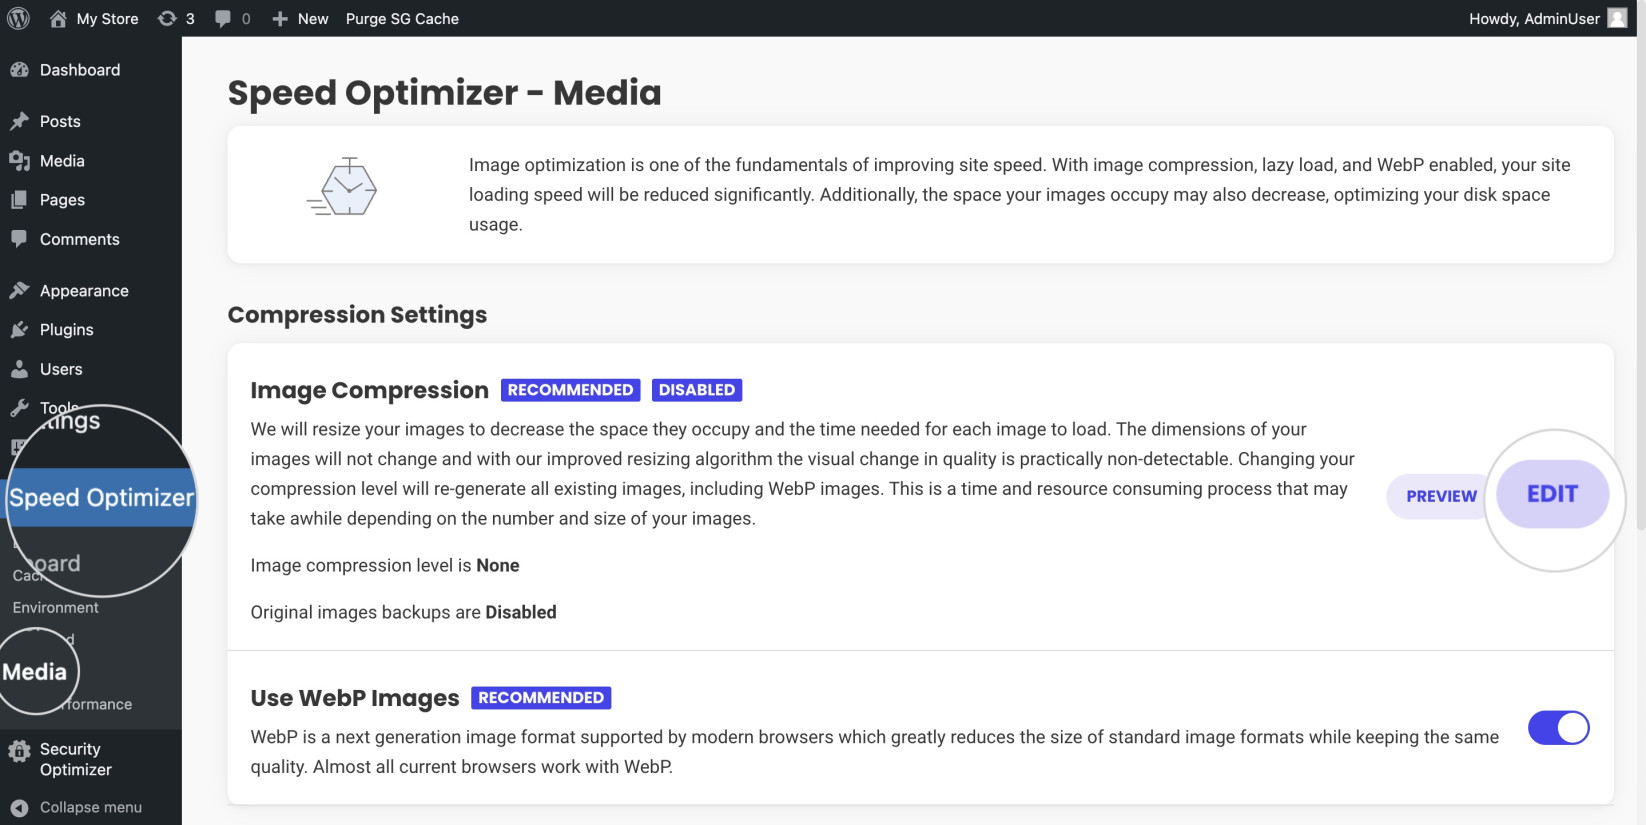
- Optimize Resolution – Ensure your images are no larger than they need to be. Serving an image at a higher resolution than necessary results in larger file sizes and slower load times.
- Use Responsive Images – Implement responsive images using HTML’s srcset and sizes attributes. This allows you to serve the right image size based on the user’s device and viewport size, decreasing unnecessary data transfer.
- Leverage Browser Caching and a CDN – Browser caching and Content Delivery Networks (CDNs) can also help improve image loading times. Caching allows repeat visitors to load images locally rather than downloading them again, while a CDN can serve images from the server closest to the user.
Image optimization is crucial, but you can further improve your site’s performance by deferring offscreen images. Read the following step to learn how.
Step 12. Defer Offscreen Images
Often, when you open a website, the entire page can’t fit on the screen, and you need to scroll down to see all the content and images. These non-visible images are called offscreen images. Browsers download them before you even scroll down, which slows down the page visualization.
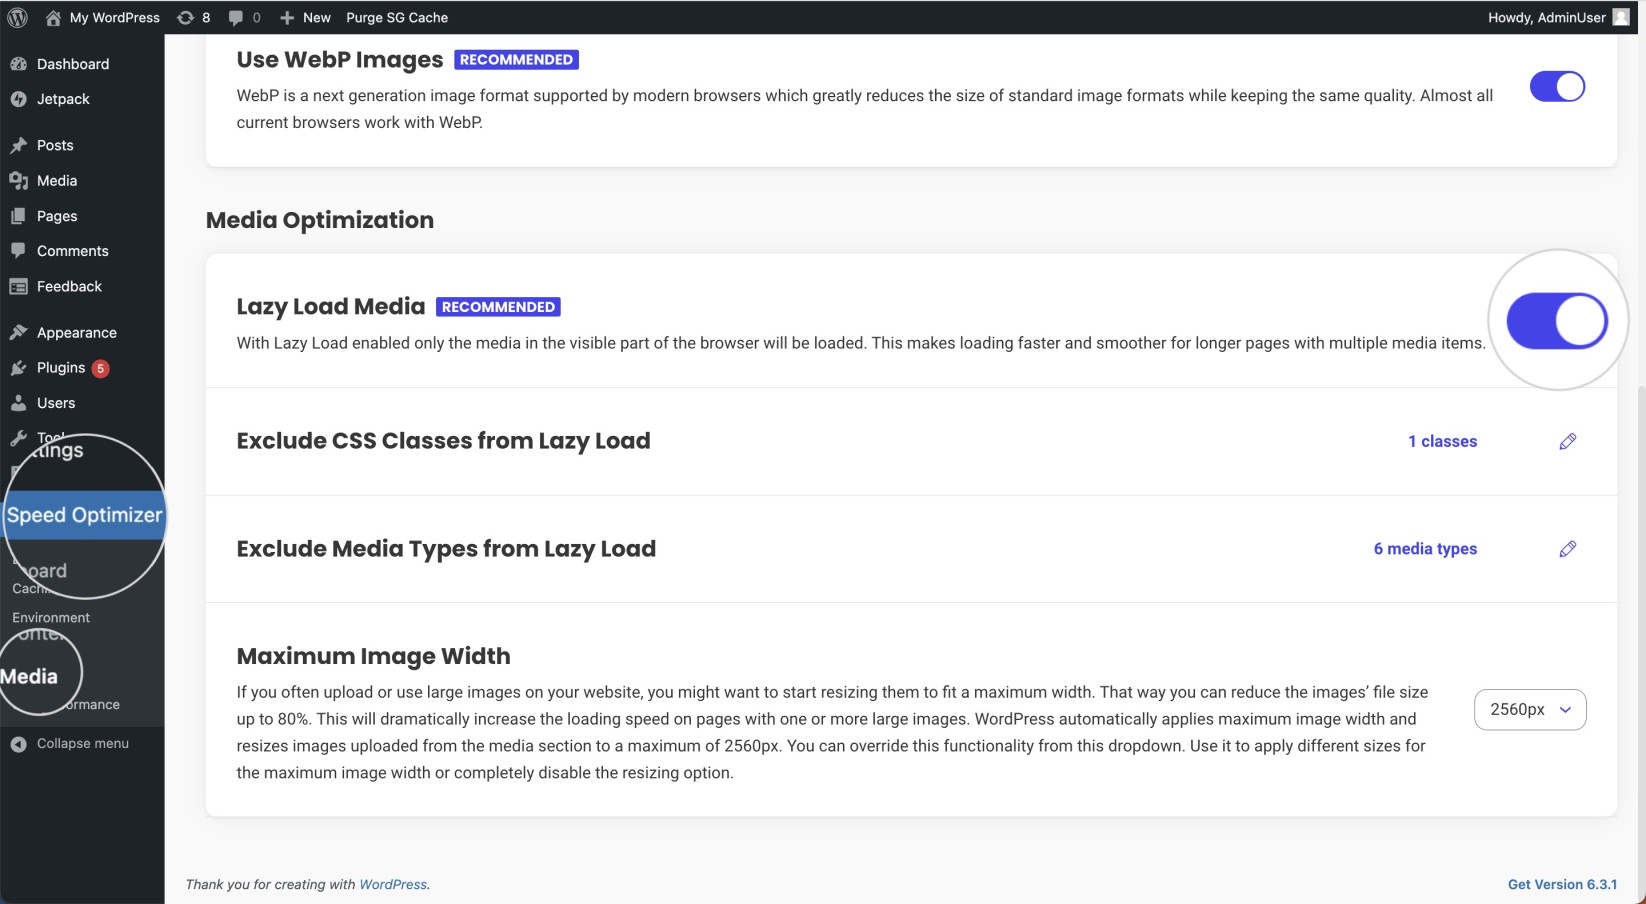
To improve the loading speed, you can defer the offscreen images. A very useful solution is lazy loading. By using it, browsers will prioritize loading the “above the fold” content and visualize the offscreen images once they come into view.
Speed Optimizer can once again help you if you are a WordPress user. Go to Speed Optimizer > Media > Media Optimization, and turn on Lazy Load Media.
Undoubtedly, images take longer to load, and taking care of them drastically improves your website performance. But there are other assets you need to pay attention to. Web font loading can also impact user experience. The following section addresses actions to improve this aspect.
Step 13. Ensure The Text Remains Visible During Web Font Loading
Custom web fonts have become increasingly popular in modern web design. However, web fonts can impact page performance, particularly the perceived loading speed of your text content. By default, browsers will hide text that uses a web font until the font is fully loaded, a behavior known as the “Flash of Invisible Text” (FOIT). This can lead to a poor user experience, affecting your Google PageSpeed Insights score.
To provide a seamless user experience, ensure the text remains visible during web font load. This way, the browser will display text immediately in a fallback font and then swap it with the web font once it loads. This behavior, known as the “Flash of Unstyled Text” (FOUT), is generally a more user-friendly approach.
Here’s how to ensure text remains visible during webfont load:
- Use the font-display CSS Property – This property controls how a font face is displayed based on whether and when it is downloaded and ready to use. The value font-display: swap; ensures that text remains visible during web font load by using a system font until the custom font is ready.
Below, you can see an example of a CSS code incorporating the font-display: swap; descriptor.@font-face { font-family: ExampleFont; src: url(/path/to/fonts/examplefont.woff) format('woff'), url(/path/to/fonts/examplefont.eot) format('eot'); font-weight: 400; font-style: normal; font-display: swap; } - Host Fonts Locally – Hosting fonts on your server instead of a third-party server can reduce load times.
- Limit the Number of Font Families – While variety in fonts can enhance your design, they also add extra weight to your page. Try to limit the number of font families, weights, and styles you’re using to only those necessary.
- Preload Key Web Fonts – Preloading makes the browser download the web fonts when loading the page before all of the CSS is parsed. WordPress websites can use the Speed Optimizer plugin for web fonts preloading.
To enable this feature, open your dashboard, go to Speed Optimizer > Frontend > General, and activate Web Fonts Optimization.
You can also select which web fonts should be preloaded from the Fonts Preloading option if you manage multiple ones.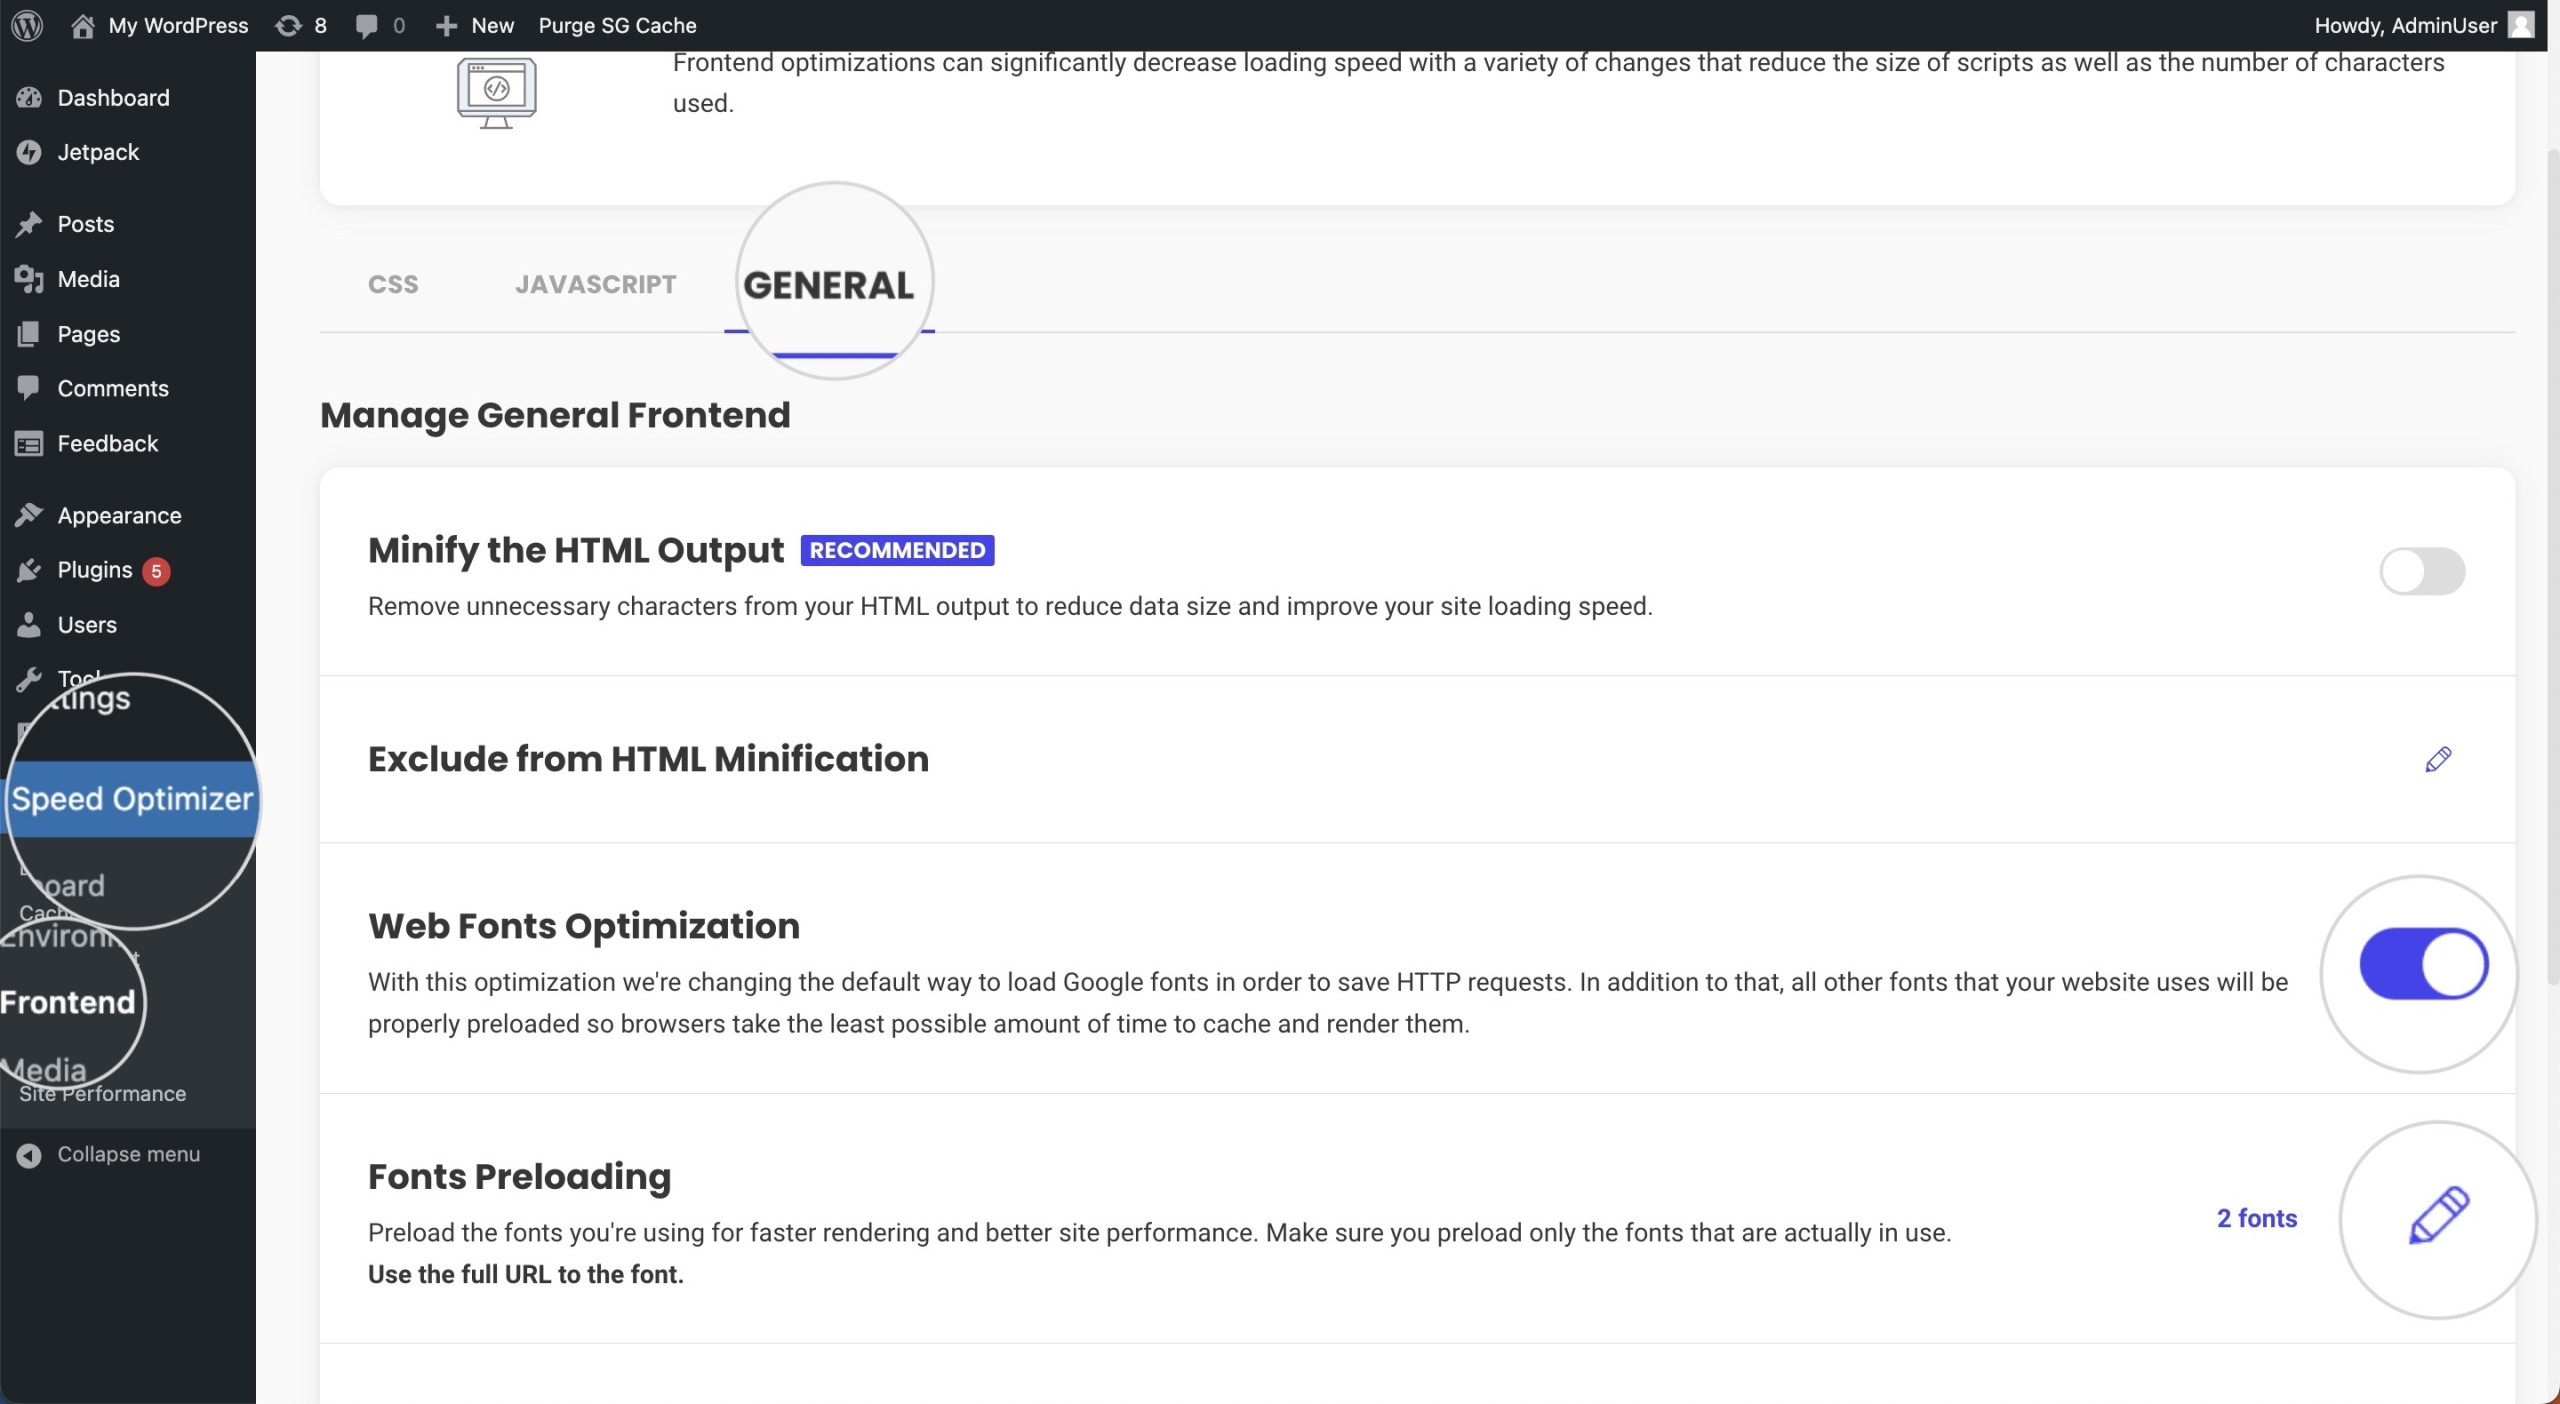
So far, we’ve covered the most general and critical measures. However, you can implement more specific strategies to improve your website further. Let’s start with instructions for preventing excessive redirects.
Step 14. Avoid Excessive Redirects
Often, you have to use redirects when you move or delete pages. Their purpose is to send users and search engines to a different URL than the one they originally requested. However, excessive or unnecessary redirects can result in slower page load times, negatively impacting the user experience and your Google PageSpeed Insights score.
Each redirect triggers an additional HTTP request-response cycle, increasing the overall time it takes for a page to load. This is especially problematic for mobile users, who often rely on less reliable network connections.
Here’s how to avoid excessive redirects and optimize your website’s performance:
- Minimize Redirect Chains – A redirect chain occurs when there is more than one redirect between the original URL and the final landing page. It’s important to update all links to point to the final destination URL to minimize these chains.
- Use Direct Links – Whenever possible, make sure to use direct links in your navigation, sitemap, and document structure.
- Regularly Audit Your Redirects – It’s good practice to audit your site for unnecessary redirects on a regular basis.
- Use Redirects Wisely for Mobile Sites – If you have separate desktop and mobile sites, ensure you’re redirecting mobile users correctly. Avoid faulty redirects, such as sending a user to an irrelevant page or using a redirect when a direct link would be more appropriate.
After fixing outstanding redirect issues, you can examine the chaining of critical requests. Find more information in the next section.
Step 15. Avoid Chaining Critical Requests
Chaining happens when resources are dependent on each other. For instance, a JavaScript or CSS file requested within another resource (like an HTML document) creates a chain. The browser has to wait until it gets the HTML response to discover the JavaScript or CSS request, then wait again to get the JS or CSS response.
The longer the chain, the longer it takes for the page to render, impacting your Google PageSpeed Insights score negatively. Employing the following methods can help you minimize resource chaining.
- Minimize the Number of Critical Resources – Only include resources that are absolutely necessary for the initial rendering of the page. Non-critical JavaScript files or CSS can be loaded asynchronously or deferred until after the first render.
For WordPress, you can use optimization plugins like Speed Optimizer that contain the features Minify CSS Files, Minify JavaScript Files, and Defer Render-blocking JavaScript. - Optimize the Order of Your Requests – Prioritize the loading of visible content or above-the-fold content. This can ensure that your users see something on the screen as quickly as possible.
Use Speed Optimizer and its Lazy Load Media option if your website is WordPress-based. - Preload Key Resources – You can use preloading to load key resources earlier and reduce the length of the request chain. For example, you can use Web Fonts Optimization and Fonts Preloading in Speed Optimizer for your WordPress site.
Taking things up a notch, you can improve the loading speed by preloading key requests. Read the following section to learn how.
Step 16. Preload Key Requests
Key requests are critical requests that the page executes with priority at an early loading stage. They could be anything – JavaScript files, CSS styles, or web fonts. Applying preload to key requests can significantly improve your page load time.
You can implement preloading of key requests with a few techniques:
- Identify Key Resources – These could be critical JavaScript or CSS files, important images, or web fonts that are needed early in the page load process.
- Use the Preload Directive – Add a link tag in the head of your HTML document with `rel=”preload”` and href pointing to the resource you want to preload. For example:
<link rel="preload" href="/styles/important.css" as="style">The as attribute is necessary to specify the type of content to preload.
- Preload Web Fonts – Web fonts are often discovered late in the load process. Preloading key web fonts can make them available earlier, reducing the chance of a “flash of unstyled text.” For example:
<link rel="preload" href="/fonts/myfont.woff2" as="font" type="font/woff2" crossorigin>If you manage a WordPress site, you can use a plugin like Speed Optimizer for preloading web fonts.
- Be Selective – Preloading too many resources can actually hurt performance, as it might result in the download of non-critical resources that compete with more important resources. Be selective about what you preload.
- Use Preconnect or Prefetch When Appropriate – Preconnect can establish early connections with important third-party origins. Prefetch, on the other hand, can help load resources that will be used in the next navigation/page load.
Now, we can focus on optimizing your website’s animated content. The next step describes the most beneficial methods.
Step 17. Use Video Formats for Animated Content
Animated content is an excellent way to engage visitors and enrich their user experience. However, the format you choose for your animations can significantly impact your site’s loading speed and overall performance.
Traditionally, animations were often created as GIFs, but GIFs can be quite large, resulting in slow load times. A better alternative is to use video formats for animated content. Video formats, such as MP4 or WebM, are more efficient at compression and can deliver higher quality with a smaller file size.
Below, you’ll find a few tips for managing animated content.
- Convert GIFs to Video Formats – Tools like FFmpeg or online converters can help you convert existing GIFs into MP4 or WebM formats. You can then use the HTML5 video element to embed them into your site.
- Use the Right Compression Settings – When creating a video, experiment with different quality and compression settings to create a balance between file size and visual quality.
- Autoplay and Loop – You can make your videos behave like GIFs by using the autoplay and loop attributes in the video tag. Remember to add `muted` to autoplay videos inline, especially on mobile devices.
- Use a Video Hosting Platform – Consider using a video hosting platform like YouTube or Vimeo. This can reduce the load on your server, provide a good viewer experience across various devices and internet connections, and offer additional features like video analytics.
Next, let’s examine some healthy maintenance practices for popular CMS applications like WordPress sites.
Step 18. Reduce the Usage of Third-Party Code
Third-party code is scripts hosted on other websites but loaded and executed on your site. These can be scripts for analytics, advertising, customer support, social media sharing buttons, and other features. They usually provide useful functionality but can significantly impact your site’s load time and overall performance.
Each third-party script requires an additional HTTP request, which adds up to the load time. Moreover, since these scripts are hosted on external servers, you have less control over their performance.
The following guidelines can help reduce their impact:
- Audit Third-Party Scripts – Start by identifying all third-party scripts running on your website. You can use Google Chrome’s DevTools tab to do this. Evaluate the value each script provides against its performance impact.
- Limit the Number of Third-Party Scripts – Only use necessary third-party scripts. Every script you remove will improve your site’s load time and overall performance.
- Load Scripts Asynchronously – Asynchronous loading allows the rest of the web page to continue loading while the script downloads. Applying this to third-party scripts can prevent them from blocking the page rendering.
- Use Lazy Loading – Consider using lazy loading for third-party content that isn’t immediately visible (like widgets or embeds). This technique delays the loading of resources until they’re needed, such as when a user scrolls down the page.
- Host Scripts Locally – If the third-party provider allows it, consider hosting the scripts locally on your own server. This gives you more control over their performance and eliminates an additional DNS lookup.
Another issue often encountered in WordPress websites is a large Document Object Model (DOM) size. Learn how to deal with it in the next step.
Step 19. Reduce Document Object Model (DOM) Size
The Document Object Model (DOM) is a representation of your web page that browsers use to build the visual interface. When a web page has a complex or large DOM, it means there are numerous elements on the page that the browser needs to process and manage. This can slow down your page load time, impact user interaction, and lower your Google PageSpeed Insights score.
A large DOM can result from having deeply nested elements or just too many elements in general on the page. A high number of elements requires more memory and CPU resources, and slows down page rendering.
Here are some strategies to reduce your DOM size:
- Simplify Page Structure – Try to simplify your HTML structure as much as possible. Reduce the depth and number of child elements and avoid unnecessary parent-child relationships.
- Remove Unnecessary Elements – Eliminate elements that do not contribute to the page’s visual interface or functionality. This might include empty or duplicate elements.
- Break Down Large Pages into Smaller Ones – A large page with lots of content will inevitably generate a large DOM. Consider breaking large pages into multiple smaller ones.
- Limit Elements on The Page – As a general rule, try to limit your web page to fewer than 1500 elements. Pages with more than this can often experience performance issues.
- Lazy Load di Content – Consider lazy loading for content below the fold. This can delay the processing of non-critical parts of your page, reducing the initial size of the DOM.
- Use Reputable Themes – Quite often, the culprit causing a large DOM size is a WordPress theme that contains lots of junk code. Use tried and tested themes with clean code to avoid generating a large DOM.
Finally, ensure that your website utilizes the latest technologies, which generally improve performance and security. Read the last two steps for more information.
Step 20. Implement HTTP/2
HTTP/2, the latest version of HTTP, offers performance improvements over its predecessor, such as multiplexing and header compression. Implementing HTTP/2 can significantly improve your website’s score.
Make sure that your web server is configured to use this protocol to ensure better load time and performance. SiteGround servers have incorporated this feature for a long time. For more information, read this guide on what is HTTP/2.
Step 21. Use the Latest PHP Technologies
Most websites, including popular content management systems (CMS) like WordPress, are built in PHP. PHP is a programming language that constantly undergoes updates and revisions which include performance and security improvements.
Use the latest PHP version possible to take advantage of all performance and security updates, which can increase your PSI score. SiteGround always supports the latest technologies, and PHP is no exception. You can enable Managed PHP, which will automatically set the latest stable PHP version.
Furthermore, we’ve developed our own PHP server setup, called Ultrafast PHP, which can increase your website’s speed by up to 30%. To learn more, read this guide about Ultrafast PHP.
Conclusion
Google PageSpeed Insights is an indispensable tool for any website owner or developer seeking to optimize website performance. By providing valuable metrics and actionable recommendations, it helps identify areas of improvement that can significantly enhance your website’s load time, usability, and overall user experience.
This article showcased multiple strategies to improve your PageSpeed Insights score. We hope you’ll put them to good use and make the best version of your website.
Frequently Asked Questions about Google PageSpeed Insights
Does Google PageSpeed Insights Affect My Website SEO Ranking?
No, Google doesn’t take into account the PageSpeed Insights score when it formulates your website’s SEO ranking. However, PSI measures metrics like accessibility and performance that formulate the search engine optimization score.
How Much Does Google PageSpeed Insights Cost?
Google PageSpeed Insights is an absolutely free tool, and Google doesn’t plan to make it a premium service.
Does Google Own Google PageSpeed Insights?
Yes. Both PageSpeed Insights and Lighthouse are tools developed and owned by Google.
Why is there a difference between the scores from PageSpeed Insights and Lighthouse?
The scores from PageSpeed Insights and Lighthouse defer because of the different approaches both tools take to test your website. PageSpeed Insights relies on real-time data collected from users who visit your website on various networks and devices. Lighthouse tests your website in a controlled environment with prefixed conditions – the same network and the same simulated devices.