What is “401 Error Unauthorized Access” and How to Fix it?
Table of Contents
Occasionally, when you try to access a web page, you may stumble across the “401 Error Unauthorized Access”. Like other HTTP errors, there could be various causes. This article will outline the most common problems and how to fix them.
In other words, you get this error because you are trying to access a page protected by the server. The server requires the correct login details to grant you access. The exact error message may vary depending on your browser or the website’s hosting server. Other variations of the 401 error are:
- HTTP 401 Error – Unauthorized
- Access Denied
- Error 401 Unauthorized
- 401 Unauthorized
- 401 Authorization Required
Usually, when you visit a protected page, you will first see a login prompt. It will require a username and password.
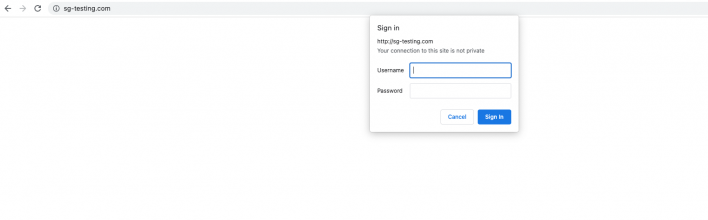
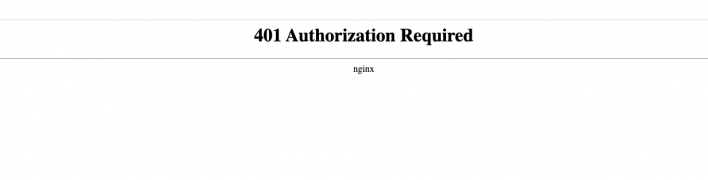
To view the page, you need to provide the correct logins. If you cancel the prompt or provide incorrect credentials, you will see the message with the error. You can see an example of the error page below.
In many cases, the website owners intentionally protect the page’s URL with a password. They prefer that the page remains inaccessible for the general visitor until fully developed, or they want this page to be available to authorized users only.
How to Fix the 401 Unauthorized Access?
Now that we listed the most common causes of the “401 Error Code”, we can explore the solutions.
Clear your browser cache and cookies
Corrupted and outdated browser cache and cookies can lead to unexpected behavior in your internet browsing. The “HTTP Error 401” is one of the possible results. Clearing your browser cache and cookies is recommended for troubleshooting the “401 Unauthorized” error as well as for most of the errors you encounter.
Below, you can see detailed instructions on how to clear the cache for various browsers and devices.
- How to clear cache and cookies in your browser?
- How to clear the cache in your iPhone or other iOS devices?
- How to clear the cache in your Android phone?
Clear your device’s DNS cache
Corrupted or outdated local DNS settings in your device are not a very common cause of the “401 HTTP Error”. Nonetheless, it is worth considering flushing the device’s DNS cache. Depending on the operating system (OS), the process is different.
For detailed instructions, check the following guides:
- How to flush the DNS cache in Windows?
- How to flush the DNS cache in Mac?
- How to flush the DNS cache in Linux?
Inspect the website URL
Carefully check the URL of the page in your browser’s address bar. You may see the “Error code 401” if you try to access an outdated or misspelled URL. It means that the URL is non-existent, and the server may return a server error “401 Unauthorized Access”.
Maybe you saved the page address in your browser, but the page address has been changed, or it has been deleted. To test further, open the website home page and check if there is a link to the page producing the “Unauthorized 401” error. If the page opens this way, check if the URL of the page is the same as the one that triggered the error.
Revise the web hosting’s security settings
If none of the solutions so far helped and you are the website owner, you may need to look closer into the security settings of the website. If you see the login prompt on the page and you don’t recognize it, the URL may be protected by the server.
To examine this possibility, open your hosting panel and check if there is a tool for setting password protection.
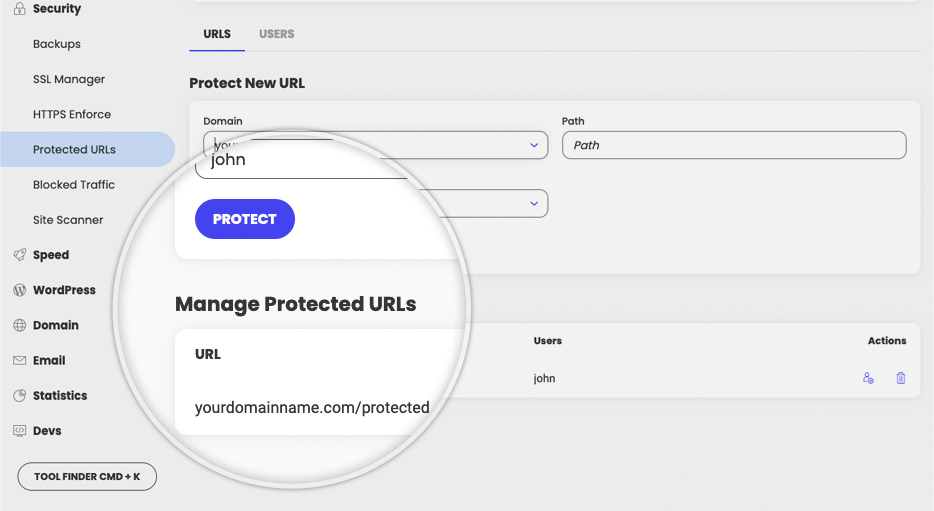
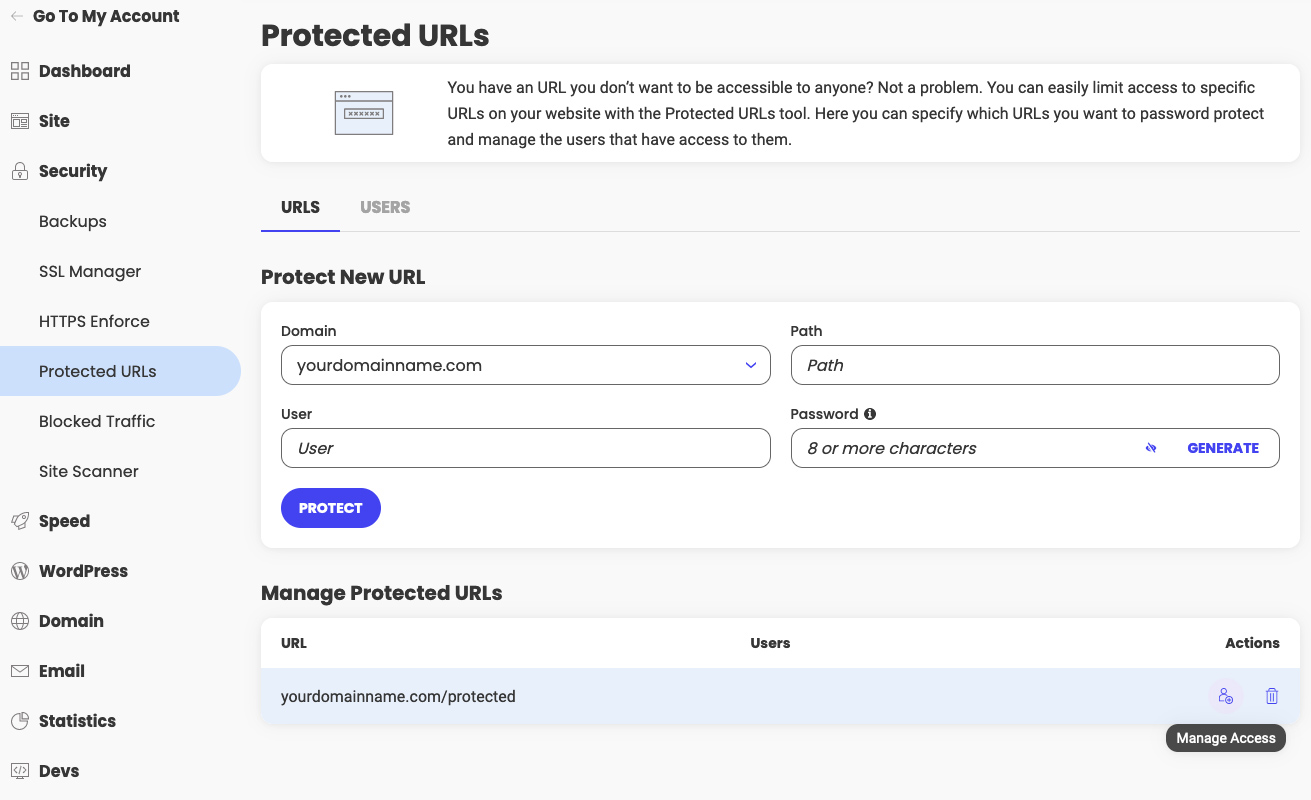
SiteGround users have the feature Protected URLs in Site Tools. For more information, read this guide on how to password-protect a URL.
To check its settings, open Site Tools for the website, navigate to the Security section, and open Protected URLs.
If the URL is protected, you will see it listed in the section Manage Protected URLs.
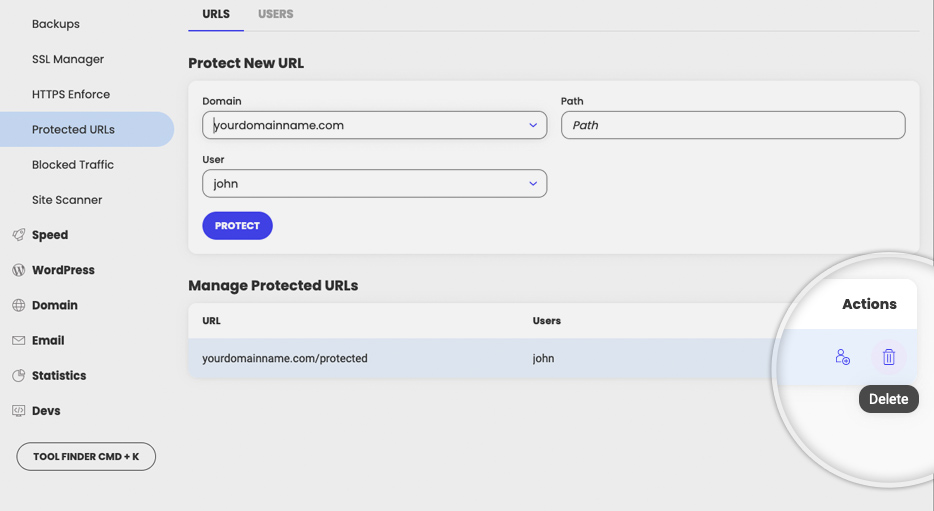
If this protection is not needed, you can delete it. Under the Actions column, select the Delete icon (trash bin). A popup will appear to confirm the action. Select Confirm to delete the URL protection.
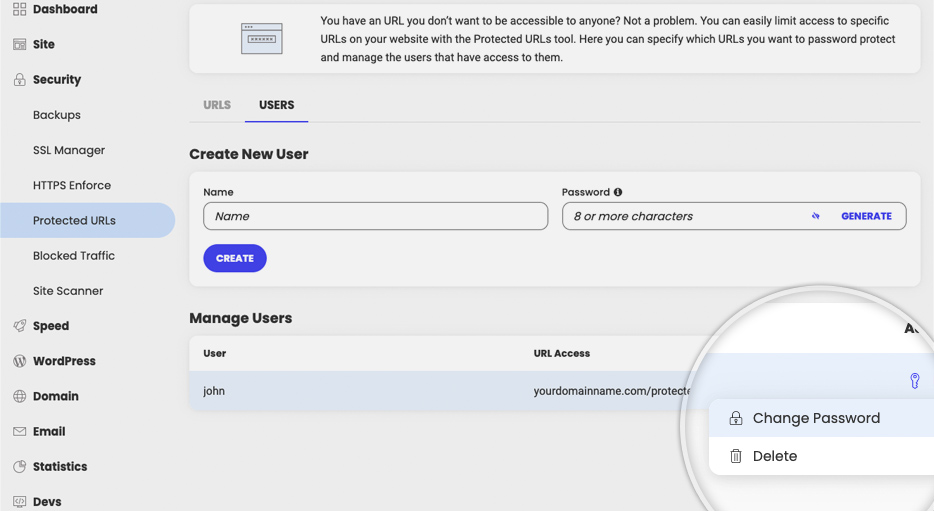
If the protection was intended, but the logins are not accepted in the login prompt, you may have the wrong username or password. You can see the existing user for the protected URL in Manage Protection URLs under the column Users.
To make sure you have the correct user password, select the section USERS. In the USERS section, select the kebab menu under the column Actions. Select Change Password to reset the password.
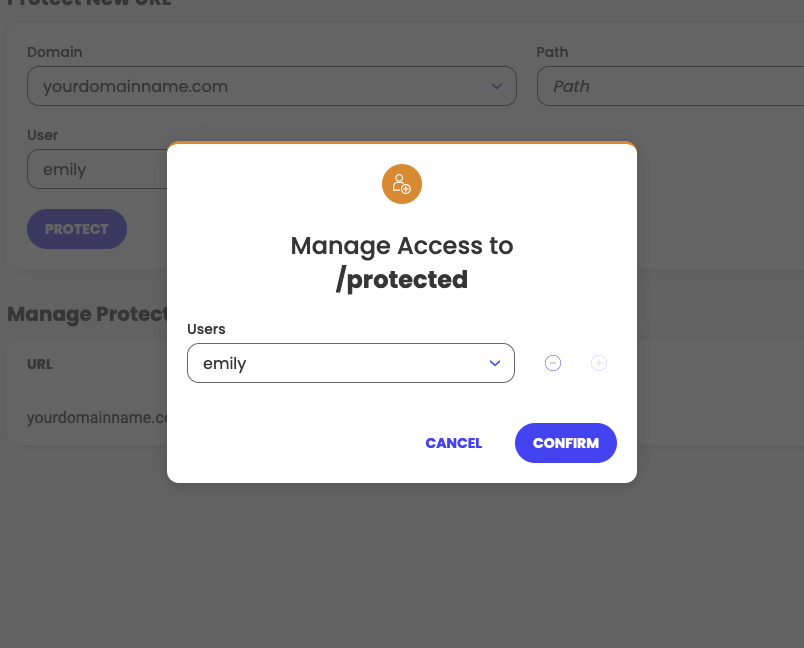
Another possibility is that the protection was set with a user that was later deleted. The protection remains active, but since there is no existing user, the login prompt can not be completed.
When you open the section URLS in Protected URLs, there will be no assigned user.
To add a user to the URL, select the Manage Access button. You will see a popup window that allows you to add one of the existing users to the URL. Select the user from the drop-down menu Users and then press Confirm. If there is no existing user yet, you will be prompted to create one.
Reload the web page after the protection is deleted or the user and password are reset. The page should load properly if the protection is deleted. If you’ve kept the protection, test the user and password. After the logins are entered, you should load the page correctly.
Inspect the website’s .htaccess file
The hosting panel is not the only source of password protection. If it is not set in the hosting panel but the website still prompts a login, it may be forced by directives in its .htaccess file.
Perhaps you set the .htaccess code earlier, and you forgot about it, or it was added by a plugin.
To check if there are such directives, open the website’s folder from FTP or File Manager and inspect the .htaccess file.
SiteGround clients can use the respective Site Tools to review the .htaccess file. Navigate to the section Site and open File Manager.
In Site Tools, the root folder for your website is the website name/public_html. In our example, the website name is sg-testing.com. Hence, the root folder is sg-testing.com/public_html.
In this directory, find the file .htaccess, select it, and then choose Edit.
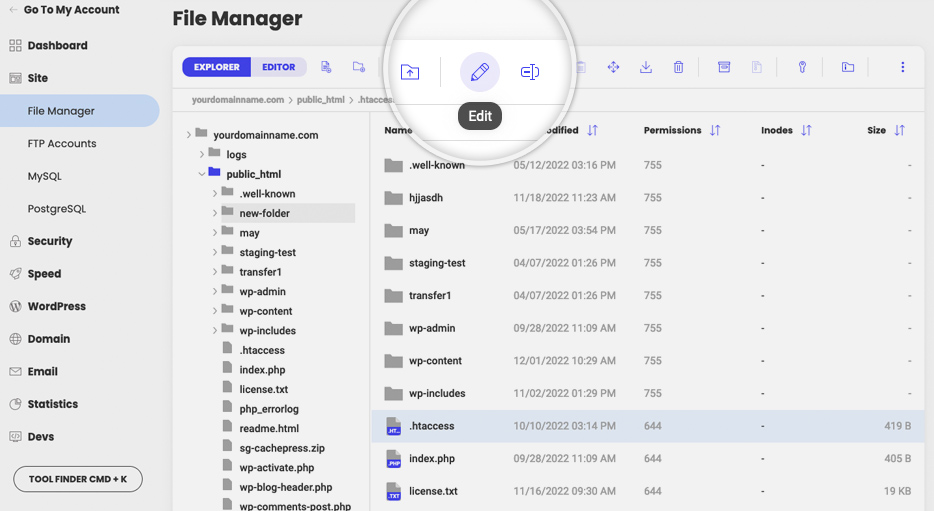
It will open the file in Editor mode and you can view the code.
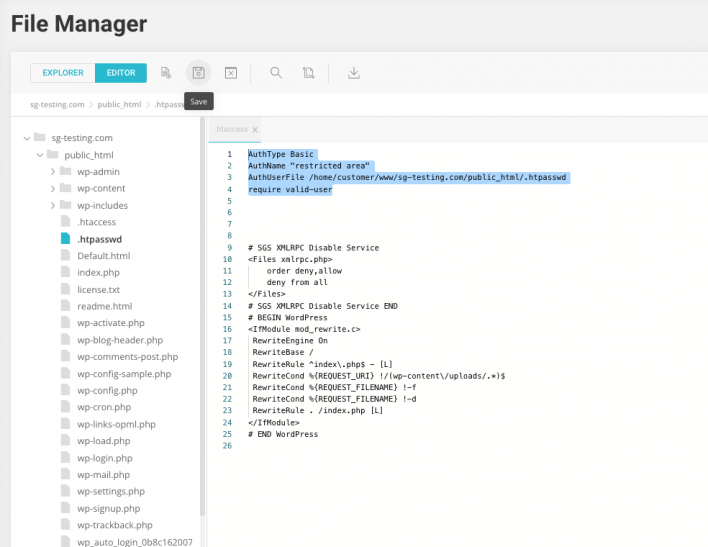
In this example, the website’s protection is defined by the highlighted code:
AuthType Basic
AuthName "restricted area"
AuthUserFile /home/customer/www/sg-testing.com/public_html/.htpasswd
require valid-user
The protection’s login credentials are specified in the file .htpasswd. It contains the user name and the encrypted password.
If the protection is not intended, delete the code from the .htaccess file and confirm the changes with Save.
Deactivate the website’s security plugins
Another common cause of the error “401 Not Allowed” for WordPress sites is a misconfigured plugin. A security plugin may block visitors by mistake or force restrictions on specific pages.
To troubleshoot, you may consider disabling the plugins. Open your WordPress site dashboard, go to the Plugins section, then select Installed Plugins.
Look at the plugins’ description to find out which of your plugins provide security features.
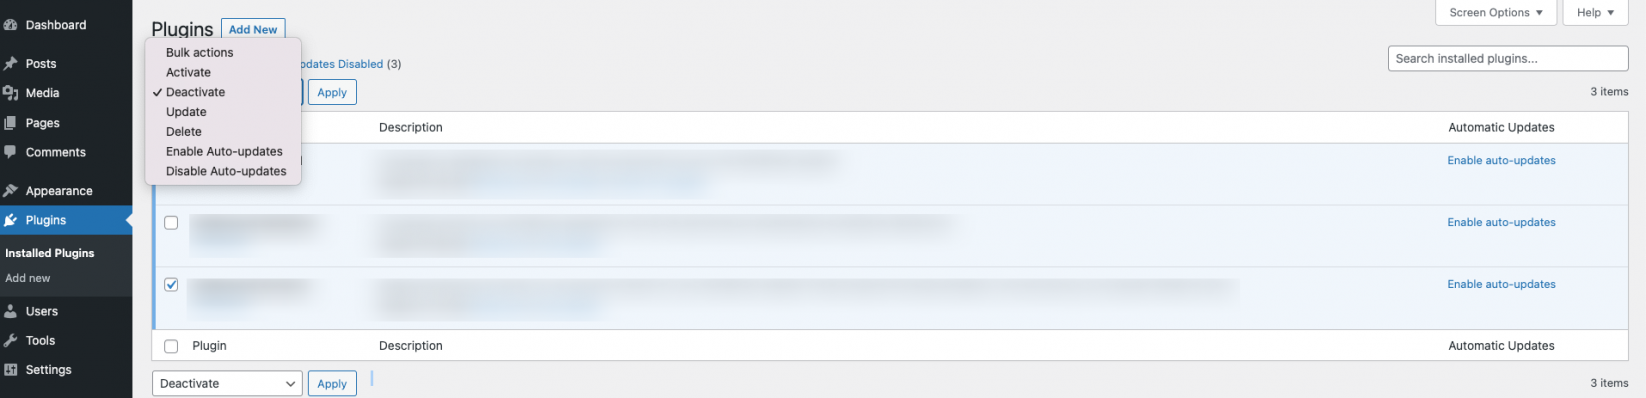
Check the box for the plugin you wish to disable, then select Deactivate from the drop-down menu and hit Apply.
Test again if the page showing the “401 Error” message will now load correctly.
Sometimes, an ongoing error may prevent access to the dashboard. In such cases, you can disable all plugins for the website from Site Tools or its database.
Read the guides below for detailed instructions.
- How to disable WordPress plugins from Site Tools?
- How to disable WordPress plugins from the database?
After the plugins are disabled, you should be able to access the dashboard and activate the plugins one by one. When you enable the culprit, the error will most likely return.
If a plugin was the cause of the “Unauthorized Error 401”, contact its support to report the error or replace it with an alternative one.
What causes the “401 Error Unauthorized Access”?
Although the URL protection may be set by design, there are cases where the restriction is set unintentionally or caused by local issues from the visitor’s side. We will examine the most common causes below.
Expired browser cache or cookies
Modern browsers keep local cache and cookies in your device to improve the loading speed. However, if your browser’s cache is corrupted or expired, it may prevent you from accessing the page correctly, and the error “401 Unauthorized Access” may occur.
Incorrect URL
Another cause of the error page is an incorrect webpage URL. It may be an outdated page address or a misspelled URL.
Protected URL from the server
Many hosting providers offer the functionality to set password protection directly on the server. The login prompt may come from such protection specified in the hosting panel.
Plugin misconfiguration
Another common cause of restricted access is plugin functionality. For example, many security plugins for WordPress provide different options to limit or restrict access. If the plugin is misconfigured, it may prevent access by mistake or detect a legitimate visit as suspicious activity.
Restrictions in the .htaccess file of the site
Password protection may come from Apache directives in the website’s .htaccess file. The website owner may have set them previously and forgotten to remove them. The directives may have been added automatically by a plugin as well.
Summary
Fixing the 401 unauthorized error may require investigation, but it is important to note that it is related to the security and protection settings of the websites.
This guide examined the common causes and how to fix the error “401 Access Denied”.
Another similar error related to restricted access is the HTTP Error 403. Read more about it in the following guide on what is 403 Forbidden Error and how to fix it.
For more information on the various HTTP codes, read this article on HTTP status codes explained.